Departmental Standards
Company-Wide
eCornell Styleguide & Branding
Cornell University Branding
Writing and Editing Style Guide
Faculty and Expert Naming Conventions in Courses
Cornell School and Unit Names
Tips for Campus Engagements
LSG
Legal Policies
CSG
Updating Wrike Due Dates
Photography Style Guide
eCornell Mini Visual Style Guide
The Pocket Guide to Multimedia Design Thinking (*as It Pertains to Your Job Here)
Creative Services (CSG) Handbook
Administrative
LSG Meeting Recordings and Notes
Sending Faculty Sign-Off Forms in Adobe Sign
Weekly Faculty Status Emails
Animation/Motion Design
Instructional Design
Required Course Elements
The Pocket Guide to Instructional Design Thinking at eCornell
Adding AER to Canvas
Grading
D&D Newsletter
LSG Newsletter (LSGN) - February 2024
LSG Newsletter (LSGN) - March 2022 Edition
LSG Newsletter (LSGN) - December 2023
LSG Newsletter (LSGN) - October 2021 Edition
LSG Newsletter (LSGN) - June 2022 Edition
D&D Newsletter November 2024
LSG Newsletter (LSGN) - August 2022 Edition
LSG Newsletter (LSGN) - June 2023
LSGN Newsletter April 2023
LSG Newsletter (LSGN) - February 2022 Edition
LSG Newsletter (LSGN) - October 2022 Edition
LSGN Newsletter February 2023
LSGN Newsletter March 2023
D&D Newsletter September 2024
LSG Newsletter (LSGN) - August 2023
LSG Newsletter (LSGN) - March 2024
LSG Newsletter (LSGN) - April 2022 Edition
D&D Newsletter - August 2024
LSGN Newsletter January 2023
LSG Newsletter (LSGN) - October 2023 article
LSGN Newsletter (LSGN) - April 2024
LSG Newsletter (LSGN) - November 2021 Edition
D&D Newsletter February 2025
LSG Newsletter (LSGN) - January 2022 Edition
LSGN Newsletter December 2022
D&D Newsletter April 2025
LSG Newsletter (LSGN) - July 2022 Edition
LSG Newsletter (LSGN) - September 2022 Edition
Course Development
Image Uploads for Inline Projects
How to Install the Firefox Canvas Utilities Extension
Revising a Course/ Creating a Redux Version/ Course Updates
Creating a Perma Link With Perma.cc
Course Content Deletion Utility — Removing All Course Content
Teleprompter Slide Template
Course Names
Requesting High Resolution Video Uploads
Technical Talking Points Template
Writing Discussions: Guidelines for IDs
Online Resources in Credit-Bearing Courses
Hiring Actors for an eCornell Project
Marketing
Operations
Tech
Master Course Template Differences (8675309s)
Non-CSG File Uploads
Mentored Learning Conversion Process and Resources
Doc-Based Master Course Template and Standards (8675309-DOC)
Pedagogical Guidelines for Implementing AI-Based Interactives: AER
Coding Master Course Template and Standards (8675309-CODE)
Practice Quiz Standards
Hero Image
Platform Training
Administrative Systems
ADP
Google Drive
Downloadables Process
Embed a Document from Google Drive
Adding Google Links to Canvas
File Naming and Storage Convention Standards
Google Drive for Desktop Instructions
Storing Documents in Multiple Locations
Wrike
Wrike System Fundamentals
Field Population
1.0 to 2.0 Wrike Project Conversion
Blocking Time Off in Work Schedule (Wrike)
Wrike Custom Field Glossary
Wrike "Custom Item Type" Definitions
How to Create a Private Dashboard in Wrike
Using Timesheets in Wrike
Importing Tasks into a Wrike Project
Wrike Project Delay Causes Definitions
Setting OOO Coverage for Roles in Wrike
How to Change a Project's Item Type in Wrike
Using Search in Wrike
How to Create a Custom Report in Wrike
@ Mentioning Roles in Wrike
Automate Rules
Using Filters in Wrike
Managing Exec Ed Programs in Wrike
External Collaborators
Wrike for External Collaborators: Getting Started
Wrike for External Collaborators: Views
Wrike for External Collaborators: Tasks in Detail
Wrike Updates
New Experience Update in Wrike
Wrike Course Development Template 2.0 - What's New
Wrike - Course Development Template 3.0 Release Notes
Wrike Process Training
Course Development & Delivery Platforms
Canvas
Development
Adding Custom Links to Course Navigation
Adding Comments to PDFs from Canvas Page Links
Setting Module Prerequisites and Requirements in Canvas
Canvas Page Functionality
Create a New Course Shell From 8675309
Using LaTeX in Canvas
Search in Canvas Using API Utilities - Tutorial
Reverting a Page to a Previous Version
Student Groups
Create Different Canvas Pages
Importing Specific Parts of a Canvas Course
Canvas HTML Allowlist/Whitelist
Understanding Canvas Customizations/Stylesheets
Operations
Discussion Page Standards
How to import a CU course containing NEW quizzes
Canvas LMS: NEW Quiz compatibility
Faculty Journal
Course Content Style Guide
Click-To-Reveal Accordions in Canvas
Course Maintenance Issue Resolution Process
Meet the Experts
Codio
Codio Operations
Managing Manually Graded “Reflect and Submit” Codio Exercises
Codio Structure and Grading for Facilitators
Premade Codio Docs for Ops & Facilitators
Codio Remote Feedback Tools for Facilitators
Developers
Development Processes
Creating a New Codio Course
Creating a New Codio Unit
Integrating a Codio Course into Canvas Using LTI 1.1
Embedding a Codio Unit into Canvas
Setting Up the Class Fork
Jasmine Autograde Unit Testing
Setting Up the Class Fork (LTI 1.3)
R Studio - Exclusion List for R Code
Mocha/Selenium Autograding
Starter Packs in Codio
Configuring Partial Point Autograders in Codio
Launch a Jupyter Notebook from VM
AI Extensions
Program-Specific Developer Notes
Codio Functionality
Jupyter Notebooks
Jupyter Notebooks - nbgrader tweaks
Jupyter Notebooks Style Guide
Adding Extensions to Jupyter Notebooks
Setting up R with Jupyter Notebooks
Change Jupyter Notebook Auto Save Interval
How to Change CSS in Jupyter Notebook
RStudio in Codio
How To Centralize the .codio-menu File to One Location
Codio Fundamentals for LSG
Using the JupyterLab Starter Pack
Using Code Formatters
Using the RStudio Starter Pack
Conda Environments in Codio
Updating Codio Change Log
Codio Basics: Student Support
eC Facilitator Guide to Codio
Migrating to Updated Codio Courses
Qualtrics
Ally
Ally Institutional Report Training
Ally Features Overview Training
Using the Ally Report in a Course
Ally Vendor Documentation/Training Links
Adobe
Other Integrations
Pendo Overview
How to Add VitalSource eBooks in Canvas
Enabling Zoom/"Live Sessions" in a Course
Pendo Guide Creation
H5P
Modifying Subtitles in H5P Interactive Videos
Embedding H5P Content Into Canvas
Troubleshooting H5P Elements in Canvas
Inserting Kaltura Videos into H5P Interactive Videos
Adding Subtitles to H5P Interactive Videos
S3
BugHerd
Instructional Technologies & Tools Inventory
Canvas API Utilities
Getting started with the MOP Bot
eCornell Platform Architecture
HR & Training Systems
Product Development Processes
Accessibility
What Is Accessibility?
What Is Accessibility?
Accessibility Resources
Accessibility Considerations
Accessibility Support and Assistive Technology
Structural Accessibility
Accessibility Design and Development Best Practices
Accessible Images Using Alt Text and Long Descriptions
Accessible Excel Files
Accessibility and Semantic Headings
Accessible Hyperlinks
Accessible Tables
Creating Accessible Microsoft Files
Mathpix: Accessible STEM
Design and Development General Approach to Accessibility
Integrating Content Authored by a Third Party
Planning for Accessible Tools
Accessibility Considerations for Third Party Tools
Studio Accessibility
Designing for Accessible Canvas Courses
Accessibility: Ongoing Innovations
Course Development
Planning
Development
0. Design
1. Codio Units
1. Non-Video Assets
3. Glossary
4. Canvas Text
4. Tools
4. Tools - Wrike Task Definitions
3. Review And Revise Styled Assets
ID/A to Creative Team Handoff Steps
General Overview of Downloadables Process
Course Project: Draft and Final
Excel Tools: Draft and Final
eCornell LSG HTML Basics
1. Non-Video Assets - Wrike Task Definitions
2. Video
Multifeed Video
2. Video (Standard) - Wrike Task Definitions
Studio Tips
Tips for Remote Video Recording Sessions
Who to Tag for Video Tasks
3. Animation
3. Animation - Wrike Task Definitions
2. Artboard Collab Doc Prep
6b. Motion Design Review and Revise
Who to Tag for Animations Tasks
3. Artboard Collab Process Walkthrough
DRAFT - FrameIO Process Walkthrough
Motion Contractor Guide for IDAs / IDDs
Requesting / Using Stock Imagery (Getty Images and Shutterstock)
3. Ask the Experts
5. On-Demand Conversion
5. Review
5. Review - Wrike Task Definitions
1. Prep Course for Reviews
2. Conduct Student Experience Review
3. Implement Creative Director Edits
3. Implement IDD Edits
3. Implement Student Experience Review Edits
4. CSG - Revise Tools Export 1
5. Conduct Faculty Review
6. Implement Faculty Edits
7. Conduct Technical Review of Course (STEM-only)
Technical Student Experience (Tech SE) Review Process
2. Conduct IDD or Sr ID Review
6. Alpha
6. Alpha - Wrike Task Definitions
Alpha Review Process
Prepare a course for Alpha review
Schedule & Conduct Alpha Triage Meeting
7. QA
7. QA - Wrike Task Definitions
1. Prep Course for QA
2. Copy Edit Captions
2. Copy Edit Course & Files
4. Conduct Content QA of Course
4. Final Creative Review and Export
Adding Chat With Tech Support to Course Navigation
5. Implement QA Edits
Working With Video Captions That Contain Special Characters
Copy Edit Captions in SubPLY
Creating a Course Style and Settings Guide
Copy Editing Content in Frame.io
1. Complete Dev to QA Checklist
Copy Edit Captions in 3Play
Tag a Video for Transcription by 3Play
Course QA Checklists
8. Deployment
8. Deployment - Wrike Task Definitions
1. Finalize Master Version of Course
2. Create & Add Course Transcript (CT) to Course
Replace a Master -M With a Redux Version of the Course
3. Create -T (Training Course) and Associate With Master Blueprint
Canvas Blueprint Course Functionality
Project Management in Wrike
Managing Project Reporting in Wrike
Managing Task Needs/Schedule in Wrike
Adding Tasks
Comments and Communication
Statuses
Updating Task Start and Due Dates
Predecessors
Durations
Rollups
Calculating Project Schedule by Deadline in Wrike
Creating Course Project Plans in Wrike
Setting Custom Capacity for Resources
Customizing Effort in a New Project Plan
Marking Projects Complete in Wrike
How to Set Up Workload Charts to Track Effort in Wrike
For-Credit Considerations
1-Sheet Population
Post-Development
AI Simulations
Program Facilitation & Operational Guidelines
Data Science
Facilitator Resources
Canvas Navigation
Adding Events to the Course Calendar
Navigating Canvas and the Dashboard
How Do I View Previous Courses I Have Taken or Facilitated?
Why Am I Receiving Duplicate Canvas Emails?
How Do I Edit My Canvas Profile?
Send Students a Direct Message on Canvas
Adding Notes to Canvas Gradebook
How Do I Send Students Nudges from the Gradebook?
Overview of 2024 Changes- Course Layout and Structure
How Can I Update My Canvas Notification Preferences?
Ursus Navigation
How Do I Access My Offer in Ursus?
How Do I Edit My Ursus Profile?
How Do I Request Time Off (Blackout Dates)?
How Can I Request to Learn More Courses?
Live Sessions
Enabling Student Use of Closed Captioning in Zoom
When Should I Schedule My Live Sessions For?
Changing Live Session Date and Time After Created with Facil Tool
Help! I Need to Reschedule a Live Session
Live Session Information page
Set up Live Sessions with the Facil Tool
Combining Live Sessions with Facil Tool
Course Set-Up
Course Set Up: Getting Ready for Live Sessions
Recording and Posting a Welcome Video
Course Set Up: When can I begin to edit my course?
Course Set Up: Reviewing Due Dates
Course Set Up: Reviewing Announcements
What Do I Need to Do to Make Sure My Course is Set Up Correctly?
How Do I Customize My Course Sections?
Course Announcements and Messages Templates
Facilitator Focus
Zoom and other Technical Support
Reporting Spam/Phishing
How Do I Set Up My Zoom Account?
Support Resources for Facilitators
Live Session/Zoom Trouble Shooting Guide & Technical Readiness
How to Upload Videos to Zoom On-Demand
Student Survey FAQs
How Do I Save and Refer Back to Zoom Recordings?
How Do I Find My Personal ID Meeting link in Zoom?
Benefits as an eCornell Employee
Do I Have Access to Microsoft Office as a Cornell Employee?
Taking Courses as a Student
Professional Development Benefit
Student Success
Help! My Students Can't View a Video Within My Course
Extensions and Retakes
Policies and Navigation Resources for Students
Symposium Access Extension- Fall 2025
Students enrolled through special groups: Corporate and VA
Unique Circumstances for Student Extensions and Retakes
Communicating with Students via Canvas
Can I Provide Students with a Letter of Recommendation?
Understanding and Addressing Instances of Plagiarism
Support Resources for Students
Understanding and Addressing Use of AI
Help! My Student is Having a Hard Time Uploading a Video
Unique Student Situations
I Have a Student Requesting Accommodations- How Should I Proceed?
Canvas Mobile App
Messaging Students via the Canvas Mobile App
Setting up and Navigating the Canvas Mobile app
Setting up Push Notifications on Canvas Mobile
Canvas App Features for eCornell courses
New Facilitator Onboarding and Quick References
Facilitator Onboarding at eCornell
Why Do I Have Multiple eCornell email and Canvas Accounts?
Quick reference: Systems and Accounts we use at eCornell
Quick reference guide: Key eCornell Personnel
How do I Log Onto Canvas and Access FACT101?
How Do I Add eCornell to My Email Signature?
Training Course Review & Facilitation Authorization
What to Expect During Live Shadowing Experience
Setting up Email Forwarding
Facilitator Expectations and Grading Help
Changes in Grading Scheme: Incomplete/Complete and 75% to 85%
New (Embedded/Inline Format) How do I grade Course Projects?
Navigating the Gradebook and Accessing the Speedgrader
Quick Reference: Sort assignments in the Speedgrader
How do I Grade Quizzes?
(Old format) How Do I Grade Course Projects and Add Annotations?
Rubrics for Effective Facilitation
Is There an Answer Key for my Course?
How to Monitor and Promote Student Progress
How Do I Grade Discussions?
Adding an Attempt to a Course Project
How Quickly Do I Need to Provide Grading to Students?
Payroll and the Monthly Scheduling Process
Codio References
Manually Graded “Reflect and Submit” Codio Exercises
Codio Quick Resources
Codio Reference: Embedded quiz questions (H5P)
Codio Reference: Checking for Completion Status
Codio Reference: Manually Graded Exercises
Codio Remote Feedback Tools
Codio Reference: Ungraded exercises
Codio Reference: Autograded Exercises
Archived
Table of Contents
- 1. Create Series Course Template
- 2. Remove Variable Tasks as Needed
- 3. Add Unique Tasks
- 4. Fine Tune Task Durations/Predecessors
- 5. Mass Assign ID/IDA/IDD Tasks
- 6. Manually Assign Unique Tasks
- 7. Populate Course Fields
- 8. Duplicate Individual Course Projects from Course Template
- 9. Set Project's Item Type
- 10. Set Cross Project Predecessors
- 11. Populate Custom Fields in "Attributes & Measures" Space
- All Categories
- Product Development Processes
- Course Development
- Development
- Project Management in Wrike
- Creating Course Project Plans in Wrike
Creating Course Project Plans in Wrike
 Updated
by Casey Shew
- 1. Create Series Course Template
- 2. Remove Variable Tasks as Needed
- 3. Add Unique Tasks
- 4. Fine Tune Task Durations/Predecessors
- 5. Mass Assign ID/IDA/IDD Tasks
- 6. Manually Assign Unique Tasks
- 7. Populate Course Fields
- 8. Duplicate Individual Course Projects from Course Template
- 9. Set Project's Item Type
- 10. Set Cross Project Predecessors
- 11. Populate Custom Fields in "Attributes & Measures" Space
Course projects in Wrike should be done once a program is transitioning, or about to transition, from the "Planning" stage to the "Development" stage. The "Development" stage begins for a program once the courses are being outlined. This article will walk through all of the steps needed in order to correctly create those projects.
1. Create Series Course Template
In order to more easily create each individual course project in a program series, you will want to configure/setup a course series template. That way only one course project will need to be fully customized to the particular program's needs, and can then be duplicated for all of the courses in the program.
Steps:
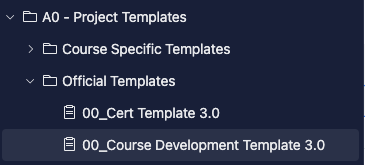
- Locate the "00_Course Development Template 3.0" within the "Official Templates" folder in the Blueprints section of the folder tree.
- Full location pathway can be seen here:
- Right click the project, and select "Duplicate"
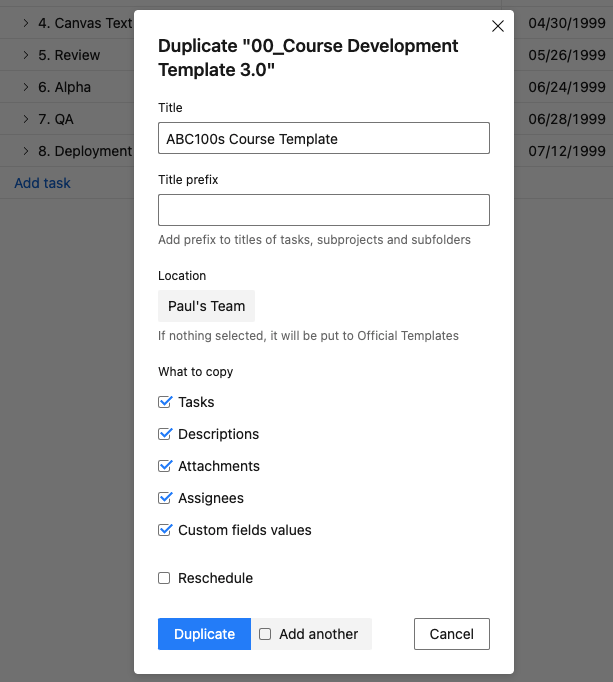
- In the following options window enter the following info:
- Title: [COURSECODE] Course Template
- Title Prefix: Leave blank
- Location: Blueprints/A0 - Project Templates>Course Specific Templates>[IDD's Name]'s Team
- What to Copy: (Check the following boxes) Tasks, Descriptions, Attachments, Assignees, Custom Field Values
- Screenshot of a completed example:
2. Remove Variable Tasks as Needed
The default course template is designed to house all of the potential tasks that might be needed for one of our programs. However, there is a wide range of potential tasks, and not all programs will need all of the tasks provided in the template. Here are some common considerations to make when assessing which tasks should be removed from your project:
Multi-Feed vs. Standard Video
The template contains two different task buckets for video - one for video using Multi-Feed and one for Standard video, labelled respectively. In some cases keeping both buckets may be appropriate if you are using a mix of video approaches for this project. In most cases however, you will want to delete the task bucket that is not relevant to your project by simply right-clicking at the task bucket level and selecting Delete.
Multi-Feed+ vs. Standard Animation
Similarly to the video task buckets, the template also includes two different task buckets for animation, one for Multi-Feed+ and one for standard, labelled respectively. The same logic applies here as with video, simply right click at the bucket level and delete the tasks not relevant to your project.
STEM vs. Soft Skills
There are certain tasks included in the template which only pertain to STEM projects, and even further some that only pertain to projects containing programming environments. If your project is not STEM/technical in nature, you will want to delete the following:
- The entire "1. Codio Units" task bucket
- The entire "6. Alpha" task bucket
- Under the "5. Review" bucket, the following tasks:
- 1. Create Alpha Schedule Doc from Template
- 7. Conduct Technical Review of Course (STEM-only)
- 8. Implement Tech Review Edits
If your project is STEM/technical in nature, you may want to leave all of the tasks mentioned above. However, you should assess if the project will have Codio Units, if not, you should delete that entire task bucket. You should also assess whether or not the project will have an Alpha review or not, and if not then delete that task bucket as well.
Steps:
- Navigate to either the Table, List, or Gantt view (user preference) of the newly created template project
- Open the filter drop down, select "More Filters", then in the right hand pane select "Add More Filters", select "Add-On", and select "Checked"
- Remove any unneeded tasks or top level task buckets from the "Add-On" selection
Ask The Expert (ATEP) and On-Demand
If you will definitely not have ATEs or ODs:
- Click into each section
- Mark the bucket and subtasks as Not Applicable
- Remove the start and finish dates.
3. Add Unique Tasks
Some programs will need unique actions taken during the Development phase. These steps might have been brought forth by the faculty member during outlining, or determined at some point by the ID or IDD, etc. When such actions will be needed, you will want to represent those as tasks in the course series template.
Steps:
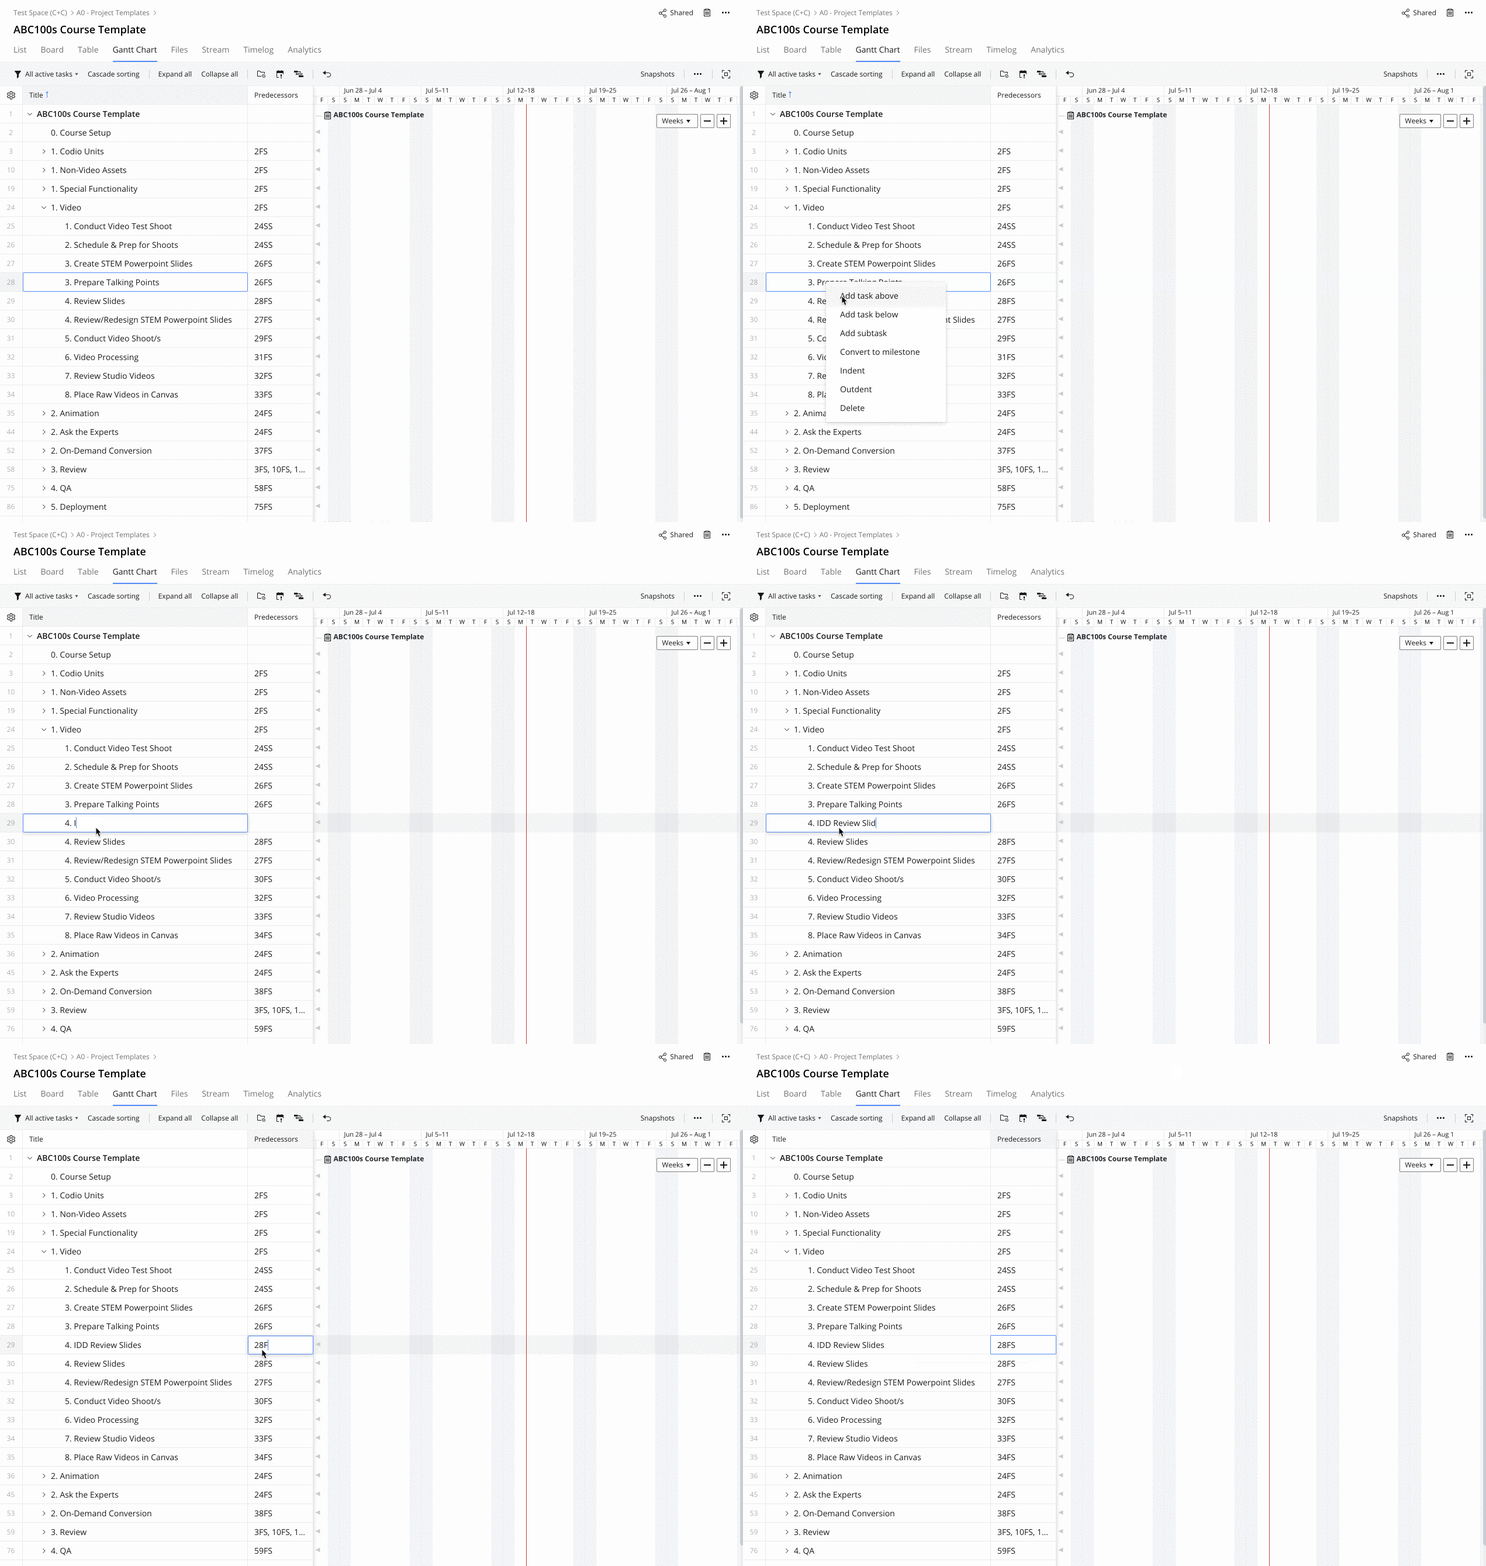
- Navigate to the Gantt view of the course series template
- Find the appropriate place, chronologically, in the timeline, right click, and select "Add task below" (or above depending on relative location)
- Once a task has been added, add the course code and appropriate sequence number for future sorting/search
4. Fine Tune Task Durations/Predecessors
The course template will come with pre-determined durations and predecessors (aka "Dependencies") associated with each task. These are the standard assumed amounts of time that a task will take (duration), and the standard assumed relational effect between each task (predecessor). However, it might have been determined during the Planning stage that a certain task will be more or less time intensive, or that a task/tasks will be started in a non-standard timeframe/sequence. Adjusting the durations and predecessors will help address these changes.
Steps:
- Navigate to the gantt chart view of the template
- In the top left corner, click the gear icon, turn off all fields except the following:
- Duration
- Predecessor
- Adjust the duration of the task(s) that need to be either lengthened or shortened
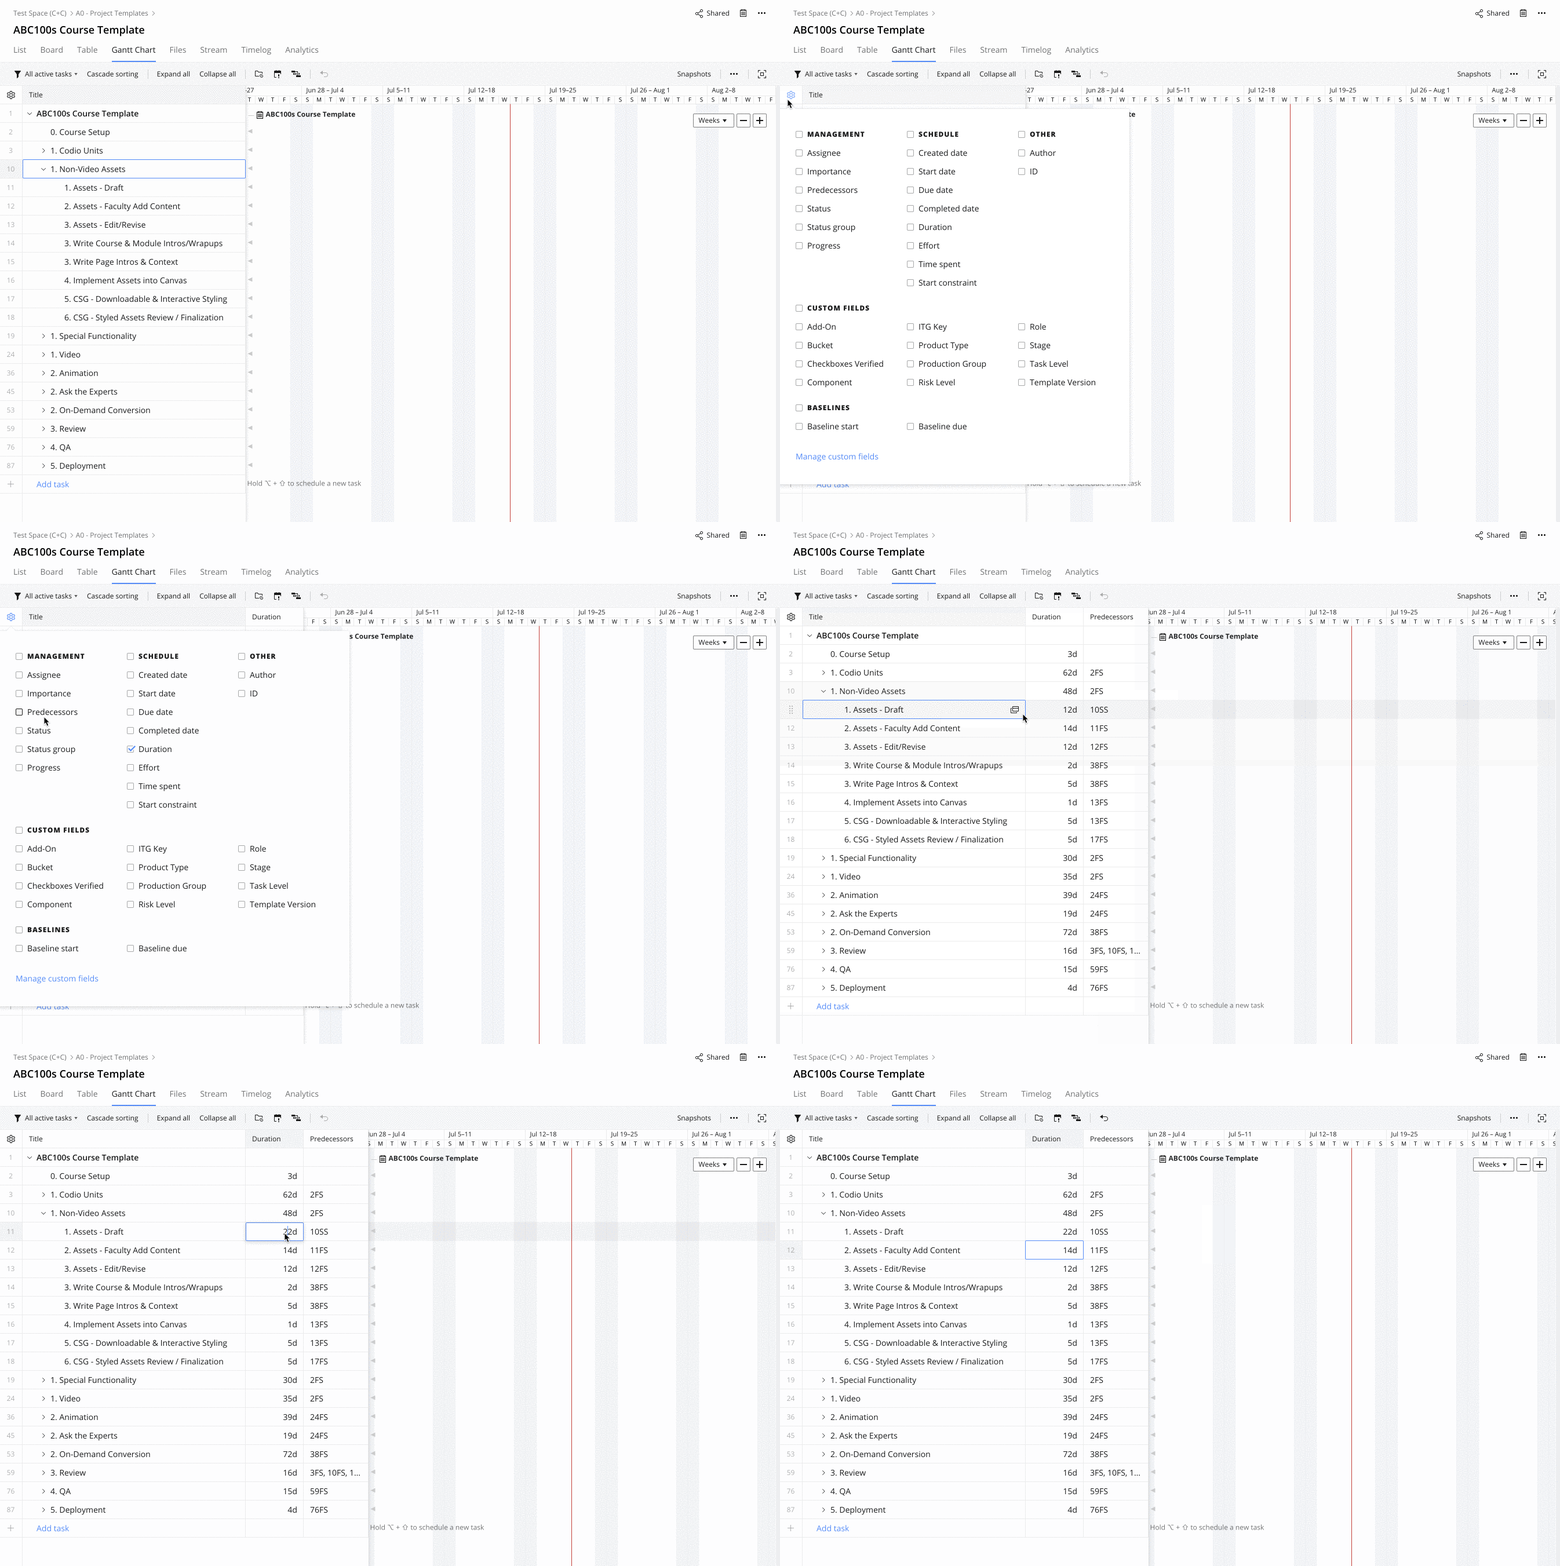
- If needed, adjust the predecessor chain by adjusting the correlating task number in front of the "Finish to Start" (FS) predecessor to the new task number that should trigger the edited task's start date
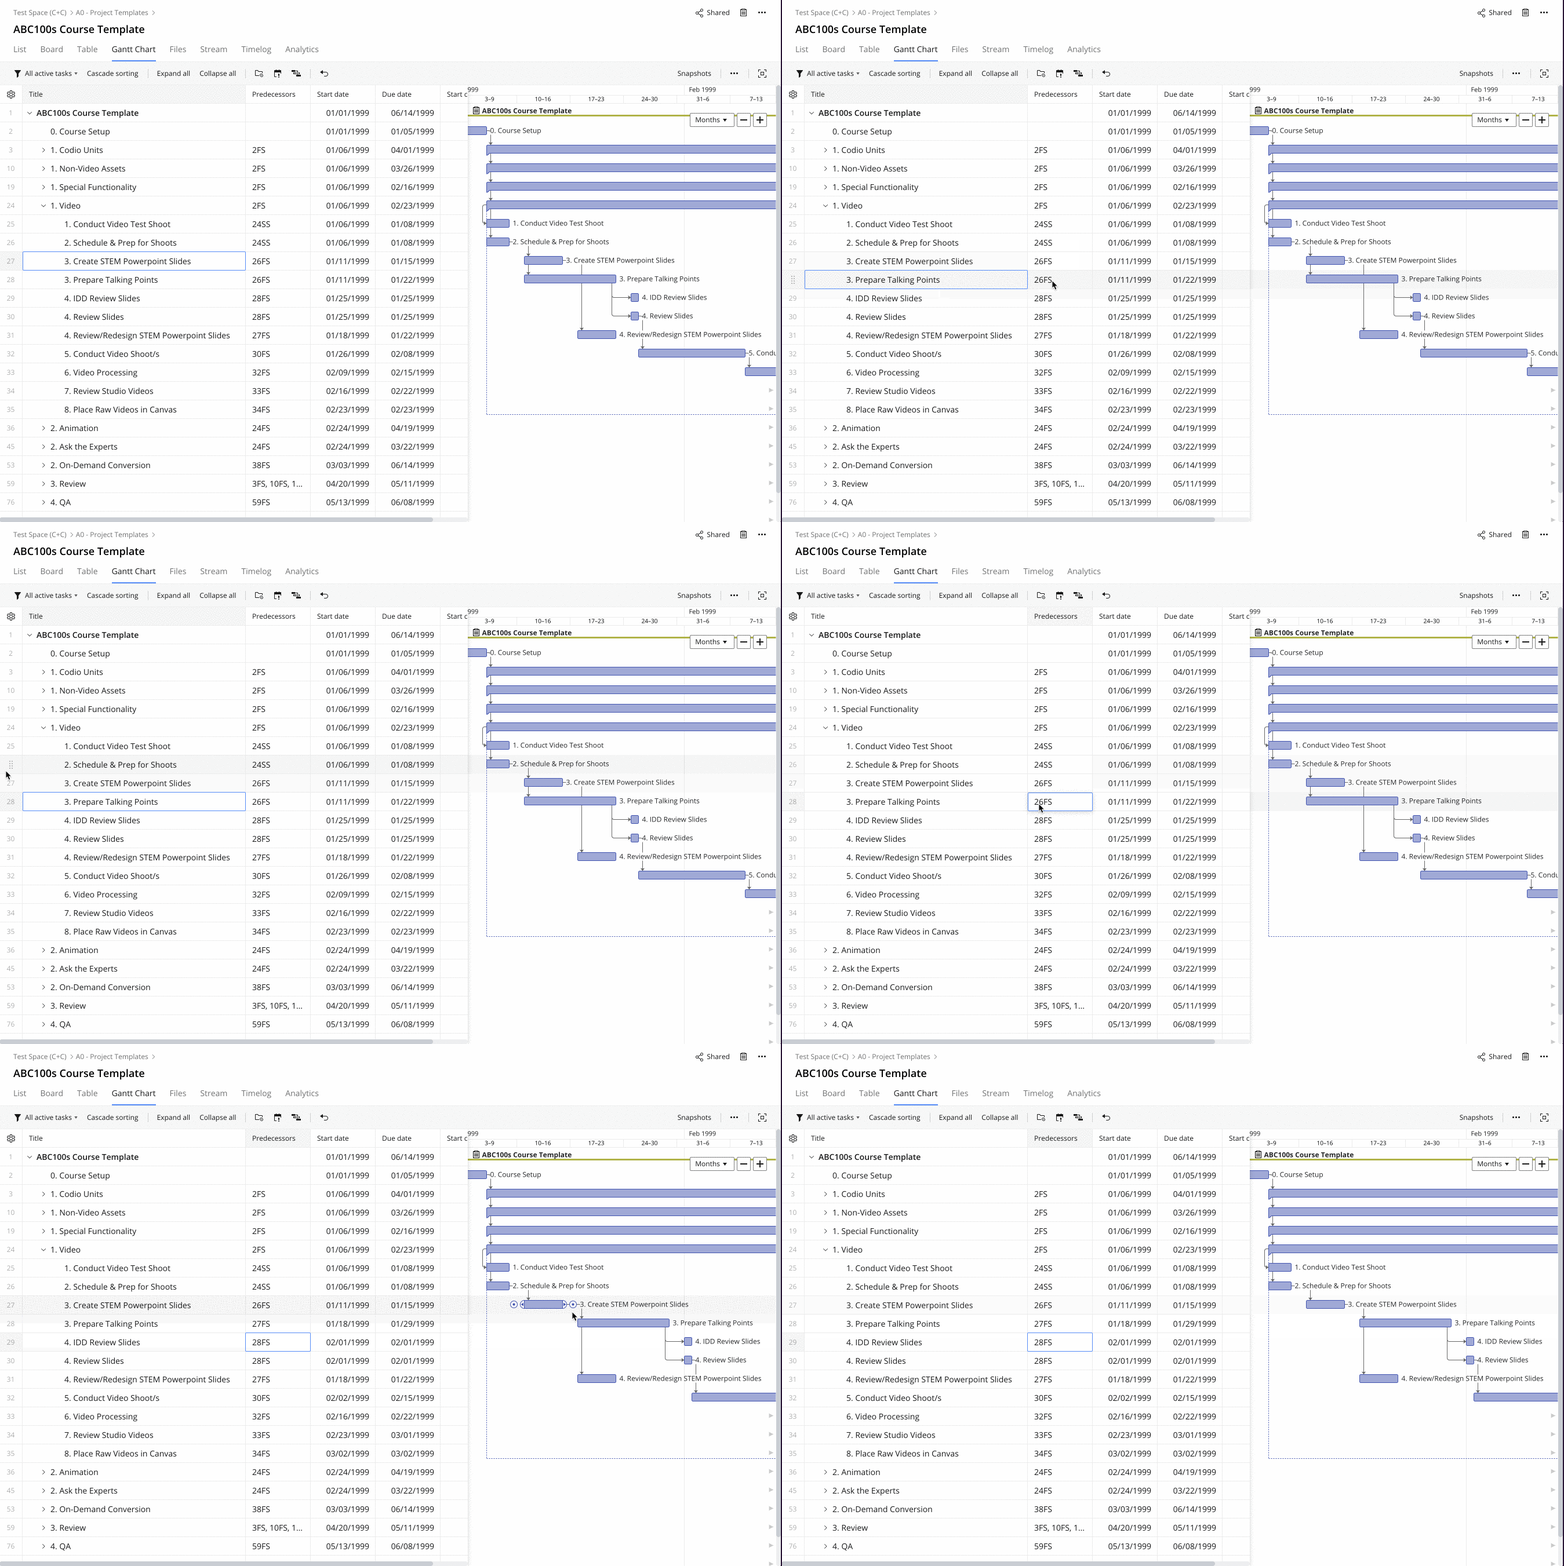
5. Mass Assign ID/IDA/IDD Tasks
Mass assignments within the course series template, for all instructional design (ID, IDA, and IDD) related work, is the quickest and easiest way to pre-assign a major percentage of the program's tasks. This will be saving time down the road for the project's ID or IDA, who will no longer need to worry about making sure these tasks get assigned to the appropriate team member.
Steps:
- Open the template project and switch to Table view.

- Click SubItems at the top of the table and select Expand All to display every task within the project hierarchy.
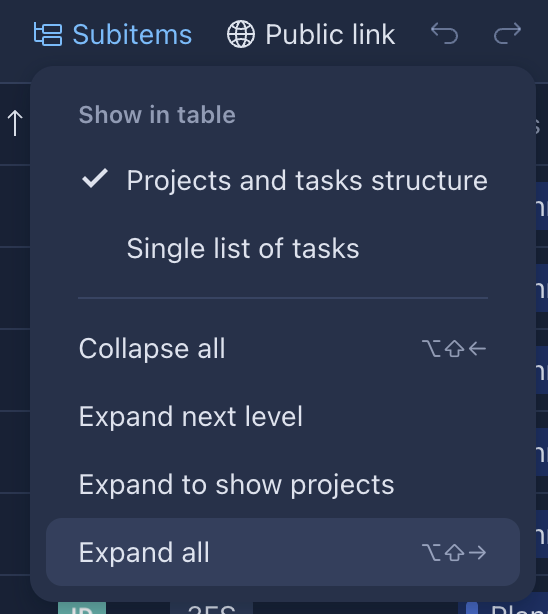
- Tick the checkbox located at the top left of the column header to bulk-select all tasks.
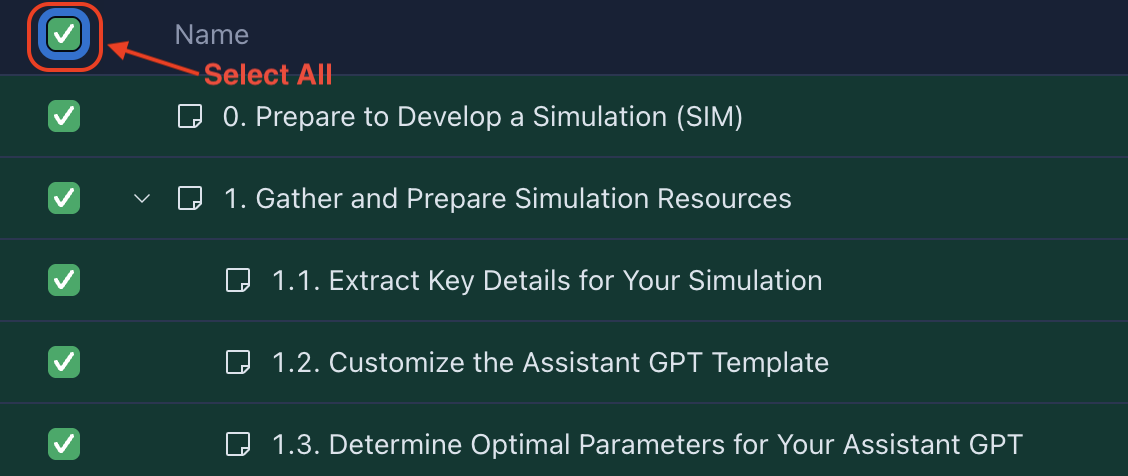
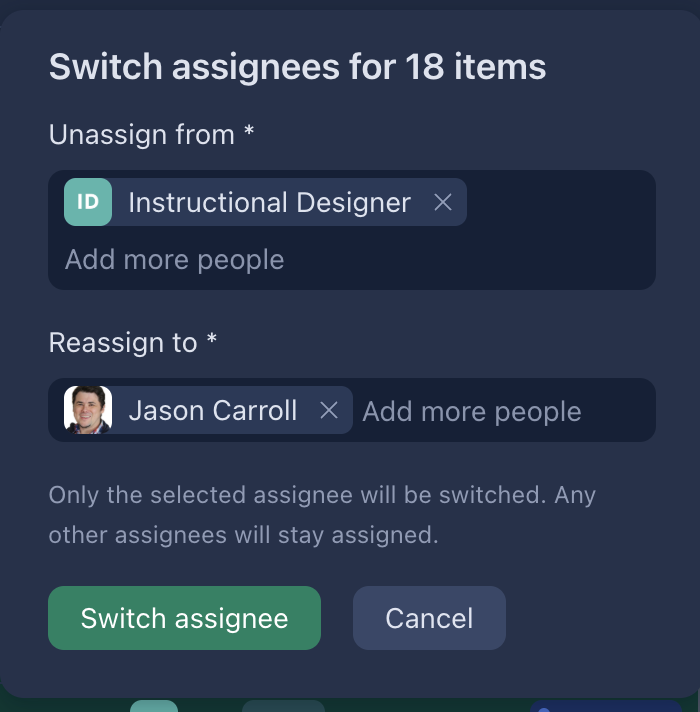
- Click on the Assignee field at the top of the selection pane and choose Switch Assignee.
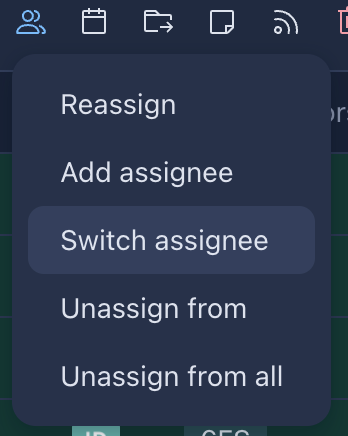
- Specify Reassignment Details
- Unassign From: Select the dummy user previously assigned to the tasks (e.g., "Instructional Designer")
- Reassign To: Input the name(s) of the actual assignee responsible for the project tasks.
- Click Switch Assignee to complete the bulk reassignment.
- Filter for, and assign, all "ID" tasks within the project.
6. Manually Assign Unique Tasks
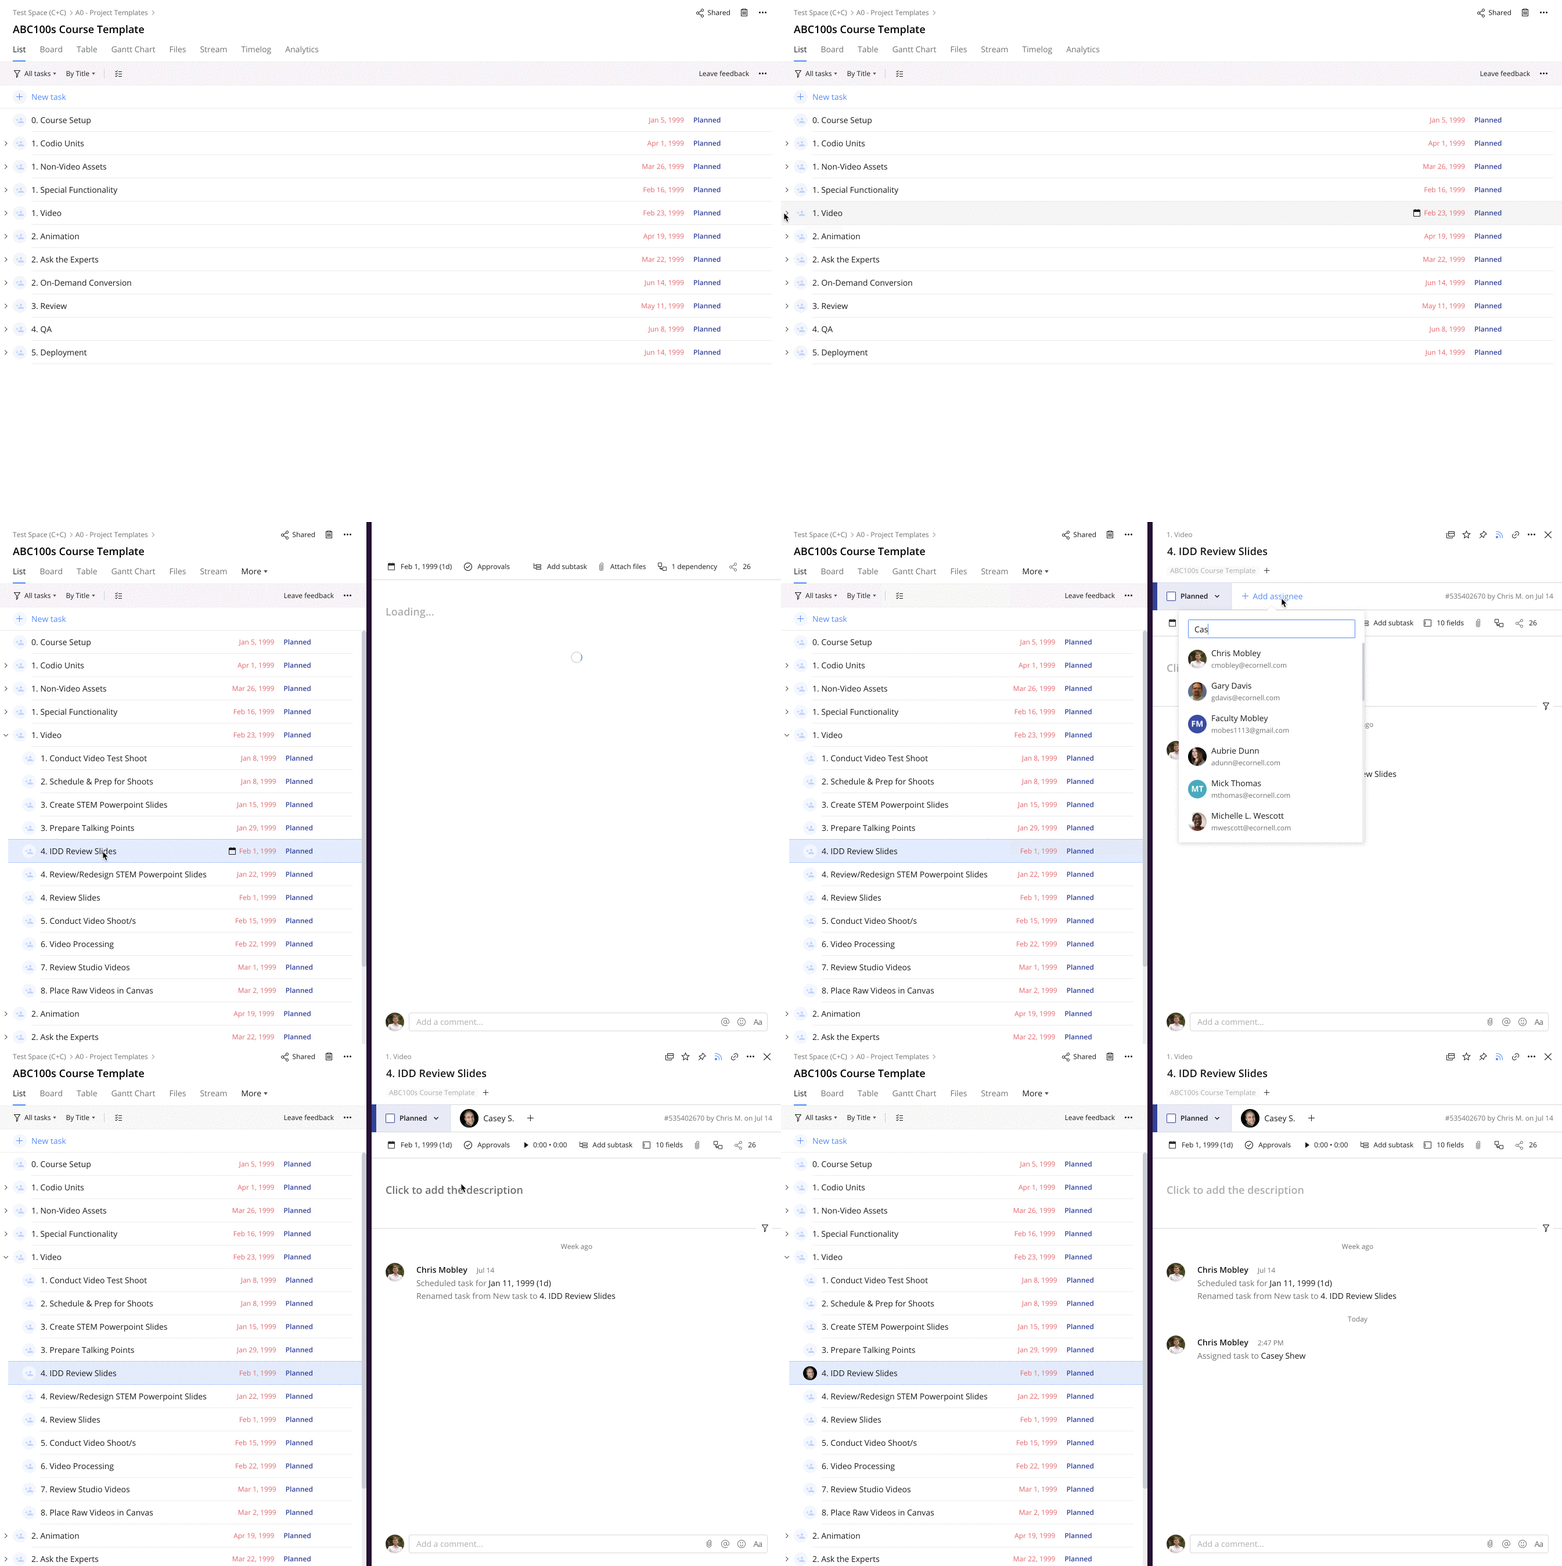
Any unique tasks that were added in Step 4 should now be manually assigned in the course template. These tasks would not have been pre-assigned to one of the dummy users representing a role, unless specifically done so by task creator, so they will not have any assignees after mass assignments.
Steps:
- Navigate to the list view of the template project
- Locate the unique/added task(s), click on each task, and add the appropriate assignee in the right hand pane
7. Populate Course Fields
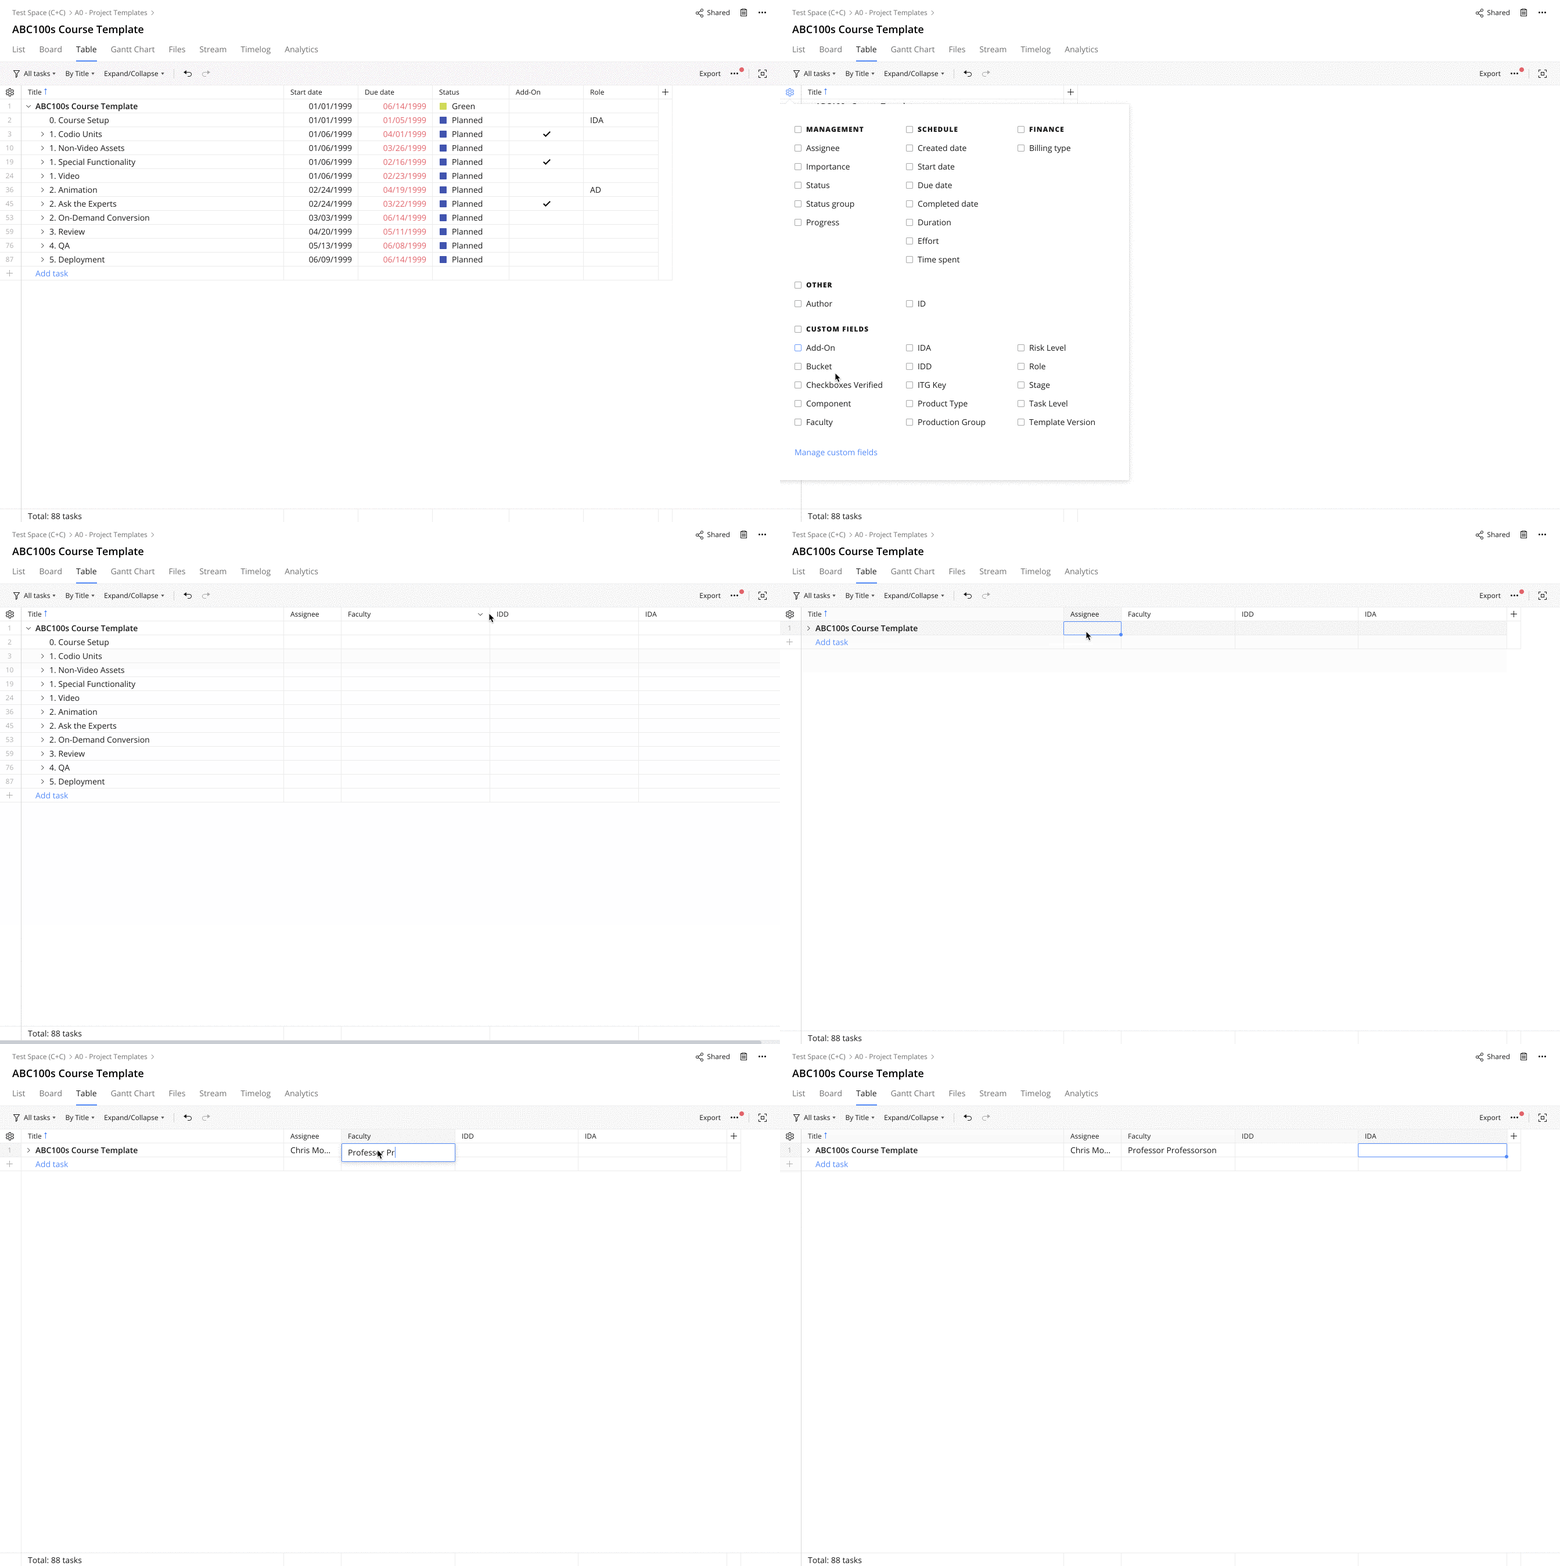
In this step you will populate the custom and system fields that the IDD is expected to fill out once a program series enters the development stage. By doing this on the course template, these pieces of data will only need to be populated once, apposed to 4-6 times.
Steps:
- Navigate to the table view of the series template
- In the top left hand, click the gear icon and select the following custom (and system) fields to activate them in the table view, and the proceed to enter to appropriate information for each:
- Owner (ID assignee)
- Faculty
- IDD
- IDA
8. Duplicate Individual Course Projects from Course Template
Once all previous steps have been taken/addressed on the course series template, you can now duplicate this specific template for each of the courses within the program series. All of the adjustments made to the series template will be reflected in each of the new course projects you create.
Steps:
- Locate the course series template in the left hand folder tree within the Blueprints section
- Right click on the template and select "Create from blueprint"
- In the following options window enter the following info:
- Title: [COURSECODE] (the course title will now be populated in a "Course Title" custom field)
- Title Prefix: [COURSECODE - ] (make sure to enter the "SPACE DASH SPACE" after the course code)
- Location: A2 - In Development>[IDD's Name]'s Team>[PROGRAMCODE]
- Notify Assignees: Recommended to uncheck this box to avoid sending large amounts of notifications to course assignees
- Reschedule: Check box/select this option and add start date for each individual course if start dates are known - do not set an End Date
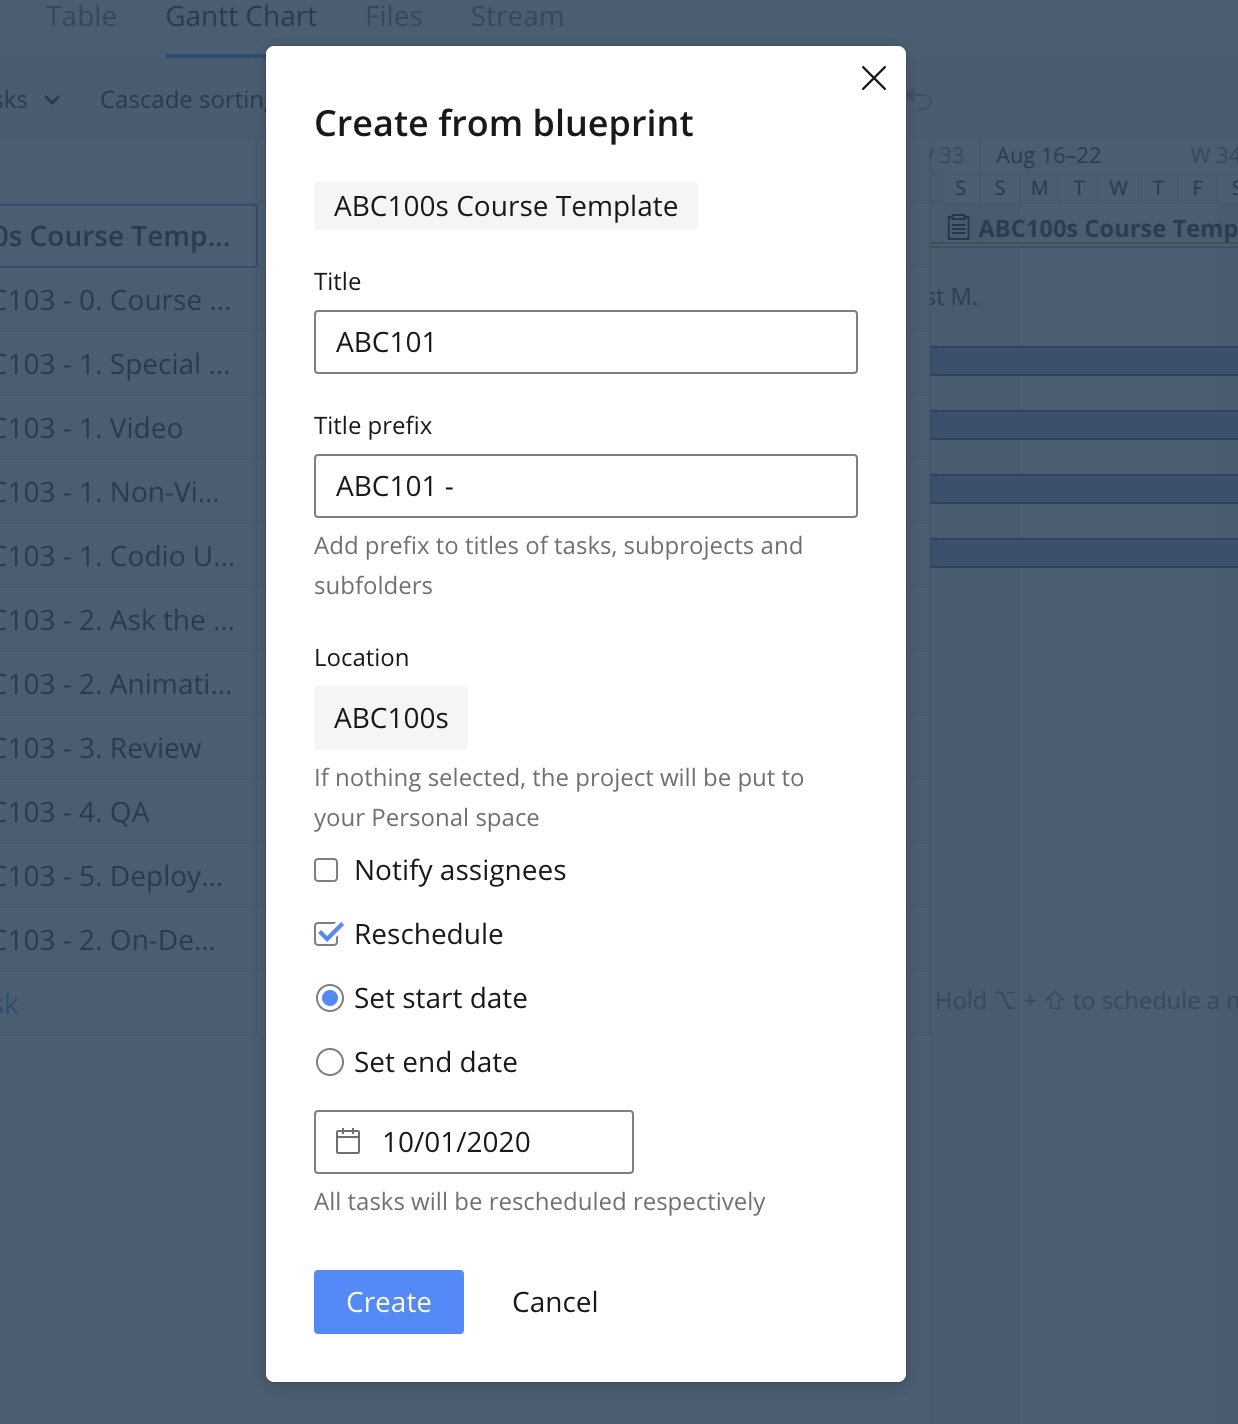
- If you are making more course templates in this cert (i.e., JCB522, JCB522, etc.), check the Add Another button (this will make this pop back up after it makes your project plan, and you’ll have less you have to do for setting up the rest.).
- Click Create.
9. Set Project's Item Type
After creating the projects, you will need to set the appropriate Item Type for the project so that it shows up appropriately in reporting. This article contains the definitions of the different item types to choose from, and this article contains instructions for how to set the item type for your project. Follow the guidance and instructions from those articles to set the appropriate item type for your new projects.
10. Set Cross Project Predecessors
Once all of the individual course projects have been created, there is now an opportunity to establish predecessor relationships between tasks, or task buckets, within each of the courses. For example, we could establish that once course A's video task bucket has been completed, we will now want to start course B's video task bucket. This would mean if there are any delays in completing the video work for course A, and the dates were updated accordingly, course B's video work's start date would be pushed back as well. These relationships will not be present by default, and without predecessors would need to be updated manually by the program's ID.
Steps:
- Navigate to the gantt chart view of the entire program
- In the top left corner, click the gear icon, turn off all fields except the following
- Start Date
- Due Date
- Predecessor
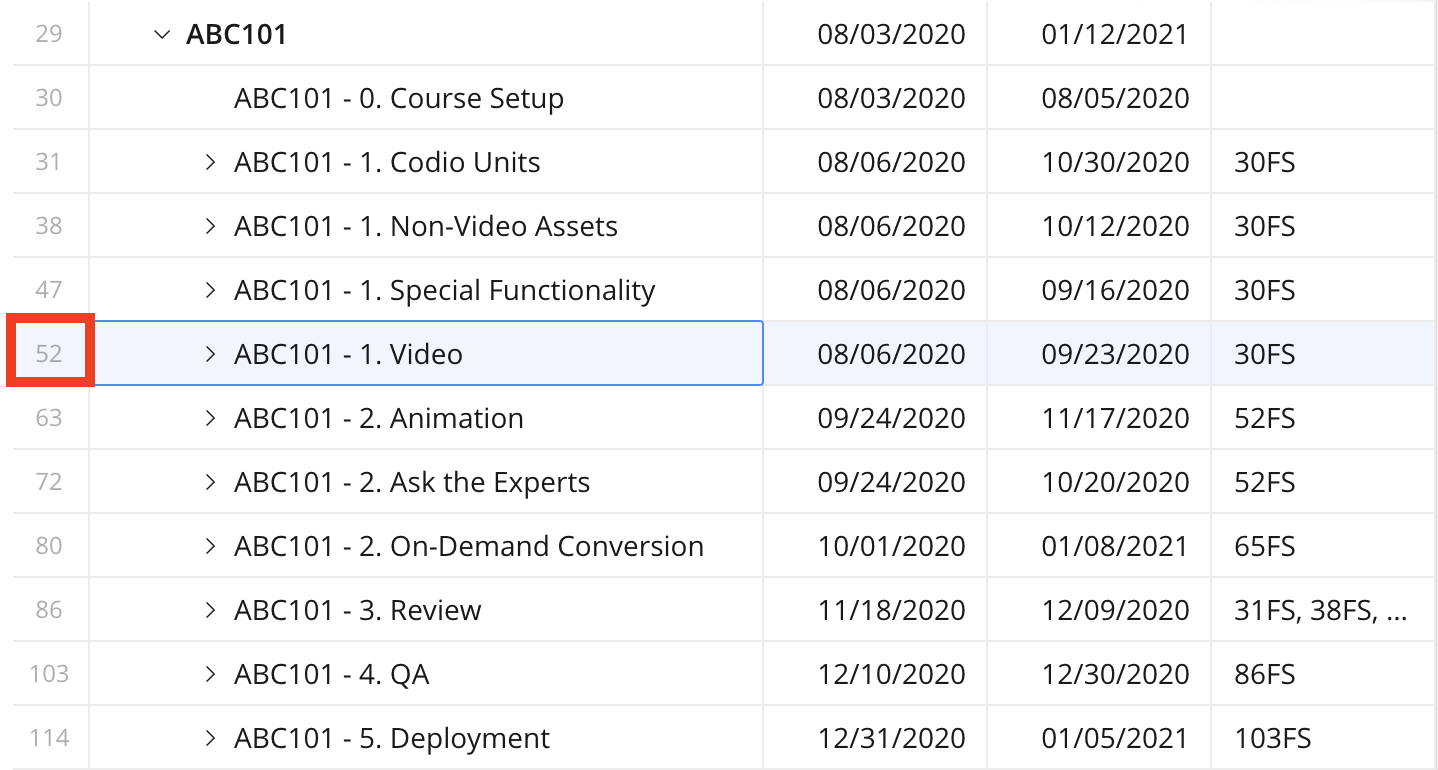
- Find the task, or task bucket, for course A, that you want to trigger a task, or bucket, in course B, by locating the task and noting the number in the far left column of the cells in the gantt view:
- Next locate the task in course B that's start date you would like to have triggered by the previously located task
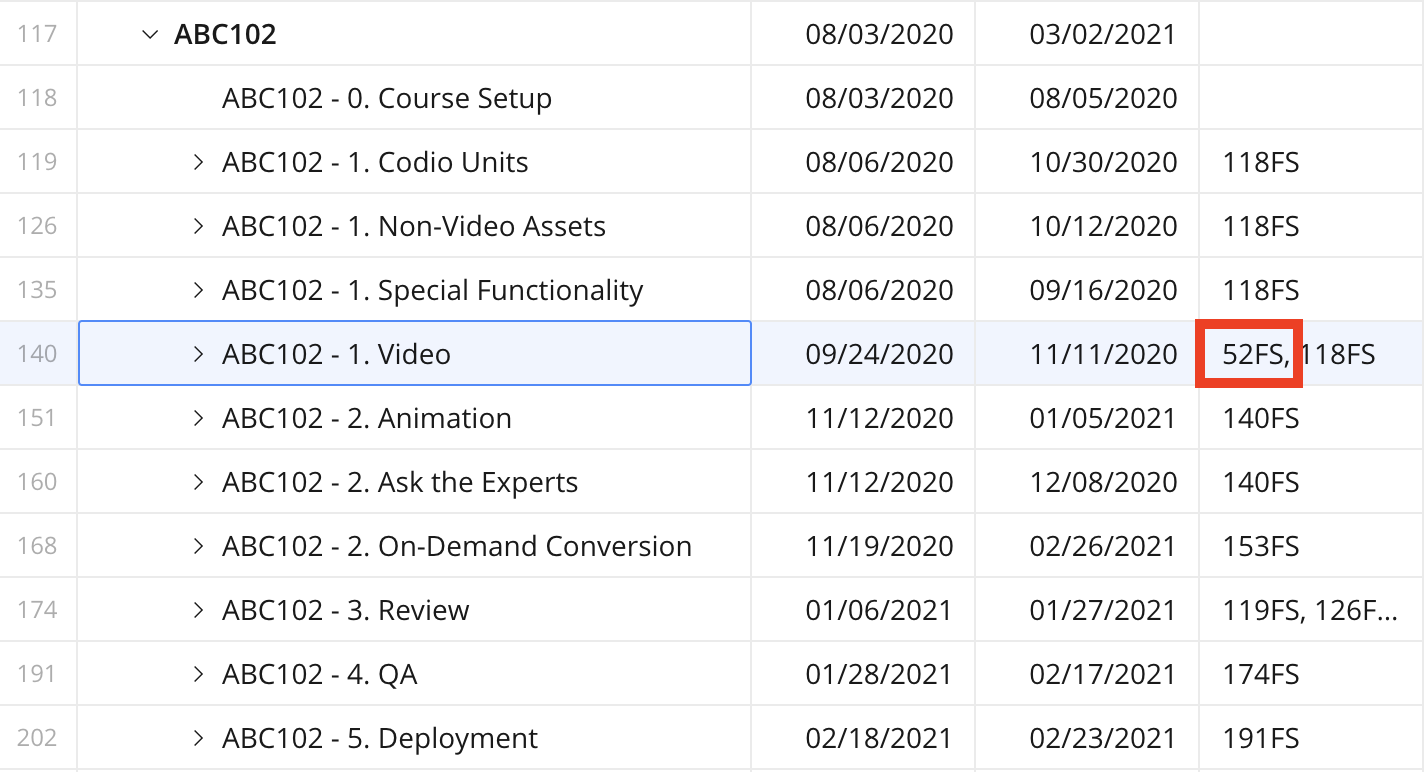
- In the "Predecessor" column, enter in the previously found task number followed by "FS, " (the comma and space is to separate it the new predecessor from any previously existing predecessors that were present and that should be left to preserve the already existing project dependency chain)
- Repeat the above steps for as many dependency relationships as you would like to configure between projects
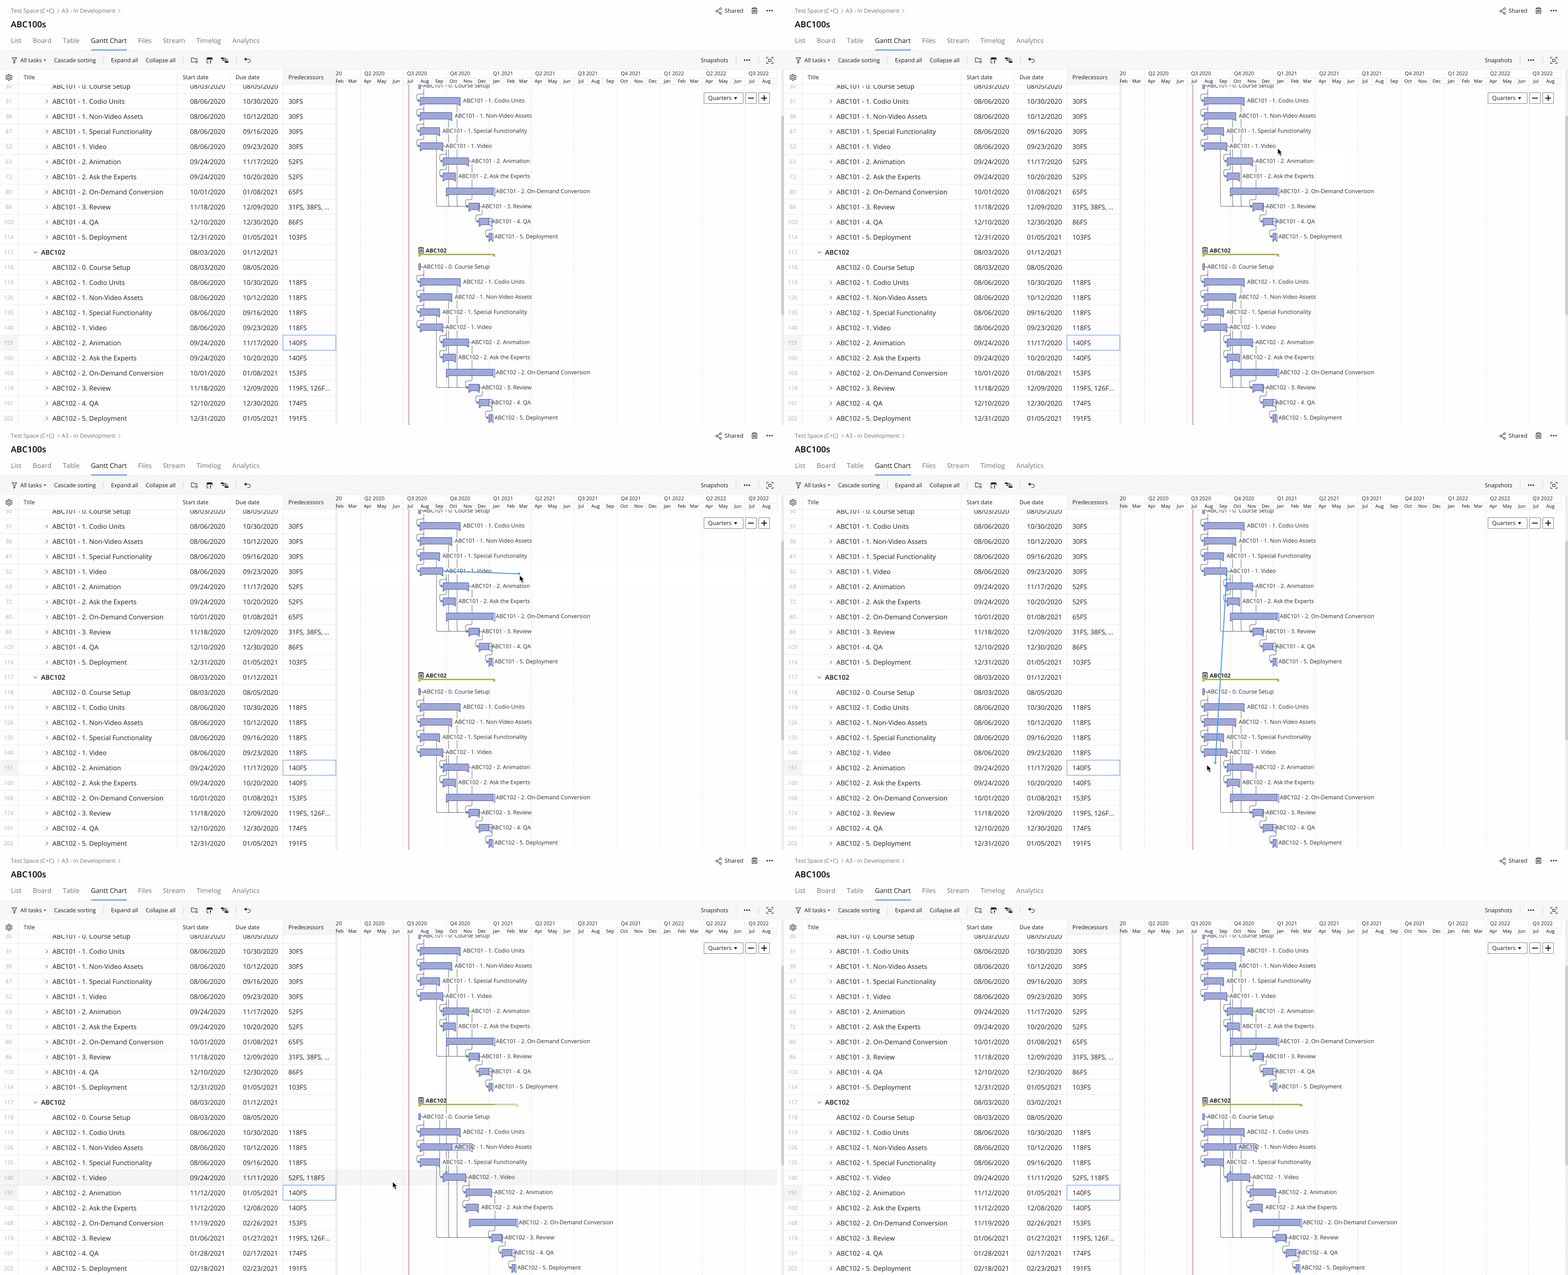
- As you do this, you can see the same predecessor value being generated as was done in the above steps
- The choice between the two techniques comes down to user preference
11. Populate Custom Fields in "Attributes & Measures" Space
As a final step, you should navigate to the space titled "A&M - {your name}'s Space", where {your name} is replaced with your individual name. open the "A&M - {your name} Folder" there. See below for a generic example of how to navigate to this view:
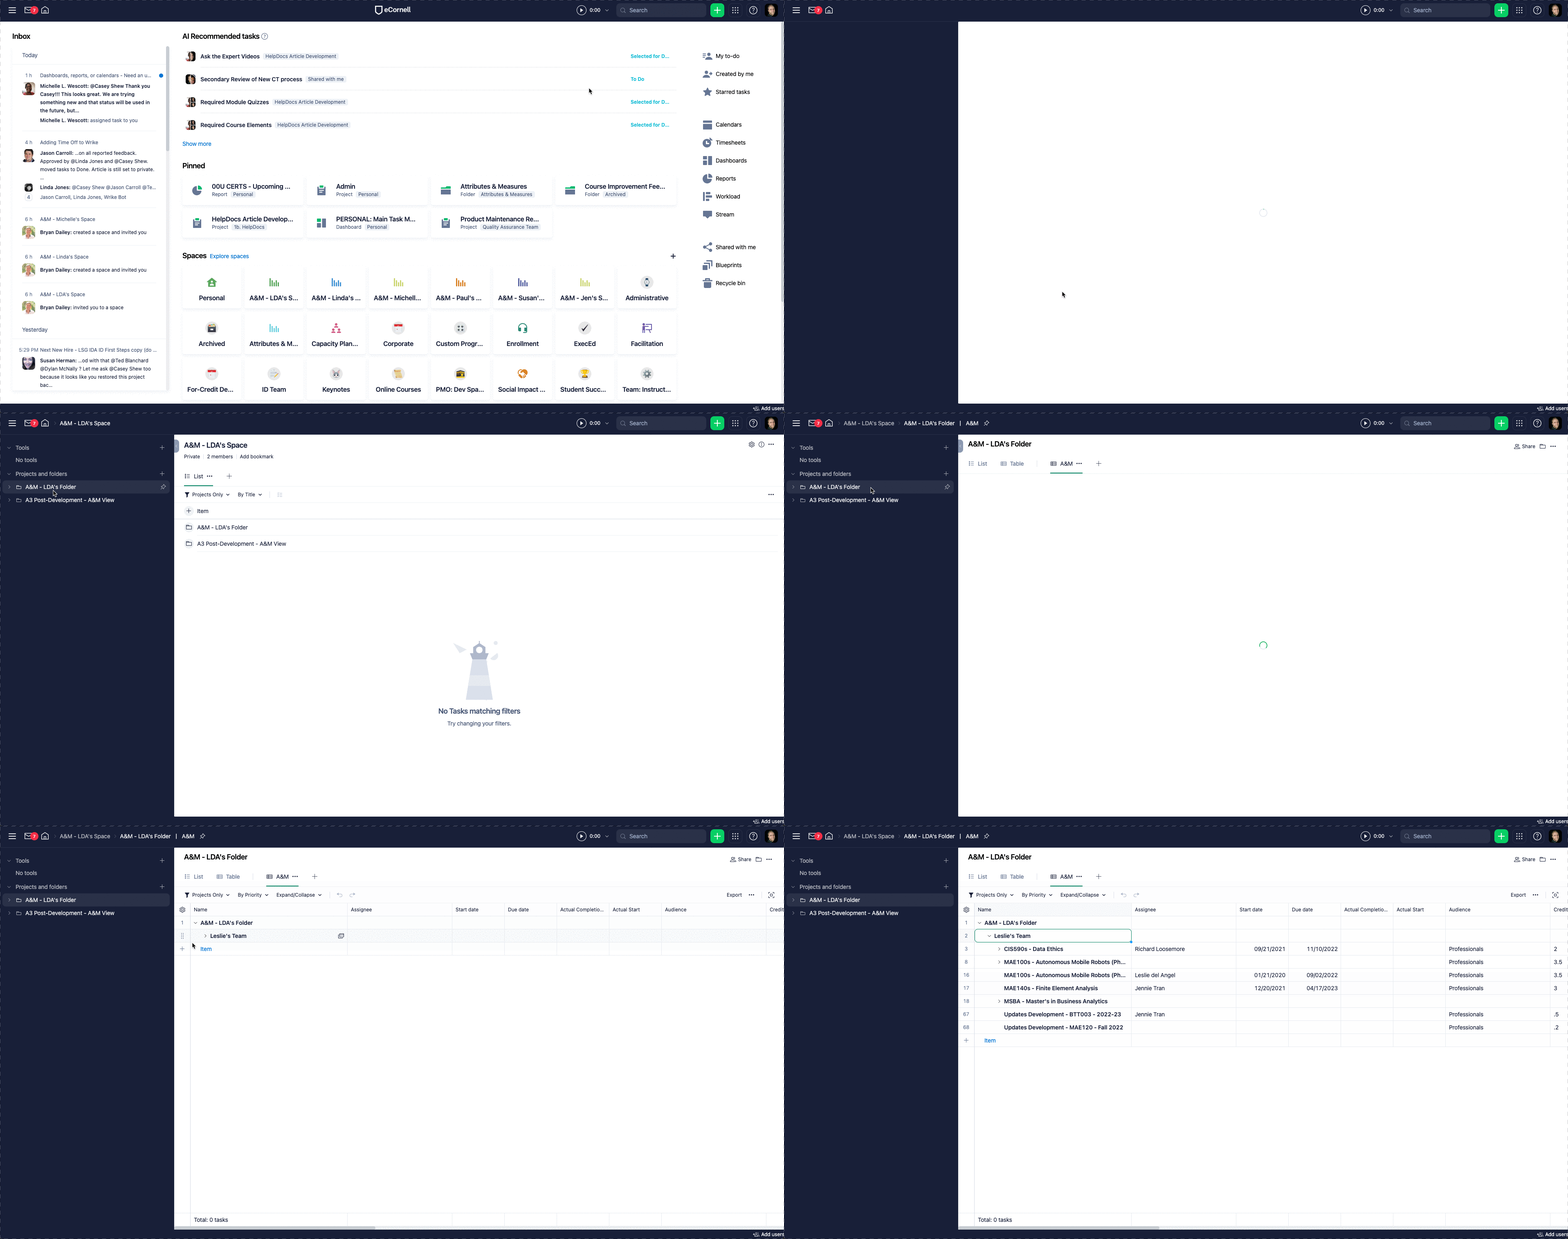
This view is pre-set to show all of the essential project-level custom fields that should be populated over a project's lifecycle. Expand the tree in the table view to the projects you just created, and populate all of the fields in the table that you are able to at this time for these projects.
Revisit this view regularly and to populate fields as a project progresses through to completion. By the end of a project, every column in this view should be populated for the project.
