Table of Contents
- Quick Reference Guide
- 1. Getting Started with Codio
eC Facilitator Guide to Codio
 Updated
by Jason Carroll
- Quick Reference Guide
- 1. Getting Started with Codio
This comprehensive guide to Codio provides step-by-step instructions and practical insights to streamline the grading process and efficiently assess student performance in eCornell courses. Discover how to seamlessly navigate Codio's platform to access, review, and grade all student coding assignments and activities.
Quick Reference Guide
This section serves as a concise reference you can return to whenever you need a quick reminder. For detailed explanations, see the relevant sections later in this guide.
Essential Workflows
Task | Key Steps |
Accessing student work | Canvas gradebook → Assignment title → Find student → Click three dots icon → Open Project |
Creating writable copy | Always click "WRITABLE COPY" immediately when viewing student work |
Basic grading | Verify blue "Completed" toggle → Click rectangle in "Grade" column → Add Grade → Enter percentage → Done |
Reset student assignment | Overview tab → Find student → Three blue dots → Reset → Confirm |
Mark assignment uncomplete | Click blue toggle in "Completed" column to turn it off |
Assignment Types at a Glance
Type | Your Role |
Ungraded Practice | Monitor completion, assist with technical issues |
Auto-graded | Monitor for issues, handle regrade requests |
Manually Graded | Review submissions, apply rubric, provide feedback |
Hybrid | Assess both auto and manual components |
Quizzes | Assist with technical difficulties |
Quick Troubleshooting
Issue | Solution |
Cannot see student work | Student must start assignment first |
Kernel errors | Students should click Kernel → Restart |
401/404 errors | Restart browser, clear cache |
Auto-grader timeouts | Escalate to eCornell via Wrike Course Maintenance Request form |
For more detailed guidance, refer to the corresponding sections in this document.
1. Getting Started with Codio
Codio, a cloud-based integrated development environment (IDE) and learning platform, simplifies coding education and assessment. The platform supports multiple programming languages and frameworks, and allows real-time code execution, testing, and progress tracking. Codio also integrates with Canvas gradebook and provides detailed analytics.
Codio's integration with Canvas creates a seamless experience for both students and facilitators. Each student receives an individual virtual machine environment, eliminating the need for file downloads or uploads. This setup enables real-time code execution, immediate feedback, and automatic grade synchronization with Canvas.
Types of Codio Assignments and How to Access Them
As a facilitator, you'll encounter various types of Codio assignments across different courses. Explore the different assignment types you'll work with and how to access them, using real course examples, using representative course examples.
1. Auto-graded Assignments
One of your first tasks as a facilitator might be checking student progress on a coding exercise, which uses auto-graded assignments.
Auto-graded assignments allow students to get immediate feedback on fundamental algorithm implementations. The automated tests check if the student's work has been implemented, ensuring they've implemented the core functionality properly.
How it works for students: Students write code to solve specific problems, run tests to check their work, and submit when satisfied with their solution.
Your role with this assignment type: Monitor the progress dashboard, respond to any questions about test failures, and occasionally handle regrade requests if a student fixes their code after submission.
Let’s take a look at the course CAC104: Creating Data Arrays and Tables in Python.
How to access the assignment:
- Click Grades in the Canvas navigation menu, then scroll right to the desired assignment.
*Notice the automated grades that appear for two of the students in the image above.
- Click the assignment title in the top row to open the associated Canvas page containing the Codio unit. In this example, the facilitator is reviewing student work in the autograded activity “Array Operations”

- Browse through your student roster - notice the blue toggles next to students who have completed the work
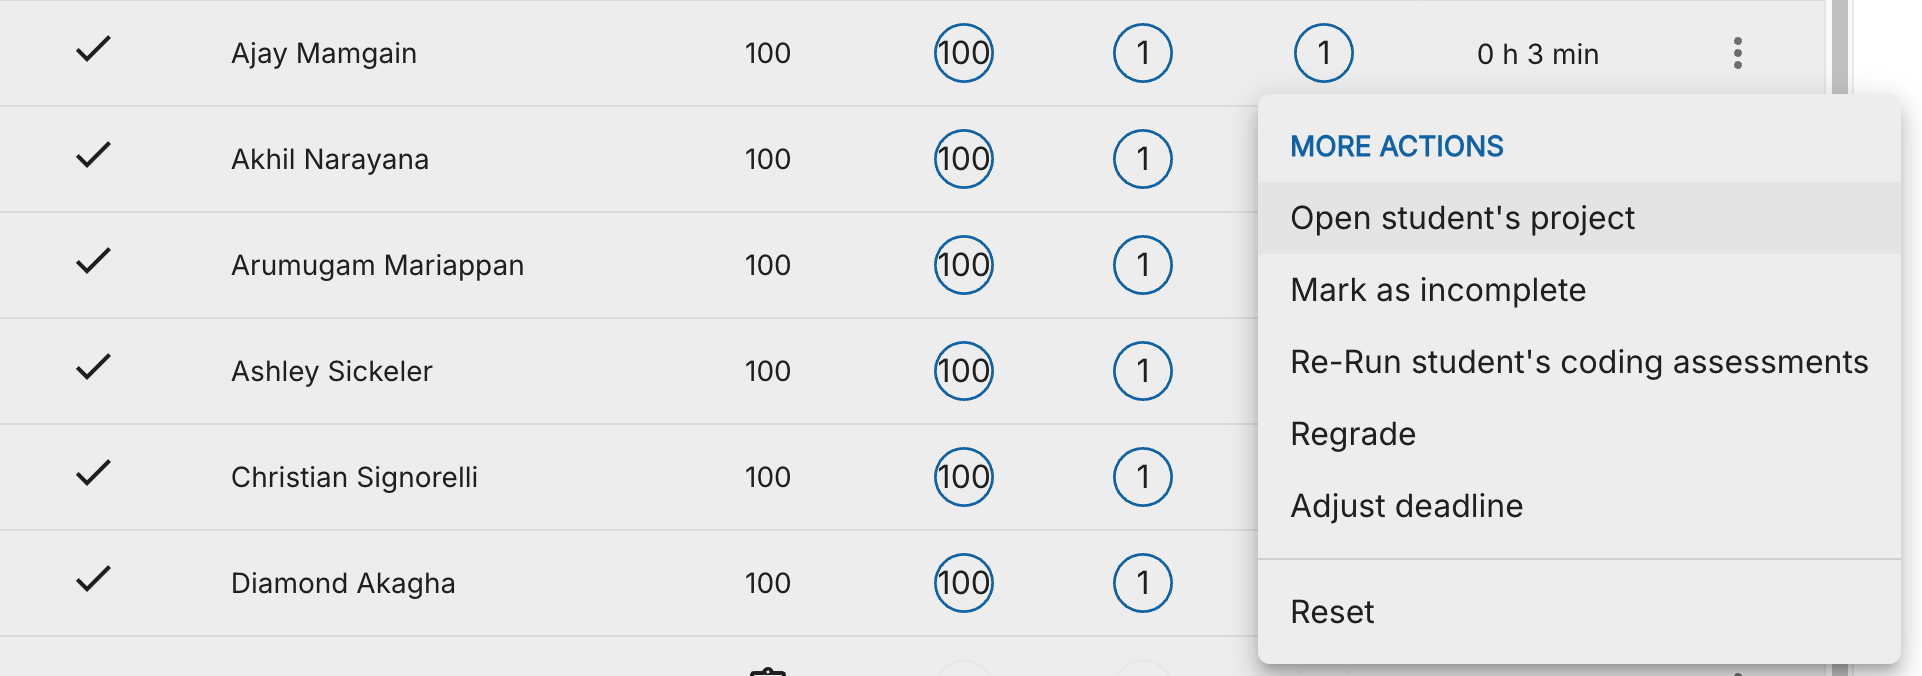
- Click the traffic light icon and “Open the Project”

When you open a student's submission, you'll see:
- The code they've written
- Test results that ran automatically
- A grade that was calculated based on test completion
2. Manually Graded Assignments
These more complex programming assignments require detailed facilitator review and cannot be automatically evaluated. Facilitators must review code quality, implementation, and overall project success, and then assign a grade based on the provided rubric. Each submission requires individual facilitator attention and grading, with the ability to provide comprehensive feedback.
The following examples demonstrate how a facilitator can access a manually graded assignment, create a writable copy, and assign a grade to the "Project 1: Data Preparation for Machine Learning" assignment in the WCM121: Machine Learning in Healthcare course.
How it works for students: Students develop more complex solutions over time, often with multiple files and components, then submit for facilitator feedback.
Your role: Review code quality, implementation choices, overall project success, and provide detailed feedback.
How to access the assignment:
- Click "Grades" in the navigation menu
- Scroll right to the desired assignment. Note the workbook icon that appears in the grade field. This signifies that the student marked their assignment as completed in the Codio interface.
- Click on the assignment title (“Project 1: Data Preparation for Machine Learning”) to open the associated Canvas page containing the Codio unit.
- Browse through your student roster - notice the blue toggles next to students who have completed the work
- Choose a student and click the traffic light icon and “Open the Project. A new browser tab will open containing the student assignment.
Writable Copy
When reviewing the assignment, facilitators should use the Writable Copy feature to test and validate student code to ensure the original submission is not affected.
If you would like to try something out in their code without changing their version:
- Click Writable Copy in the top right corner when viewing a student's submission
- A new browser tab opens with an exact copy of the student's work
- Make changes, run tests, and explore the code freely
- Your changes won't affect the student's original submission
- Close the tab when finished
How to Grade an Assignment
In this example, the facilitator has opened the student assignment, viewed the student content, experimented with their code in the Writable Copy, and now they want to grade the assignment. Follow these steps:
- Click the Grading button in the upper right corner of the open assignment.
- Click Add Grade button
- In the Grade column, click on the field containing a “0”
- In the example course, WCM121, a pre-defined Codio-specific rubric appears. Click the desired grades in each row of the rubric. Click Apply.
- Click Done
- The resulting grade will automatically appear in the Canvas gradebook.
Providing Effective Feedback
When grading assignments, you can give detailed feedback:
- Use the comment field below the rubric for overall feedback
- Reference specific parts of code or analysis
- These comments will transfer to the Canvas gradebook
- Be specific about what was done well and what needs improvement
3. Hybrid Assignments (Auto + Manual Grading)
Example above: “Leveraging Data for Decision Making” in CEEM621: Navigating Technical Product Management
Hybrid Assignments (Ex. “Leveraging Data for Decision Making” in CEEM621: Navigating Technical Product Management) blend automated testing with manual evaluation, where some portions grade automatically while others require facilitator judgment. This approach provides an efficient balance of objective functionality assessment and subjective design evaluation, allowing for both automated efficiency and detailed personalized feedback.
How it works for students: Students complete exercises with both objective elements that can be automatically tested and subjective elements that require facilitator evaluation.
Your role: Review auto-graded portions for accuracy and manually assess higher-level concepts and implementation choices.
To view student submissions for this type: Follow the same steps from the manually graded assignment section.
4. Ungraded Practice Activities
Example above: “Loading Data in Python” in CIS534: Decision Tree and Model Selection
Ungraded Practice Activities provide interactive tutorials and sandbox environments with pre-written code examples that students can freely modify and experiment with. These low-stakes environments encourage exploration and learning without formal grading requirements, tracking only completion so students can focus on building skills through hands-on experimentation.
How it works for students: Students experiment with pre-written code examples and concepts in a low-stakes environment.
Your role: Monitor completion status and assist with technical issues when needed.
How to view ungraded practice activities: Student View in Canvas allows instructors to experience their course as students do, ensuring content like Codio assignments is displayed correctly. When accessing a Canvas page with a Codio assignment in Student View, Canvas automatically switches to a Codio test student account, providing a realistic perspective to identify potential issues or challenges.
- Navigate to the specific Canvas course page where the activity is embedded
- Click the "Student View" button in the upper right corner of Canvas
- The Codio activity will appear embedded in the page. You'll experience the content exactly as students would see it
5. Embedded Quiz Activities
Embedded Quiz Activities feature Codio windows integrated directly within Canvas quizzes, allowing students to run code or perform calculations and use those results to answer quiz questions. Since grading happens automatically through the Canvas quiz system, these activities combine interactive coding with streamlined assessment.
How it works for students: Students use Codio to perform calculations or run code, then use results to answer Canvas quiz questions.
Your role: Assist with technical difficulties; grading is automatic through Canvas.
Understanding Completion Status
In every graded Codio unit, regardless of whether an exercise or assignment is auto-graded or manually graded, students are required to mark the assignment as 'Completed' after finishing. They can do this by selecting “Mark as Completed” from the Education menu in Codio. This step is crucial for tracking their progress through the material.
Once the student marks the assignment as Completed, a checkmark will appear on the left side of the window in the Codio Teacher view:

Marking an Assignment as Uncomplete
In some situations, you may need to reverse a submitted assignment back to incomplete status. This may be necessary if a student reports they saved their work but discovered it was processed as a submission, or if they simply report they never marked the assignment as complete but it still shows as submitted.
You can mark an assignment as incomplete by clicking the toggle to the left of the student’s name in the “Completed” column, in the Assignments view in Codio. After this step, the student can go back into the Codio, complete the work, and mark it as completed from the top tab in the Codio window.
Return an assignment to incomplete status:
- In Assignments view, click the toggle to the left of the student's name in the "Completed" column
- The student can then go back, complete the work, and mark it complete again

Resetting Student Assignments
Resetting a student assignment in Codio may be required to enhance the learning experience and ensure students fully understand the course material. This is especially useful if something has to be changed on the back end, not by the facilitator, or if a student makes a mistake in an assignment.
To reset an assignment for a particular student, follow these steps:
- Navigate to your course and select the Overview tab
- Choose the specific assignment
- Locate the student and click the three blue dots to the right of their name
- Select Reset

- Enter the confirmation code and click 'Yes'
2. Additional Codio Features and Considerations
Optimizing Your View of Student Work in Codio
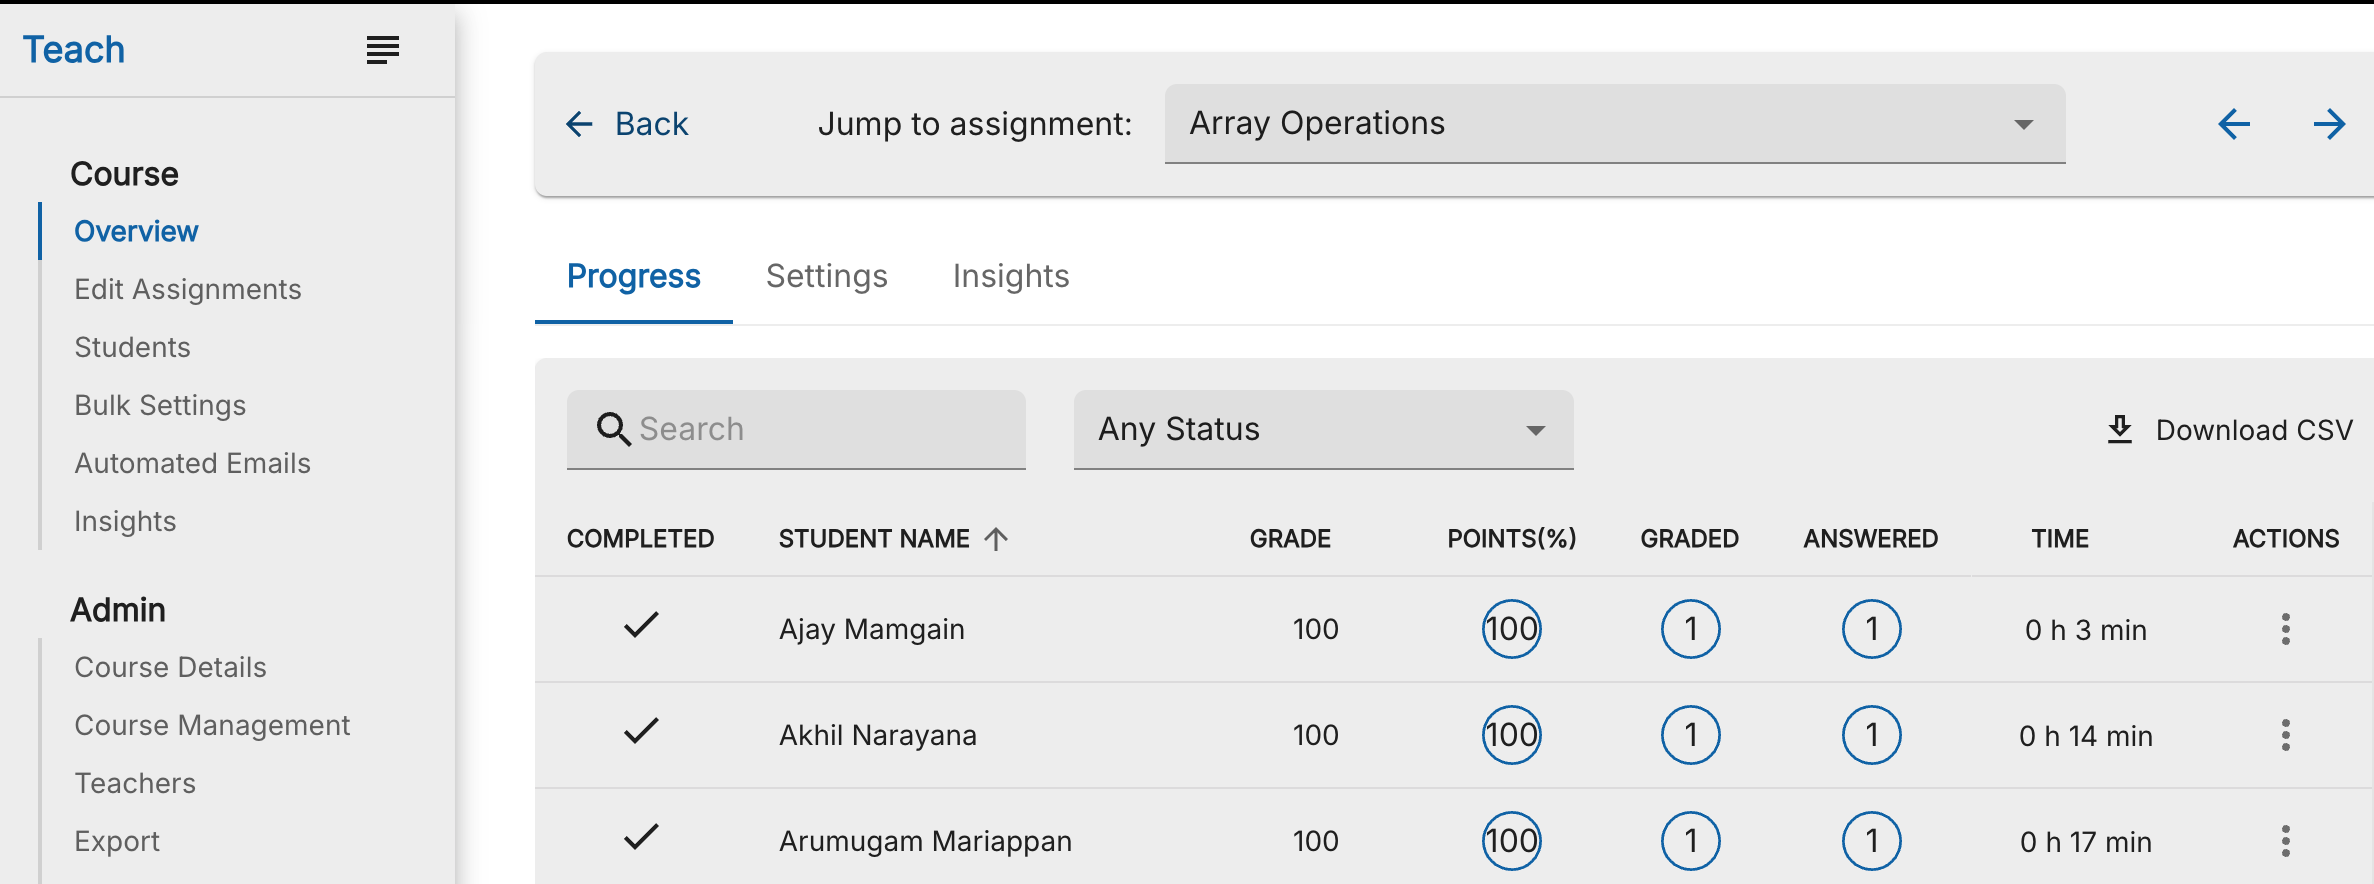
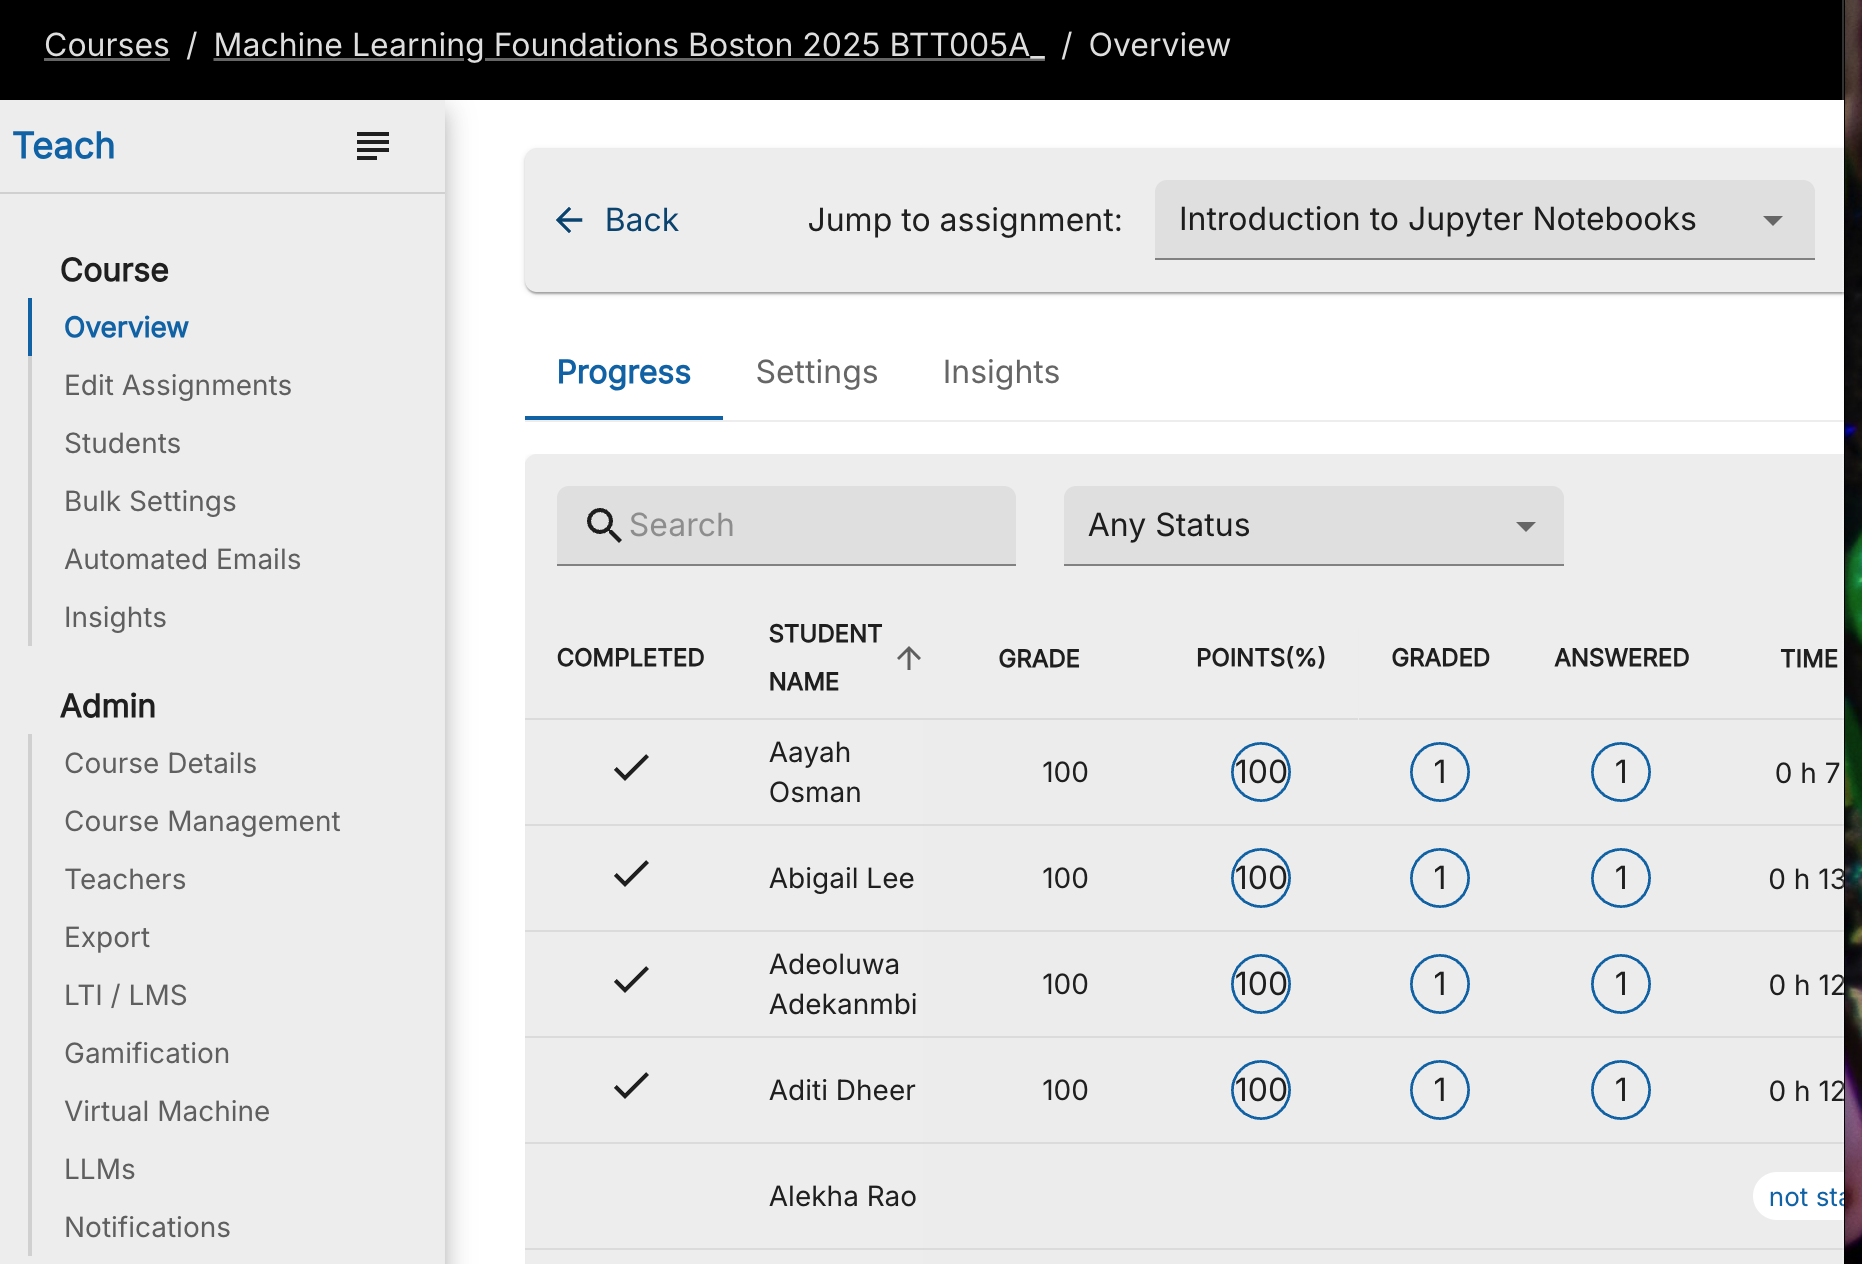
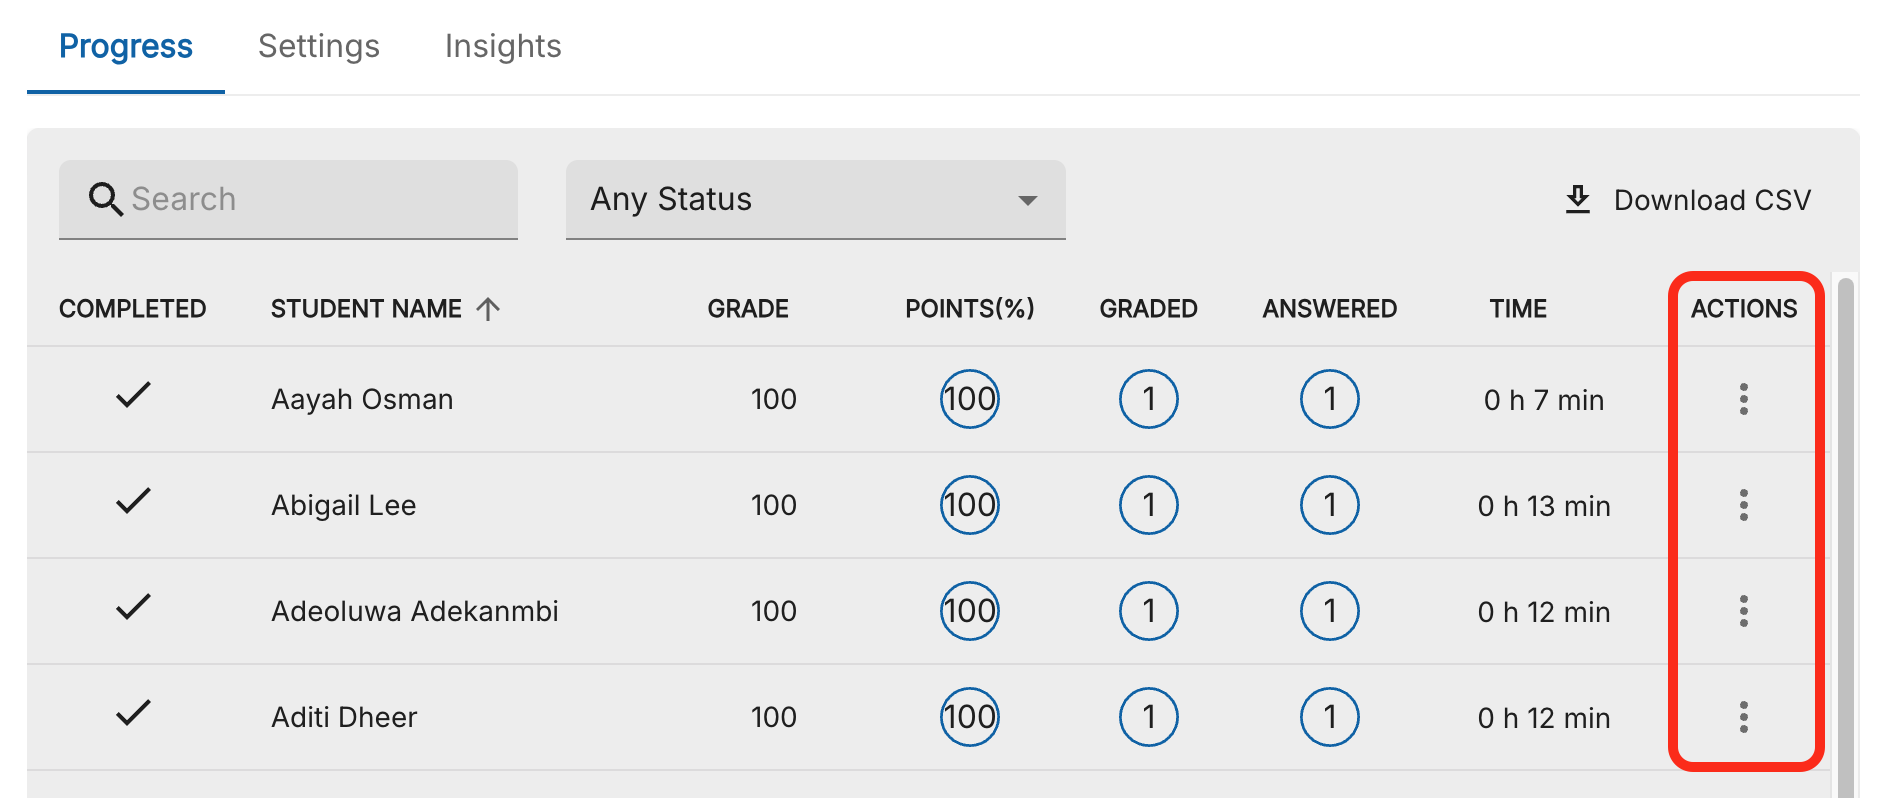
Sometimes, the Codio Teacher interface panel can become compressed or obscured due to the components and layout of the browser page. For example, when accessing student submissions in Codio, the "Open" option in Actions may occasionally appear to be missing from the interface for certain students. Since there's no horizontal scroll bar in the Codio interface, you need to ensure your screen real estate is maximized by closing the Canvas menu to see all available options. This small adjustment can make a significant difference in your ability to efficiently review student work.
In the image below, the 'Action' option is not visible. It should appear to the far right, next to the 'Answered' column, following the 'Assessments' and 'Time' columns, which are also missing in the current view.

Note how the 'Action' column is now visible on the far-right side of the screen in the image below:

Maximizing Screen Visibility
To ensure you can see all interface elements when reviewing student work:
- Close the Canvas left navigation menu by clicking the hamburger menu icon in the top-left corner
- Maximize your browser window to utilize all available screen space by clicking the green icon.
- Close the Codio left navigation menu by clicking the hamburger menu icon in the top-left corner
- If necessary, adjust your browser's zoom level (Ctrl/Cmd and - to zoom out slightly)
These simple adjustments will reveal the full interface, including the "Open" option at the far right of each student entry.
Regrading Assignments
In Codio, regrading capabilities provide facilitators with flexible tools to ensure accurate assessment of student work. Whether handling individual grading issues or managing autograder results, these features help maintain grading accuracy while saving time. Understanding when and how to use these tools effectively is key to efficient course management.
Codio's student-by-student regrade capability allows targeted reassessment of work through a simple button interface, replacing the earlier requirement of regrading entire course rosters. When an autograder fails or work needs reassessment, facilitators can trigger a regrade with a single click, maintaining the original submission timestamp while ensuring accurate evaluation. This selective approach proves invaluable for handling individual grading issues without impacting other students' submissions.
Student-by-student regrade:
- Allows targeted reassessment of individual work
- Maintains original submission timestamp
- Helpful when autograders fail or work needs reassessment
When to use regrading:
- When autograders fail due to system issues
- If a student's work was incorrectly evaluated
- When updates to grading criteria need to be applied
- If code execution timeouts occurred during initial grading
Best practices:
- Document when and why regrades are performed
- Use student-by-student regrade for isolated issues
- Monitor autograder performance patterns
AI Coach Error Assistance
The Codio Coach helps students better understand programming errors through an accessible interface in the lower right corner of coding exercises. When students encounter error messages, they can click the coach icon to open a dialog where they can paste their error message. The Coach then breaks down the error in clear terms, explaining what went wrong.
For facilitators, this means students can get immediate clarification on common coding errors, potentially reducing basic troubleshooting queries and allowing you to focus on more complex learning challenges.
3. Troubleshooting Guide
Placeholder Code
When grading student assignments, a common issue occurs when students forget to remove placeholder code that was intended to be replaced. These code blocks often include a raise NotImplementedError() statement and/or comments such as “#YOUR CODE HERE”.
What to look for:
- Students who receive zero points or failing tests despite attempting the assignment
- Error messages in test outputs that mention "NotImplementedError"
- Code cells that still contain the line raise NotImplementedError()
How to address it:
- Check if students left any code that includes raise NotImplementedError() statements or “#YOUR CODE HERE” comments
- Students must completely remove and replace these lines with their own code
If found:
- Mark the assignment as "Uncomplete" for revision
- Explain in your feedback that they need to remove this placeholder
- Clarify that these lines only mark where code should go
Example of proper code replacement:
Incorrect example
def calculate_mean(numbers):
# YOUR CODE HERE
raise NotImplementedError()
Correctly completed
def calculate_mean(numbers):
return sum(numbers) / len(numbers)
Resolving Kernel errors
A kernel error typically arises when attempting to open a Python file in an incorrect directory. It's important to understand that Jupyter and Python are distinct software entities. Therefore, a kernel error occurs when Jupyter fails to establish a connection with a designated version of Python.Students can reset the kernel in the Codio assignment when experiencing kernel errors:
- Click kernel in the Codio window menu.
- Click Restart in the kernel drop down menu.
401/404 errors
These errors can occur for the following reasons:
- Failure to Provide Authentication Credentials:
The error may occur if the client fails to include the necessary authentication credentials in the request within the specified timeframe. - Rejection of Client Request: It may also happen when the server rejects the client's request, despite the presence of correct authentication credentials.
If students experience a 401 and/or 404 issue it is recommended they try the following:
- Restart your browser: Try closing the current window and opening a new one.
- Clear cache: Remove your browser data and history. Check whether the error persists.
- Use another computer or browse:. If it works, try clearing the previous device’s cache and cookies one more time.
Auto-grader timing out and automatically giving students a “0”
Escalate this issue to eCornell via the Wrike Course Maintenance Request form
Students reporting code cells taking a long time to run
Escalate this issue to eCornell via the Wrike Course Maintenance Request form
Navigating Codio as a Student: Common Challenges and Solutions
Running Code
Understanding how to execute code cells correctly is crucial for running Python code in Jupyter notebooks. To execute Python in a cell, the cell type must be set to code. You can execute the cell by either pressing shift-enter or selecting Run in the menu bar. Upon executing the cell, the output of the code, if any, will appear below the cell containing the code. You should execute code cells from top to bottom in that order, so that the notebook reads like an annotated program. Prolonged inactivity or navigating to a different page will cause the notebook session to timeout. To resume your work where you left off, be sure to re-run all of the notebook cells in order, starting again at the very beginning.
Note: If you accidentally enter into a markdown cell's editing view, pressing shift-enter or selecting Run in the menu bar will return the cell to the rendered markdown view.
Resetting Code
Sometimes students may need to clear the output of executed code cells or reset the entire notebook. To clear the output, in the menu bar click Kernel and select Restart & Clear Output. This not only clears all output from executed code, but also restarts the kernel, so any set variables or any other persistent action from previously executed code will be lost.
Graded Assignments
Students may encounter graded assignments within Jupyter notebooks, which require specific actions such as removing placeholder code and submitting their work.
Graded code cells will be labeled accordingly and will also contain the line # YOUR CODE HERE. In addition, auto-graded cells will contain the line raise NotImplementedError(). Remove these lines and replace them with your code. Some of these code cells will be followed by self-check cells that will allow you to test your code before submitting your work for facilitator review. You can run these self-checks as many times as is necessary. Do not write any code in these cells.
Submitting Code
Students may experience issues submitting their code to be graded. Once they have completed work on this notebook, they will submit the code for grading.
Follow these steps:
- Save your work by selecting the "Save and Checkpoint" entry from the "File" menu at the top of the notebook.
- Mark as Completed - In the blue menu bar along the top of this code exercise window, you will see a menu item called Education. In the Education menu, click Mark as Completed to submit your code for grading.
Please note: Some notebooks will not contain graded exercises. Therefore, these notebooks will not contain a Mark as Completed option.
Downloading Notebooks
After completing their work, students may need to download their Jupyter notebooks for submission or offline viewing. If students would like to download a copy of their completed Jupyter Notebook, select File->Download from the menu at the top of the notebook, and then select the preferred file format.
If they choose to download their notebook in .ipynb format, they will notice that once downloaded, the notebook might have a filename extension .ipynb.json. If that is the case, they can change the file extension to .ipynb in order to properly open the notebook using Jupyter on their local machine.
If they would like to produce a static version of the notebook rendered in HTML, which they might want to share with someone who can view it in a web browser, select File->Download as->HTML (.html).
Using the Wrike Course Maintenance Request form to report feedback and errors
BugHerd offers a straightforward way for you to provide feedback directly within the Machine Learning Foundation course on Canvas LMS. All you need to do is click on the course page to leave feedback as you're navigating the site. More specifically, BugHerd is a visual bug tracking and website feedback tool used for reporting any bugs, feedback, or issues. BugHerd enables you to log feedback and issues directly on the Canvas course page, automatically sending a screenshot of your click-point to the eCornell support team!
