Departmental Standards
Company-Wide
eCornell Styleguide & Branding
Cornell University Branding
Writing and Editing Style Guide
Faculty and Expert Naming Conventions in Courses
Cornell School and Unit Names
Tips for Campus Engagements
LSG
Legal Policies
CSG
Updating Wrike Due Dates
Photography Style Guide
eCornell Mini Visual Style Guide
The Pocket Guide to Multimedia Design Thinking (*as It Pertains to Your Job Here)
Creative Services (CSG) Handbook
Administrative
LSG Meeting Recordings and Notes
Sending Faculty Sign-Off Forms in Adobe Sign
Weekly Faculty Status Emails
Animation/Motion Design
Instructional Design
Required Course Elements
The Pocket Guide to Instructional Design Thinking at eCornell
Adding AER to Canvas
Grading
D&D Newsletter
LSG Newsletter (LSGN) - February 2024
LSG Newsletter (LSGN) - March 2022 Edition
LSG Newsletter (LSGN) - December 2023
LSG Newsletter (LSGN) - October 2021 Edition
LSG Newsletter (LSGN) - June 2022 Edition
D&D Newsletter November 2024
LSG Newsletter (LSGN) - August 2022 Edition
LSG Newsletter (LSGN) - June 2023
LSGN Newsletter April 2023
LSG Newsletter (LSGN) - February 2022 Edition
LSG Newsletter (LSGN) - October 2022 Edition
LSGN Newsletter February 2023
LSGN Newsletter March 2023
D&D Newsletter September 2024
LSG Newsletter (LSGN) - August 2023
LSG Newsletter (LSGN) - March 2024
LSG Newsletter (LSGN) - April 2022 Edition
D&D Newsletter - August 2024
LSGN Newsletter January 2023
LSG Newsletter (LSGN) - October 2023 article
LSGN Newsletter (LSGN) - April 2024
LSG Newsletter (LSGN) - November 2021 Edition
D&D Newsletter February 2025
LSG Newsletter (LSGN) - January 2022 Edition
LSGN Newsletter December 2022
D&D Newsletter April 2025
LSG Newsletter (LSGN) - July 2022 Edition
LSG Newsletter (LSGN) - September 2022 Edition
Course Development
Image Uploads for Inline Projects
How to Install the Firefox Canvas Utilities Extension
Revising a Course/ Creating a Redux Version/ Course Updates
Creating a Perma Link With Perma.cc
Course Content Deletion Utility — Removing All Course Content
Teleprompter Slide Template
Course Names
Requesting High Resolution Video Uploads
Technical Talking Points Template
Writing Discussions: Guidelines for IDs
Online Resources in Credit-Bearing Courses
Hiring Actors for an eCornell Project
Marketing
Operations
Tech
Master Course Template Differences (8675309s)
Non-CSG File Uploads
Mentored Learning Conversion Process and Resources
Doc-Based Master Course Template and Standards (8675309-DOC)
Pedagogical Guidelines for Implementing AI-Based Interactives: AER
Coding Master Course Template and Standards (8675309-CODE)
Practice Quiz Standards
Hero Image
Platform Training
Administrative Systems
ADP
Google Drive
Downloadables Process
Embed a Document from Google Drive
Adding Google Links to Canvas
File Naming and Storage Convention Standards
Google Drive for Desktop Instructions
Storing Documents in Multiple Locations
Wrike
Wrike System Fundamentals
Field Population
1.0 to 2.0 Wrike Project Conversion
Blocking Time Off in Work Schedule (Wrike)
Wrike Custom Field Glossary
Wrike "Custom Item Type" Definitions
How to Create a Private Dashboard in Wrike
Using Timesheets in Wrike
Importing Tasks into a Wrike Project
Wrike Project Delay Causes Definitions
Setting OOO Coverage for Roles in Wrike
How to Change a Project's Item Type in Wrike
Using Search in Wrike
How to Create a Custom Report in Wrike
@ Mentioning Roles in Wrike
Automate Rules
Using Filters in Wrike
Managing Exec Ed Programs in Wrike
External Collaborators
Wrike for External Collaborators: Getting Started
Wrike for External Collaborators: Views
Wrike for External Collaborators: Tasks in Detail
Wrike Updates
New Experience Update in Wrike
Wrike Course Development Template 2.0 - What's New
Wrike - Course Development Template 3.0 Release Notes
Wrike Process Training
Course Development & Delivery Platforms
Canvas
Development
Adding Custom Links to Course Navigation
Adding Comments to PDFs from Canvas Page Links
Setting Module Prerequisites and Requirements in Canvas
Canvas Page Functionality
Create a New Course Shell From 8675309
Using LaTeX in Canvas
Search in Canvas Using API Utilities - Tutorial
Reverting a Page to a Previous Version
Student Groups
Create Different Canvas Pages
Importing Specific Parts of a Canvas Course
Canvas HTML Allowlist/Whitelist
Understanding Canvas Customizations/Stylesheets
Operations
Discussion Page Standards
How to import a CU course containing NEW quizzes
Canvas LMS: NEW Quiz compatibility
Faculty Journal
Course Content Style Guide
Click-To-Reveal Accordions in Canvas
Course Maintenance Issue Resolution Process
Meet the Experts
Codio
Codio Operations
Managing Manually Graded “Reflect and Submit” Codio Exercises
Codio Structure and Grading for Facilitators
Premade Codio Docs for Ops & Facilitators
Codio Remote Feedback Tools for Facilitators
Developers
Development Processes
Creating a New Codio Course
Creating a New Codio Unit
Integrating a Codio Course into Canvas
Embedding a Codio Unit into Canvas
Setting Up the Class Fork
Jasmine Autograde Unit Testing
Setting Up the Class Fork (LTI 1.3)
R Studio - Exclusion List for R Code
Mocha/Selenium Autograding
Starter Packs in Codio
Configuring Partial Point Autograders in Codio
Launch a Jupyter Notebook from VM
AI Extensions
Program-Specific Developer Notes
Codio Functionality
Jupyter Notebooks
Jupyter Notebooks - nbgrader tweaks
Jupyter Notebooks Style Guide
Adding Extensions to Jupyter Notebooks
Setting up R with Jupyter Notebooks
Change Jupyter Notebook Auto Save Interval
How to Change CSS in Jupyter Notebook
RStudio in Codio
How To Centralize the .codio-menu File to One Location
Codio Fundamentals for LSG
Using the JupyterLab Starter Pack
Using Code Formatters
Using the RStudio Starter Pack
Conda Environments in Codio
Updating Codio Change Log
Codio Basics: Student Support
eC Facilitator Guide to Codio
Migrating to Updated Codio Courses
Qualtrics
Ally
Ally Institutional Report Training
Ally Features Overview Training
Using the Ally Report in a Course
Ally Vendor Documentation/Training Links
Adobe
Other Integrations
Pendo Overview
How to Add VitalSource eBooks in Canvas
Enabling Zoom/"Live Sessions" in a Course
Pendo Guide Creation
H5P
Modifying Subtitles in H5P Interactive Videos
Embedding H5P Content Into Canvas
Troubleshooting H5P Elements in Canvas
Inserting Kaltura Videos into H5P Interactive Videos
Adding Subtitles to H5P Interactive Videos
S3
BugHerd
Instructional Technologies & Tools Inventory
Canvas API Utilities
Getting started with the MOP Bot
eCornell Platform Architecture
HR & Training Systems
Product Development Processes
Accessibility
What Is Accessibility?
What Is Accessibility?
Accessibility Resources
Accessibility Considerations
Accessibility Support and Assistive Technology
Structural Accessibility
Accessibility Design and Development Best Practices
Accessible Images Using Alt Text and Long Descriptions
Accessible Excel Files
Accessibility and Semantic Headings
Accessible Hyperlinks
Accessible Tables
Creating Accessible Microsoft Files
Mathpix: Accessible STEM
Design and Development General Approach to Accessibility
Integrating Content Authored by a Third Party
Planning for Accessible Tools
Accessibility Considerations for Third Party Tools
Studio Accessibility
Designing for Accessible Canvas Courses
Accessibility: Ongoing Innovations
Course Development
Planning
Development
0. Design
1. Codio Units
1. Non-Video Assets
3. Glossary
4. Canvas Text
4. Tools
4. Tools - Wrike Task Definitions
3. Review And Revise Styled Assets
ID/A to Creative Team Handoff Steps
General Overview of Downloadables Process
Course Project: Draft and Final
Excel Tools: Draft and Final
eCornell LSG HTML Basics
1. Non-Video Assets - Wrike Task Definitions
2. Video
Multifeed Video
2. Video (Standard) - Wrike Task Definitions
Studio Tips
Tips for Remote Video Recording Sessions
Who to Tag for Video Tasks
3. Animation
3. Animation - Wrike Task Definitions
2. Artboard Collab Doc Prep
6b. Motion Design Review and Revise
Who to Tag for Animations Tasks
3. Artboard Collab Process Walkthrough
DRAFT - FrameIO Process Walkthrough
Motion Contractor Guide for IDAs / IDDs
Requesting / Using Stock Imagery (Getty Images and Shutterstock)
3. Ask the Experts
5. On-Demand Conversion
5. Review
5. Review - Wrike Task Definitions
1. Prep Course for Reviews
2. Conduct Student Experience Review
3. Implement Creative Director Edits
3. Implement IDD Edits
3. Implement Student Experience Review Edits
4. CSG - Revise Tools Export 1
5. Conduct Faculty Review
6. Implement Faculty Edits
7. Conduct Technical Review of Course (STEM-only)
Technical Student Experience (Tech SE) Review Process
2. Conduct IDD or Sr ID Review
6. Alpha
6. Alpha - Wrike Task Definitions
Alpha Review Process
Prepare a course for Alpha review
Schedule & Conduct Alpha Triage Meeting
7. QA
7. QA - Wrike Task Definitions
1. Prep Course for QA
2. Copy Edit Captions
2. Copy Edit Course & Files
4. Conduct Content QA of Course
4. Final Creative Review and Export
Adding Chat With Tech Support to Course Navigation
5. Implement QA Edits
Working With Video Captions That Contain Special Characters
Copy Edit Captions in SubPLY
Creating a Course Style and Settings Guide
Copy Editing Content in Frame.io
1. Complete Dev to QA Checklist
Copy Edit Captions in 3Play
Tag a Video for Transcription by 3Play
Course QA Checklists
8. Deployment
8. Deployment - Wrike Task Definitions
1. Finalize Master Version of Course
2. Create & Add Course Transcript (CT) to Course
Replace a Master -M With a Redux Version of the Course
3. Create -T (Training Course) and Associate With Master Blueprint
Canvas Blueprint Course Functionality
Project Management in Wrike
Managing Project Reporting in Wrike
Managing Task Needs/Schedule in Wrike
Adding Tasks
Comments and Communication
Statuses
Updating Task Start and Due Dates
Predecessors
Durations
Rollups
Calculating Project Schedule by Deadline in Wrike
Creating Course Project Plans in Wrike
Setting Custom Capacity for Resources
Customizing Effort in a New Project Plan
Marking Projects Complete in Wrike
How to Set Up Workload Charts to Track Effort in Wrike
For-Credit Considerations
1-Sheet Population
Post-Development
AI Simulations
Program Facilitation & Operational Guidelines
Data Science
Facilitator Resources
Canvas Navigation
Adding Events to the Course Calendar
Navigating Canvas and the Dashboard
How Do I View Previous Courses I Have Taken or Facilitated?
Why Am I Receiving Duplicate Canvas Emails?
How Do I Edit My Canvas Profile?
Send Students a Direct Message on Canvas
Adding Notes to Canvas Gradebook
How Do I Send Students Nudges from the Gradebook?
Overview of 2024 Changes- Course Layout and Structure
How Can I Update My Canvas Notification Preferences?
Ursus Navigation
How Do I Access My Offer in Ursus?
How Do I Edit My Ursus Profile?
How Do I Request Time Off (Blackout Dates)?
How Can I Request to Learn More Courses?
Live Sessions
Enabling Student Use of Closed Captioning in Zoom
When Should I Schedule My Live Sessions For?
Changing Live Session Date and Time After Created with Facil Tool
Help! I Need to Reschedule a Live Session
Live Session Information page
Set up Live Sessions with the Facil Tool
Combining Live Sessions with Facil Tool
Course Set-Up
Course Set Up: Getting Ready for Live Sessions
Recording and Posting a Welcome Video
Course Set Up: When can I begin to edit my course?
Course Set Up: Reviewing Due Dates
Course Set Up: Reviewing Announcements
What Do I Need to Do to Make Sure My Course is Set Up Correctly?
How Do I Customize My Course Sections?
Course Announcements and Messages Templates
Facilitator Focus
Zoom and other Technical Support
Reporting Spam/Phishing
How Do I Set Up My Zoom Account?
Support Resources for Facilitators
Live Session/Zoom Trouble Shooting Guide & Technical Readiness
How to Upload Videos to Zoom On-Demand
Student Survey FAQs
How Do I Save and Refer Back to Zoom Recordings?
How Do I Find My Personal ID Meeting link in Zoom?
Benefits as an eCornell Employee
Do I Have Access to Microsoft Office as a Cornell Employee?
Taking Courses as a Student
Professional Development Benefit
Student Success
Help! My Students Can't View a Video Within My Course
Extensions and Retakes
Policies and Navigation Resources for Students
Symposium Access Extension- Fall 2025
Students enrolled through special groups: Corporate and VA
Unique Circumstances for Student Extensions and Retakes
Communicating with Students via Canvas
Can I Provide Students with a Letter of Recommendation?
Understanding and Addressing Instances of Plagiarism
Support Resources for Students
Understanding and Addressing Use of AI
Help! My Student is Having a Hard Time Uploading a Video
Unique Student Situations
I Have a Student Requesting Accommodations- How Should I Proceed?
Canvas Mobile App
Messaging Students via the Canvas Mobile App
Setting up and Navigating the Canvas Mobile app
Setting up Push Notifications on Canvas Mobile
Canvas App Features for eCornell courses
New Facilitator Onboarding and Quick References
Facilitator Onboarding at eCornell
Why Do I Have Multiple eCornell email and Canvas Accounts?
Quick reference: Systems and Accounts we use at eCornell
Quick reference guide: Key eCornell Personnel
How do I Log Onto Canvas and Access FACT101?
How Do I Add eCornell to My Email Signature?
Training Course Review & Facilitation Authorization
What to Expect During Live Shadowing Experience
Setting up Email Forwarding
Facilitator Expectations and Grading Help
Changes in Grading Scheme: Incomplete/Complete and 75% to 85%
New (Embedded/Inline Format) How do I grade Course Projects?
Navigating the Gradebook and Accessing the Speedgrader
Quick Reference: Sort assignments in the Speedgrader
How do I Grade Quizzes?
(Old format) How Do I Grade Course Projects and Add Annotations?
Rubrics for Effective Facilitation
Is There an Answer Key for my Course?
How to Monitor and Promote Student Progress
How Do I Grade Discussions?
Adding an Attempt to a Course Project
How Quickly Do I Need to Provide Grading to Students?
Payroll and the Monthly Scheduling Process
Codio References
Manually Graded “Reflect and Submit” Codio Exercises
Codio Quick Resources
Codio Reference: Embedded quiz questions (H5P)
Codio Reference: Checking for Completion Status
Codio Reference: Manually Graded Exercises
Codio Remote Feedback Tools
Codio Reference: Ungraded exercises
Codio Reference: Autograded Exercises
Archived
Table of Contents
Using Code Formatters
Updated
by Brock Schmutzler
This article contains some quick tips for to use JuliaFormatter, black, and styler to format code written in Julia, Python, and R (respectively). In particular, we discuss how to use these formatting packages in conjunction with Jupytext and nbQA to easily format code in the cells of a Jupyter Notebook. Using automatic code formatters can save a lot of time while making your code easy to read and maintain.
Julia
This section covers the tools for automatically formatting Julia code using JuliaFormatter and jupytext.
Installation
To install the JuliaFormatter.jl package:
- Open a terminal in Codio by selecting Tools > Terminal from the top menu
- At the
~/workspace$prompt, executejuliato start a Julia session - At the
julia>prompt, press the]key to start the package manager - At the
pkg>prompt, executeadd JuliaFormatterto install the package
If you are formatting Julia code in a Jupyter Notebook, also install Jupytext:
- Open a terminal in Codio by selecting Tools > Terminal from the top menu
- At the
~/workspace$prompt, executepip install --upgrade pipto upgradepip - At the
~/workspace$prompt, executepip install jupytext
Usage
The JuliaFormatter.jl package can be used to format Julia code from a Julia console:
julia> using JuliaFormatter

# Recursively formats all Julia files in the current directory
julia> format(".")

# Formats an individual file
julia> format_file("foo.jl")

# Formats a string (contents of a Julia file)
julia> format_text(str)
Jupytext and JuliaFormatter can be used together to format Julia code in a Jupyter Notebook. To reformat a notebook.ipynb file with Julia code, you can run the following terminal command from the ~/workspace directory in Codio:
jupytext --pipe "julia -e 'using JuliaFormatter; format_file(ARGS[1])' {}" notebook.ipynbjupytext commands that you may find useful.Configuration
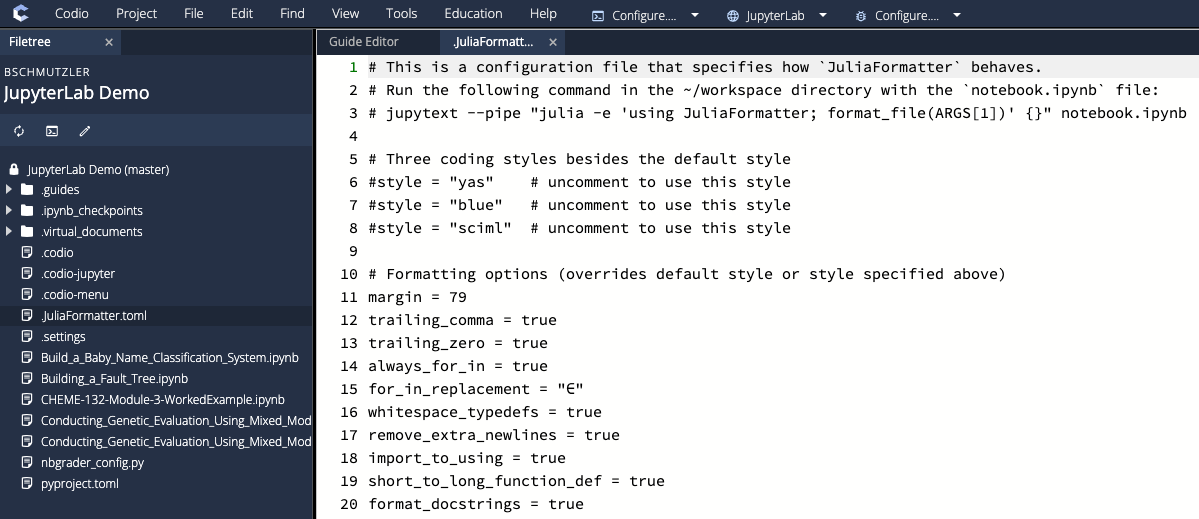
To configure JuliaFormatter formatting options, create a .JuliaFormatter.toml file (read the JuliaFormatter documentation for all the possible formatting options). For example, consider
# This is a configuration file that specifies how `JuliaFormatter` behaves.

# Three coding styles besides the default style
#style = "yas"    # uncomment to use this style
#style = "blue"   # uncomment to use this style
#style = "sciml"  # uncomment to use this style

# Formatting options (overrides default style or style specified above)
margin = 79                        # default is 92
trailing_comma = true              # default is true
trailing_zero = true               # default is true
always_for_in = true               # default is false
for_in_replacement = "∈"           # default is "in"
whitespace_typedefs = true         # default is false
remove_extra_newlines = true       # default is false
import_to_using = true             # default is false
short_to_long_function_def = true  # default is false
format_docstrings = true           # default is false
Put your .JuliaFormatter.toml file in the ~/workspace directory of Codio:
Example
As a concrete example of how this works, consider a Julia notebook with the following two cells:
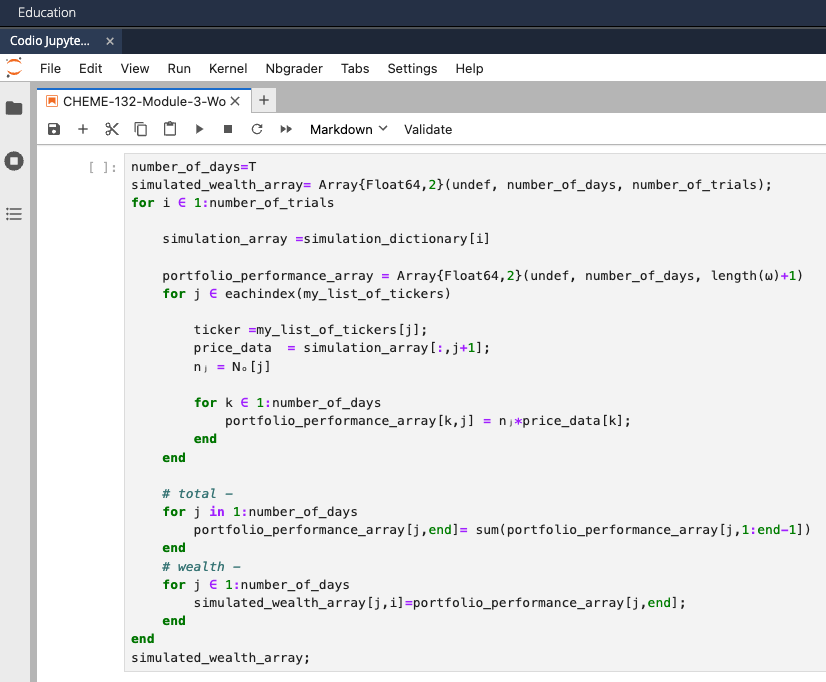
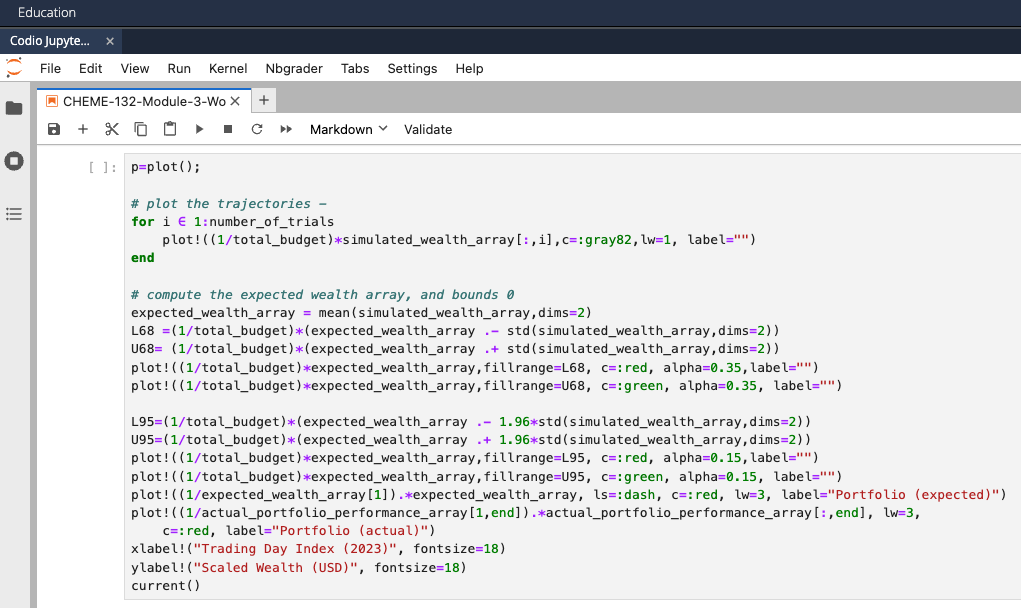
From the ~/workspace directory terminal, running the command
jupytext --pipe "julia -e 'using JuliaFormatter; format_file(ARGS[1])' {}" CHEME-132-Module-3-WorkedExample.ipynbproduces the following output for the first cell (first image) and second cell (second and third images):
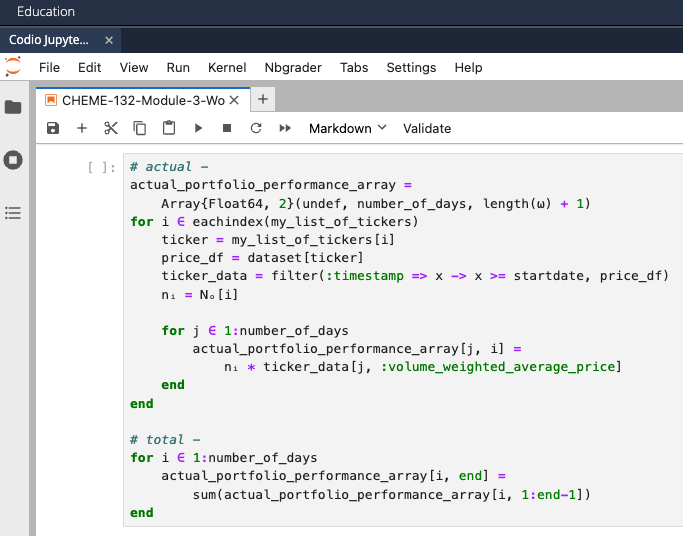
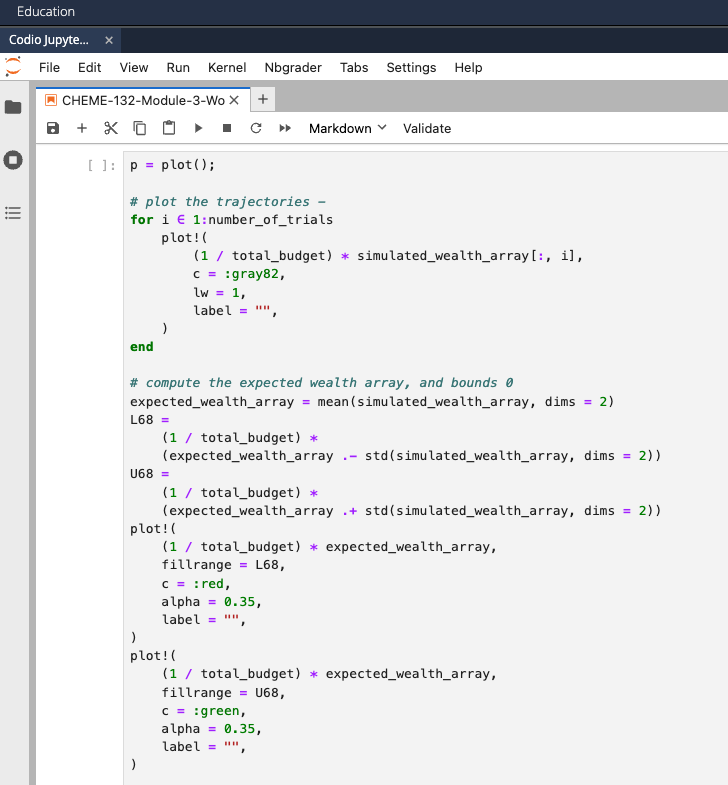
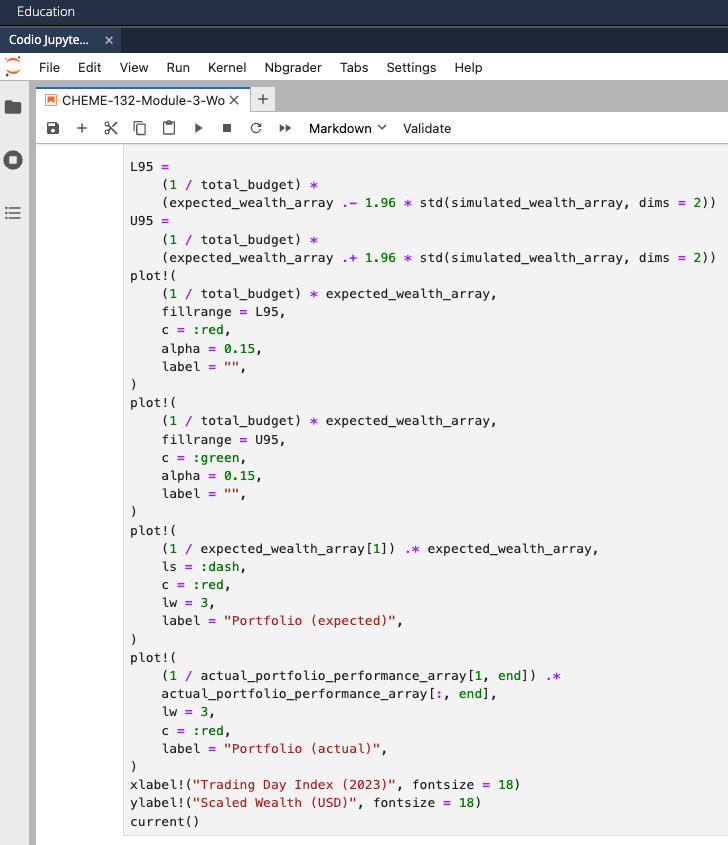
#! format: off and #! format: on to tell JuliaFormatter to ignore parts of the code, as described in the documentation on skipping formatting.Python
This section discusses how to automatically format Python code using black, isort, blacken-docs, and nbqa.
Installation
To install the packages black, blacken-docs, isort, and nbQA:
- Open a terminal in Codio by selecting Tools > Terminal from the top menu
- At the
~/workspace$prompt, executepip install --upgrade pipto upgradepip - At the
~/workspace$prompt, executepip install black blacken-docs isort nbqa
nbqa if you are formatting Python code in a Jupyter Notebook (you could also use the Jupytext CLI).Usage
You can use the Python packages black and isort to quickly format Python code and import statements. Black is an "opinionated" formatter in the following sense:
Black aims for consistency, generality, readability and reducing git diffs. Similar language constructs are formatted with similar rules. Style configuration options are deliberately limited and rarely added. Previous formatting is taken into account as little as possible, with rare exceptions like the magic trailing comma. The coding style used by Black can be viewed as a strict subset of PEP 8.
Isort is used for sorting import statements alphabetically and separated them into sections by type. You can run black and isort from a Python console:
>>> black file.py
>>> isort file.py
You can use nbQA with the Python packages black, blacken-docs, and isort to quickly format Python code in Jupyter Notebooks according to the Black code style. Here's a quick list of the tools and their uses:
blackformats Python codeblacken-docsuses the Black code style to format Python code in Markdown cells of a Jupyter Notebookisortsorts import statementsnbqaensuresblack,blacken-docs, andisortwork seamlessly with Jupyter Notebooks
To format Python code in a Jupyter Notebook, use the commands above together with the command nbqa from the terminal in the directory that contains the notebook file. For example, if you have ~/workspace/file.ipynb , then you would run the following commands from the ~/workspace$ command-line prompt:
nbqa black file.ipynb
nbqa blacken-docs file.ipynb --nbqa-md
nbqa isort file.ipynb
--nbqa-diff to see what changes would be made to file.ipynb if you were to run one of the formatting commands. For example, executing nbqa black file.ipynb --nbqa-diff would show you the changes that would be made to file.ipynb if you run the command nbqa black file.ipynb.Configuration
To ensure that black and isort are compatible (so that their formatting preferences do not overwrite each other), create a workspace/pyproject.toml file with the following contents:
[tool.isort]
profile = "black"
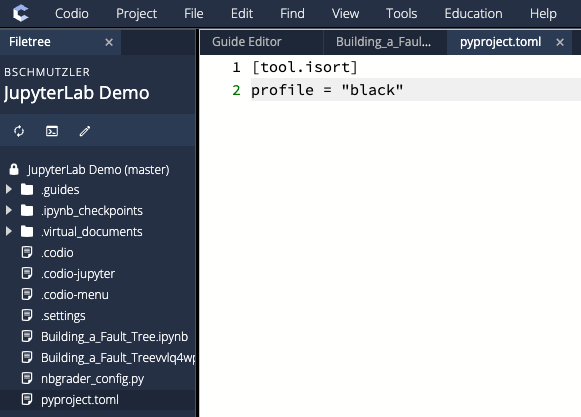
You can also specify preferences for black in pyproject.toml (this is not necessary):
[tool.black]
line-length = 79
target-version = ["py311"]
The above specifications configure black to use a maximum line length of 79 characters (instead of the default 88) and to provide support for Python 3.11.x code. In general, you probably won't need (or want) to configure Black any more than changing the line length and version of Python.
# fmt: skip to ignore a line of code or the comments # fmt: off and # fmt: on to ignore code blocks, as described in the documentation on ignoring sections.After you have created a suitable pyproject.toml file, you are ready to use black and isort to format your notebook.
Example
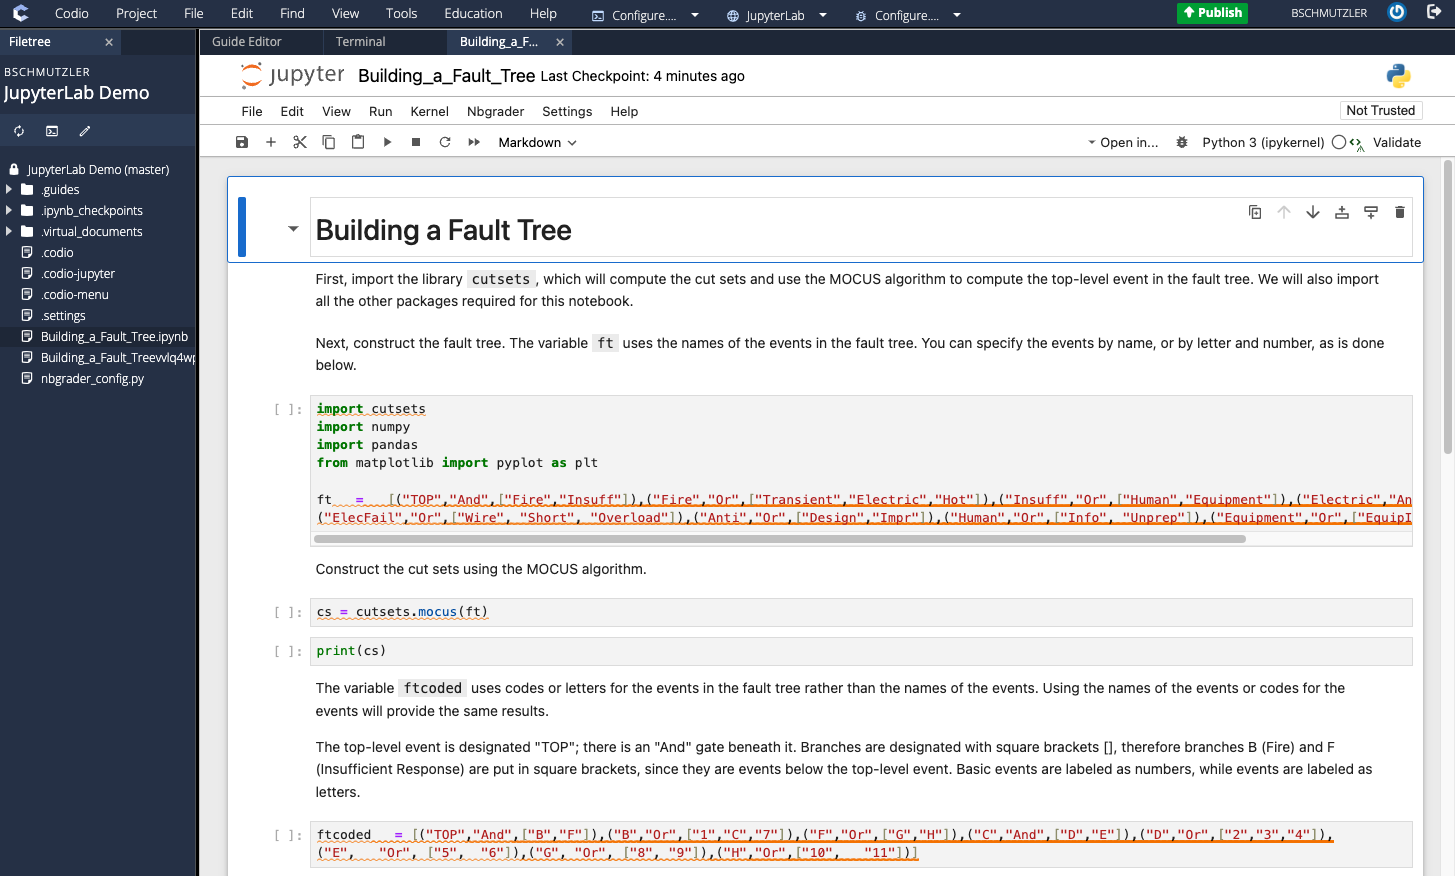
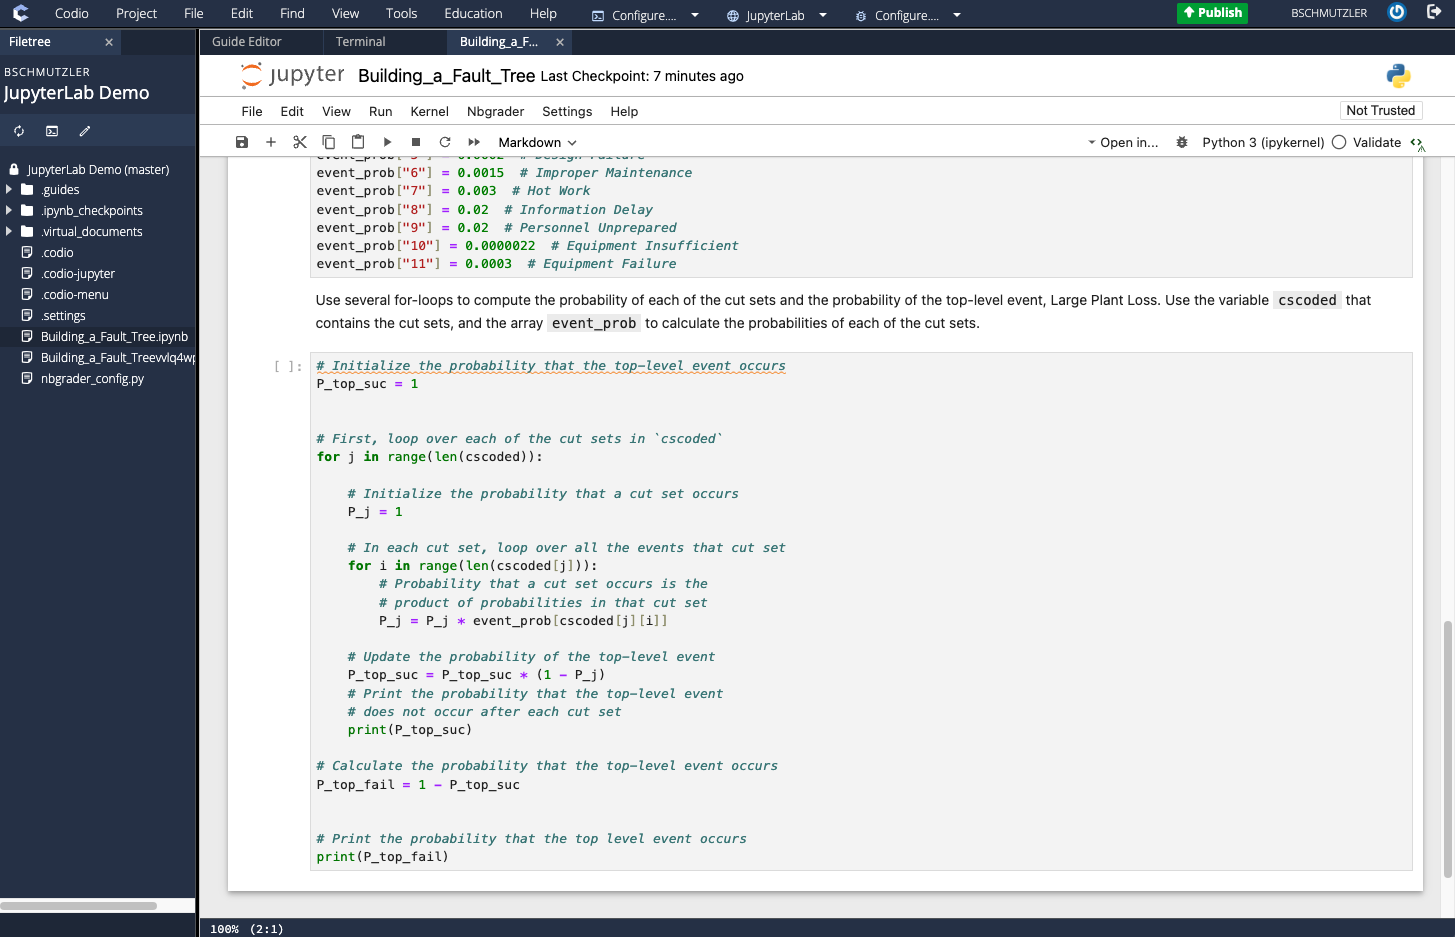
Consider the following Building_a_Fault_Tree.ipynb file in need of formatting:
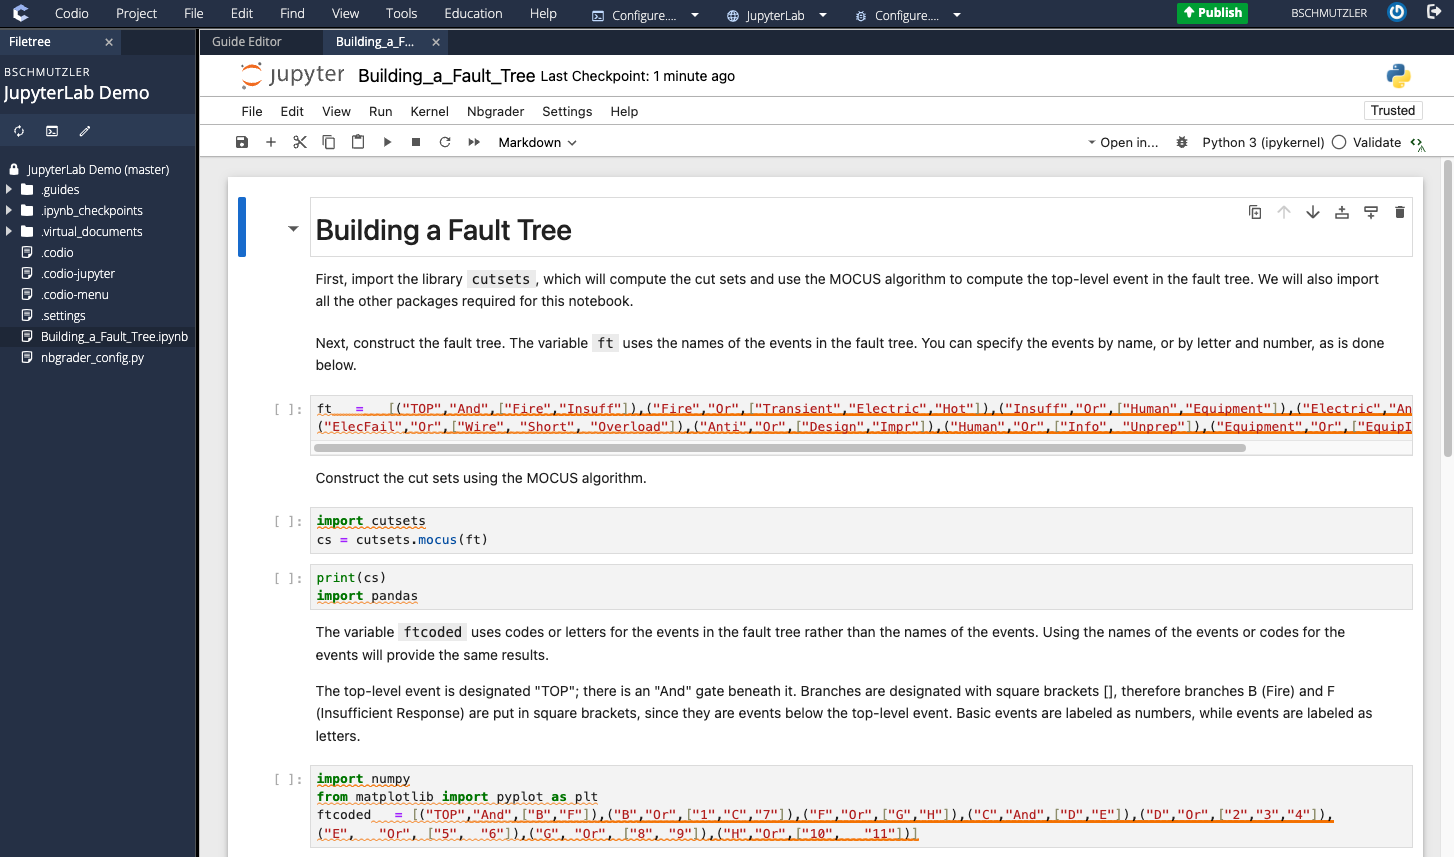
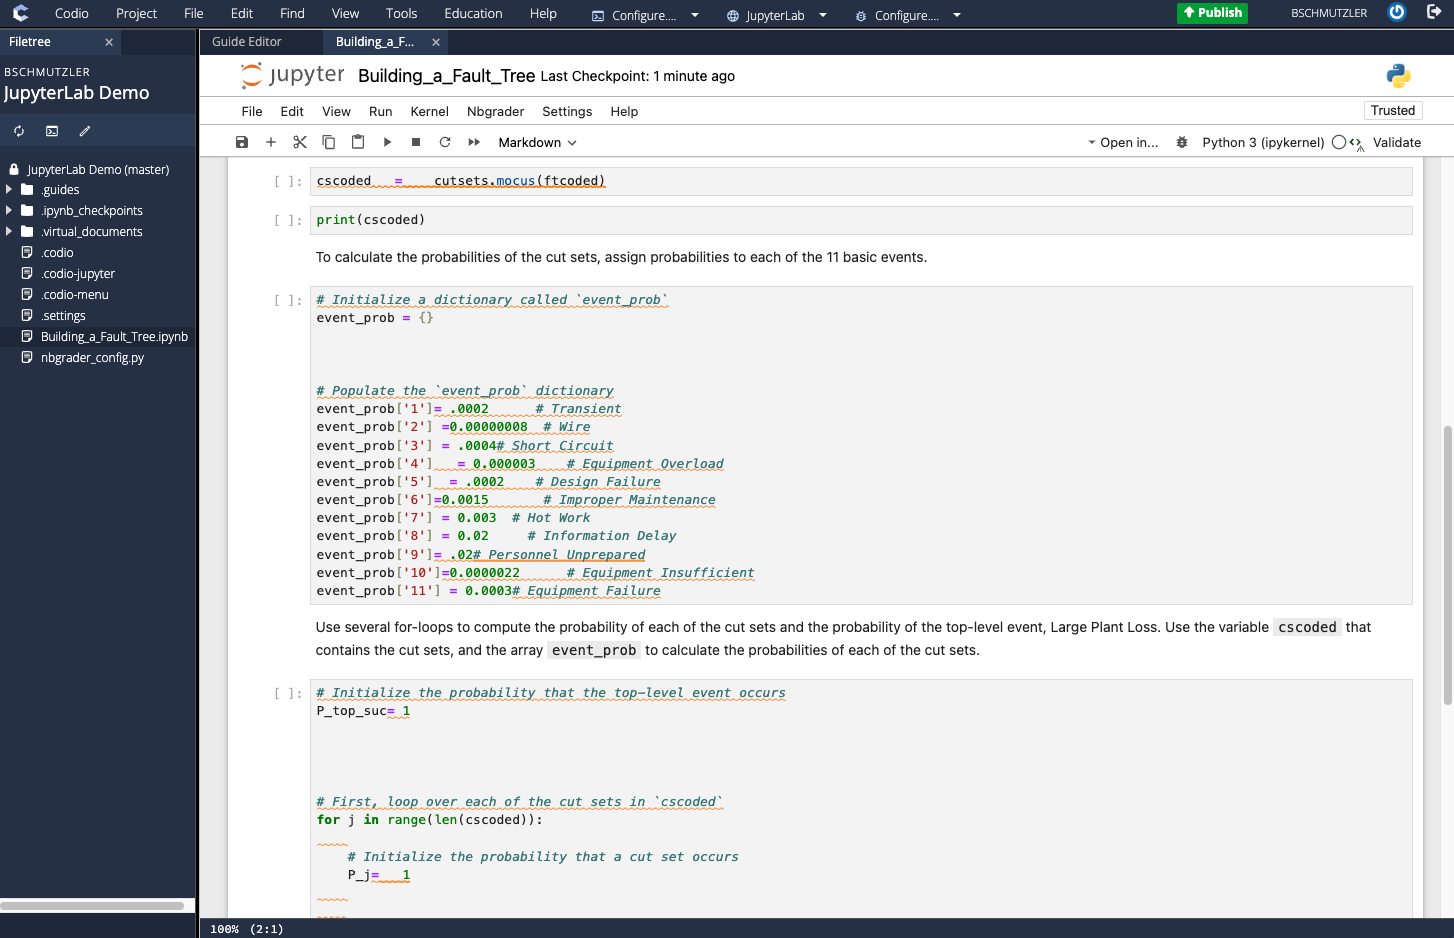
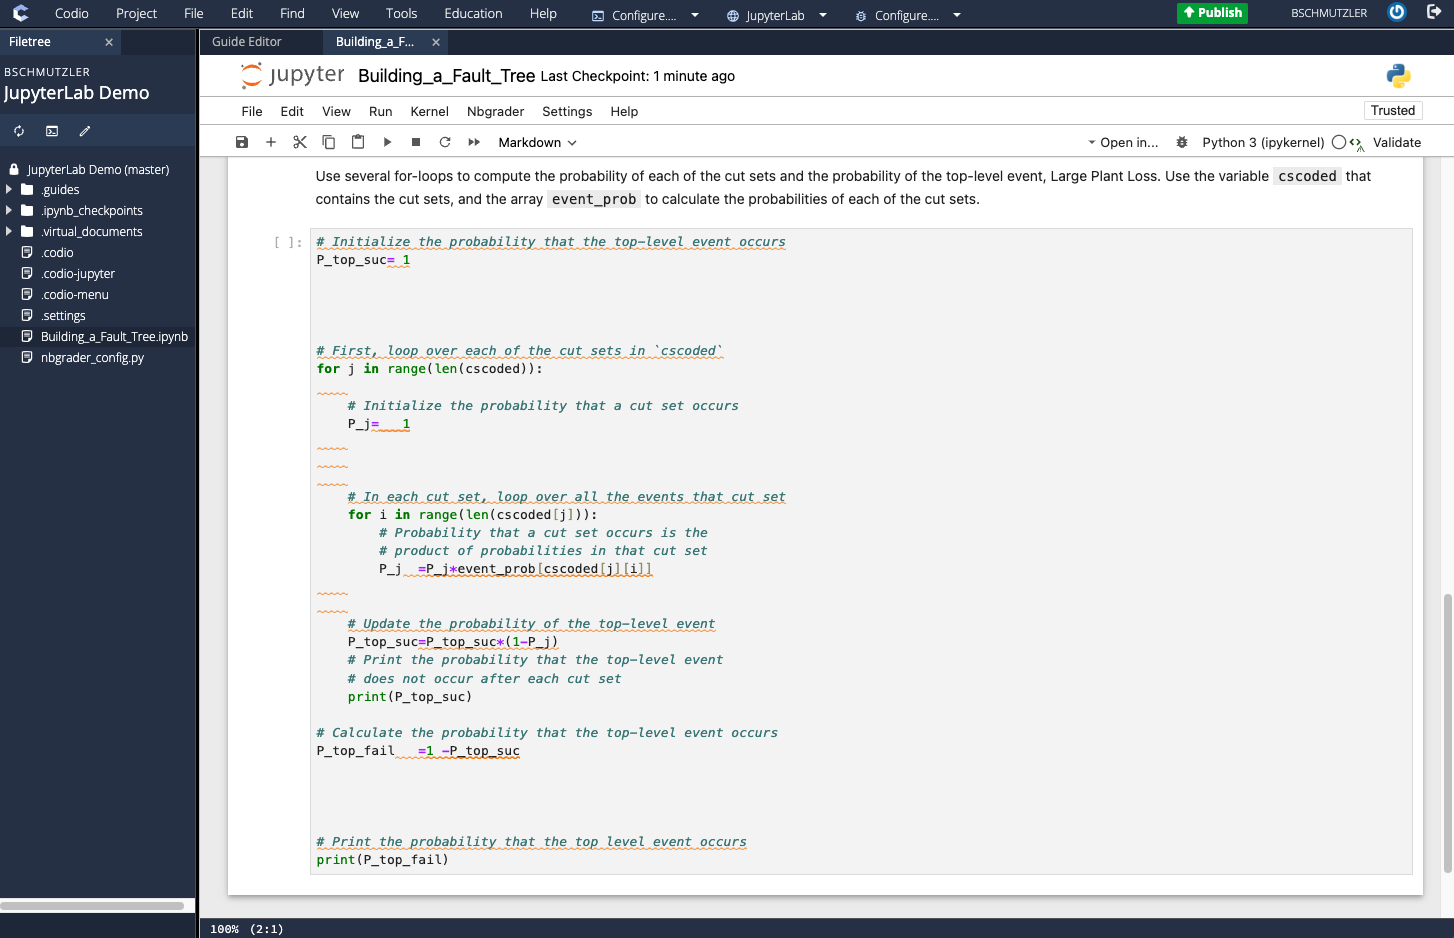
In the step-by-step procedure below, we will use this notebook to illustrate each step.
- Execute
nbqa isort notebook.ipynb --float-to-topto usenbqaandisortto sort all the import statements in your notebook and "float" them up to the first code cell (remove--float-to-topto keep all the import statements in their original code cells)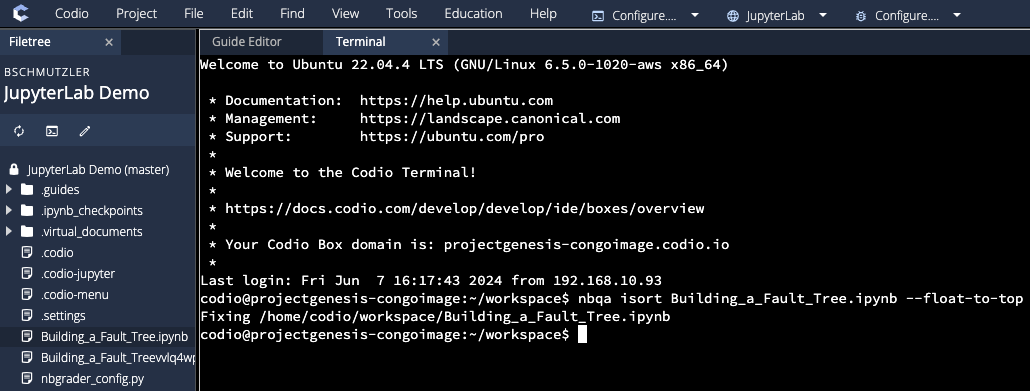
- Execute
nbqa black notebook.ipynbto format the notebook in the Black code style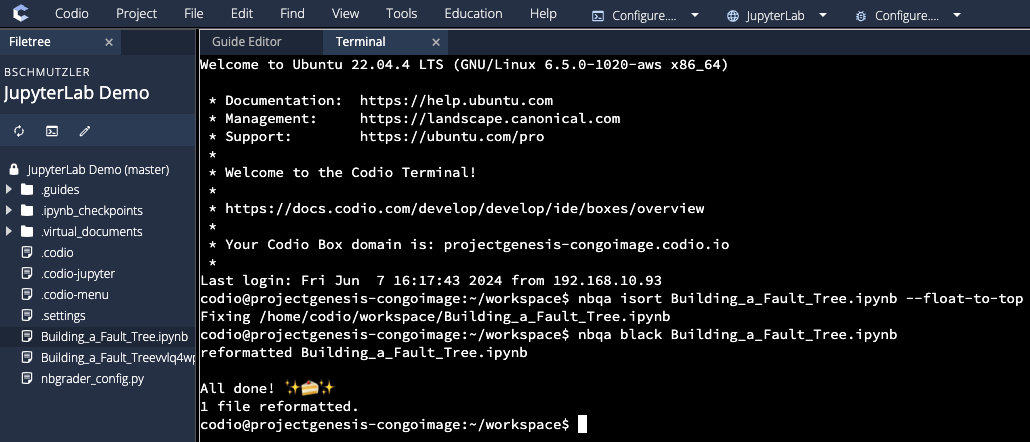
- Create a separate cell at the top of your notebook that only contains the import statements. Inspect the rest your reformatted notebook and make any further changes by hand (e.g., removing blank lines)
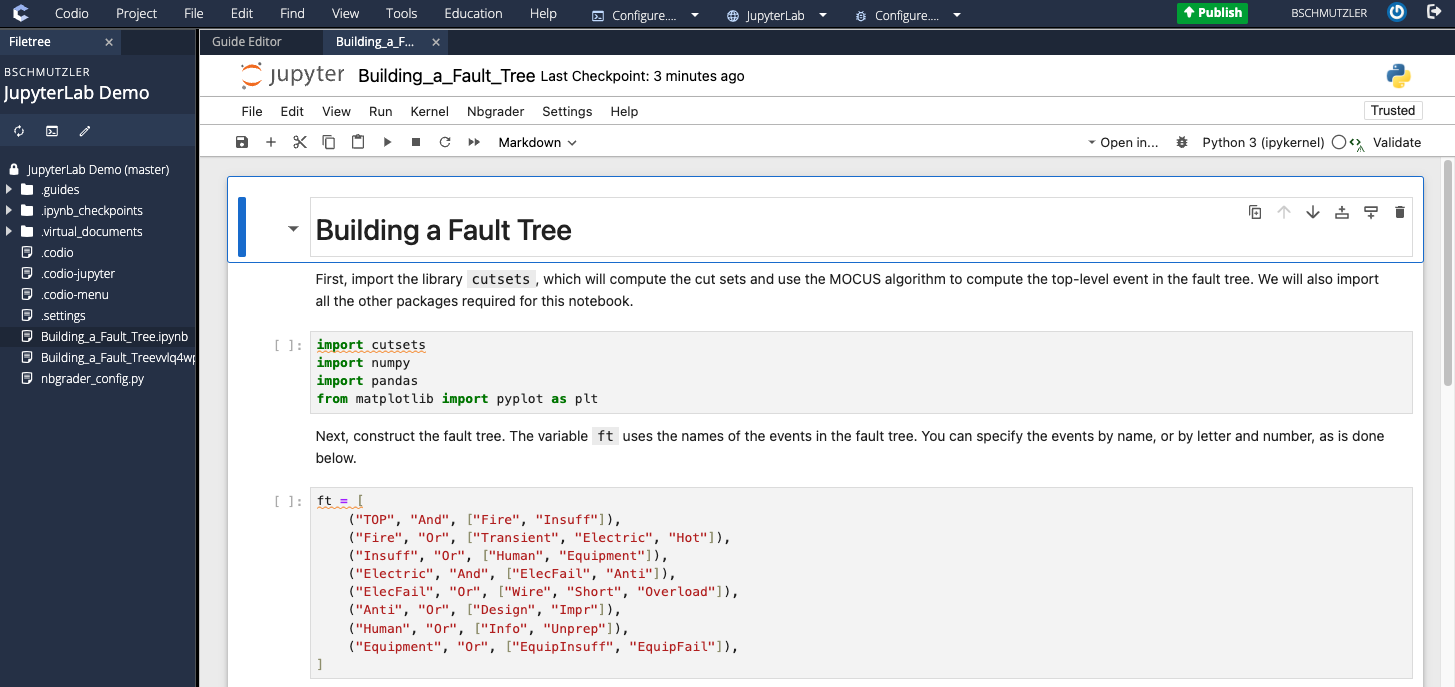
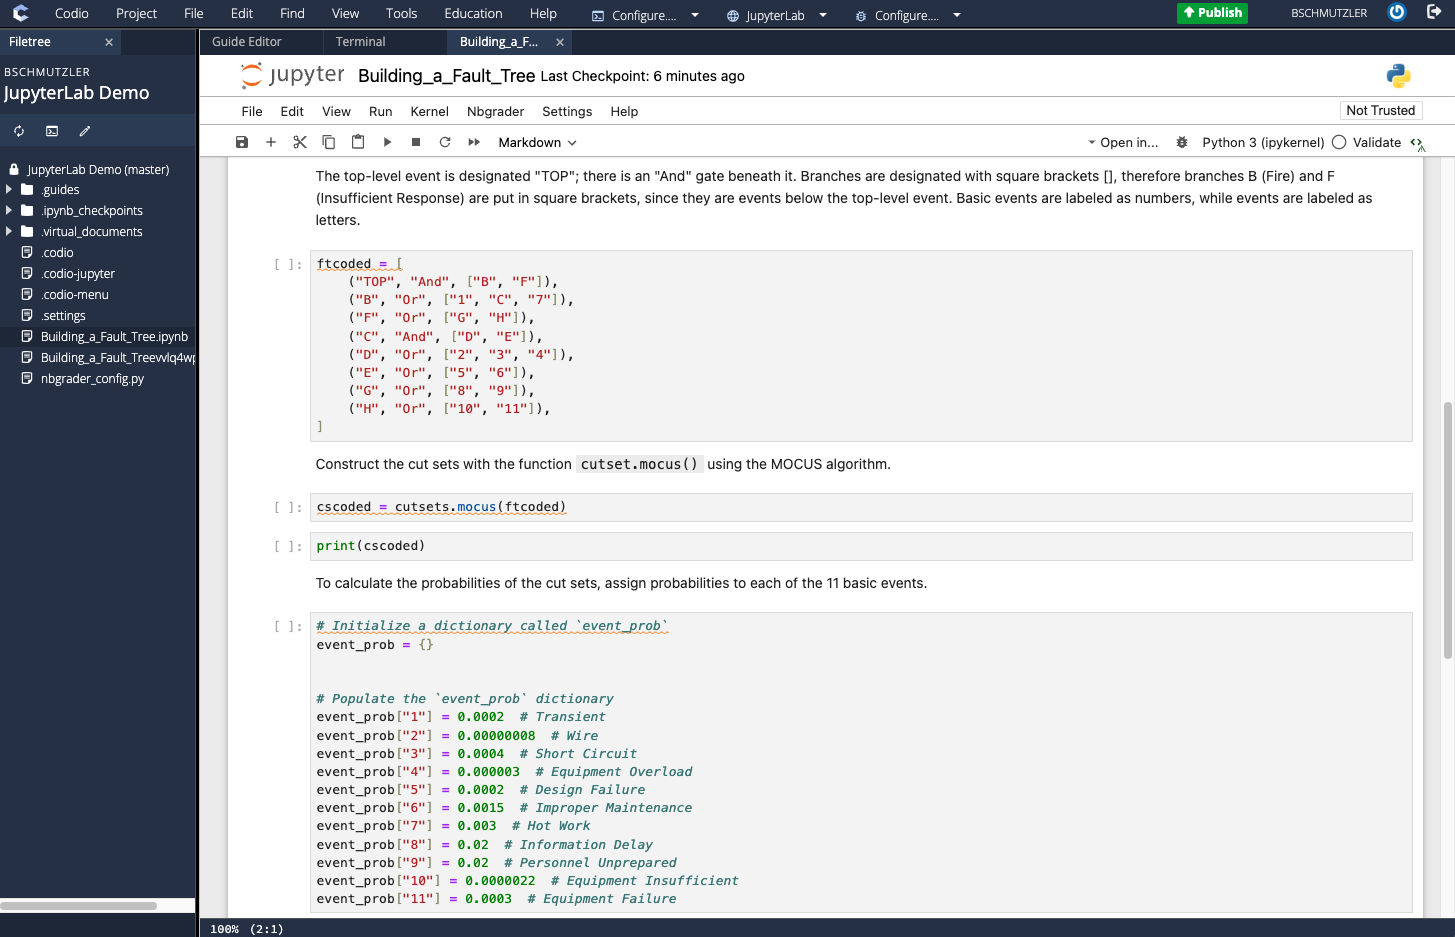
isort to sort import statements, use the inline magic comment # isort:skip if you want isort to ignore certain lines. This is necessary when the order of import statements is critical.The steps below show an example where the path /home/codio/workspace/.modules must be appended before the from helper import * statement in order for the helper module to be found in the .modules folder. In this case, the inline magic comment # isort:skip tells isort to ignore the two lines whose order matters.
- Original import statement cell before applying
blackorisort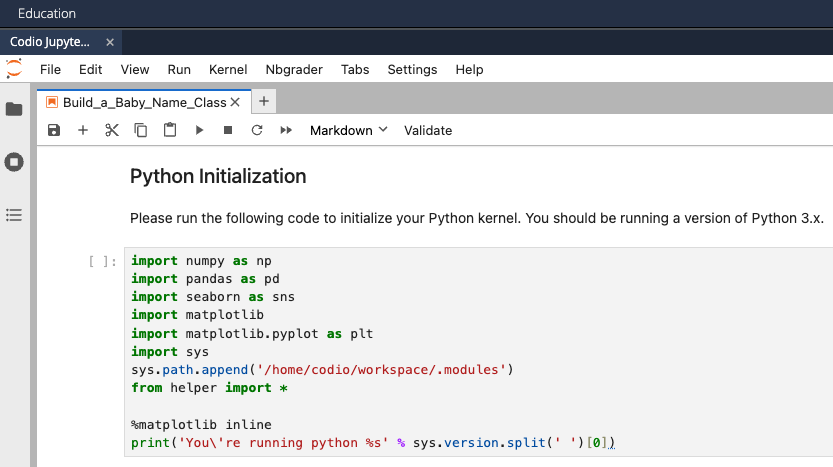
blackformats the code but does not change order of imports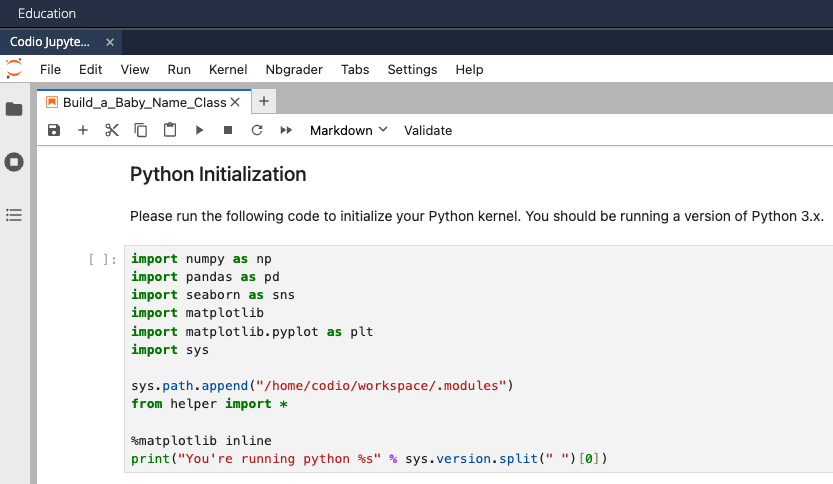
isortchanges the order of import statements and breaksfrom helper import *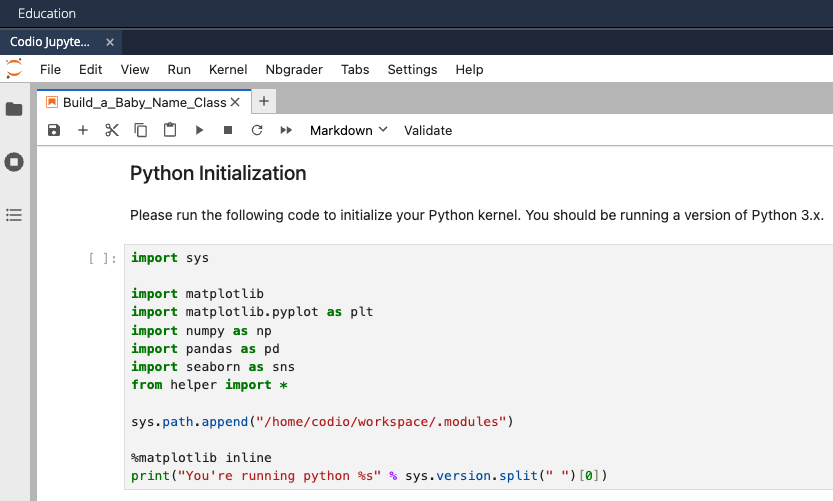
- Manually correcting and rerunning
isortwith# isort:skippreserves the necessary order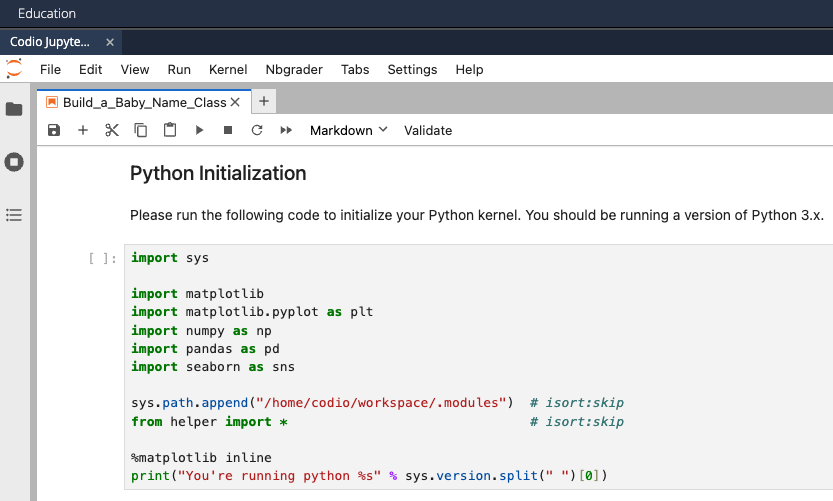
- Rerunning
blackonly changes horizontal spacing of second# isort:skipcomment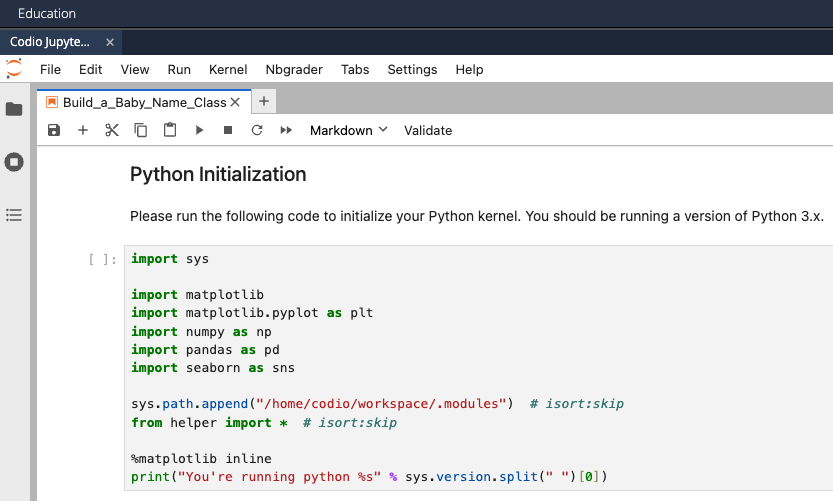
R
In this section, we walk through the process of automatically formatting R code using styler and jupytext.
Installation
To install the styler package:
- Open a terminal in Codio by selecting Tools > Terminal from the top menu
- At the
~/workspace$prompt, executeRto start an R session - At the
>prompt, executeinstall.packages("styler")
styler package is bundled with the tidyverse collection, so install.packages("tidyverse") would also install styler (along with many other R packages).If you want to format R code in a Jupyter Notebook, install Jupytext:
- Open a terminal in Codio by selecting Tools > Terminal from the top menu
- At the
~/workspace$prompt, executepip install --upgrade pipto upgradepip - At the
~/workspace$prompt, executepip install jupytext
Usage
You can use the R library styler to quickly format R code according to the tidyverse style guide. To get started, you can format R code from an R console:
# Style .qmd, .R, .Rmd, .Rmarkdown, .Rnw, and .Rprofile files
> style_file("file_name")

# Style all files in a directory
> style_dir("directory_path")

# Style all source files of an R package
> style_package("package_name")
Configuration
You can use the magic comments # style: off and # style: on to tell styler skip parts of your code, as described in the documentation on ignoring certain lines. You can also control the level of invasiveness and set various configuration options (e.g., number of spaces to indent), but the defaults should be good for general use.
Example
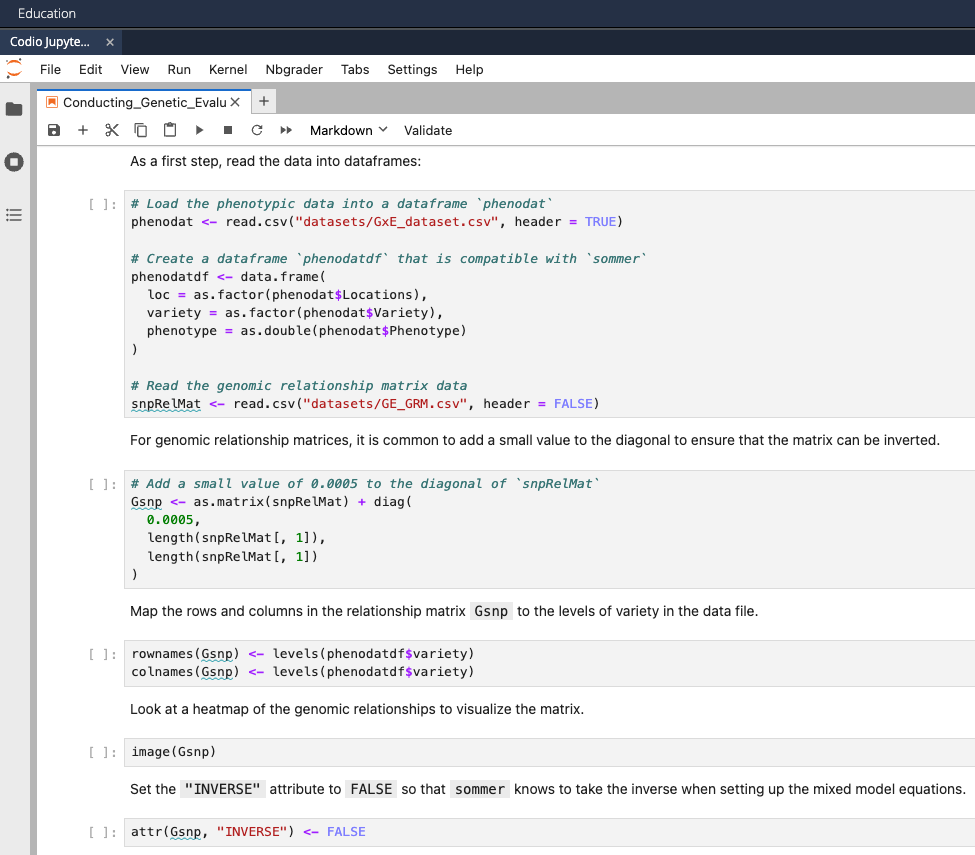
Jupytext and styler can be used together to format R code in a Jupyter Notebook.
jupytext commands that you could use with the styler package, much like jupytext and JuliaFormatter.Consider the following notebook with R code in need of reformatting:
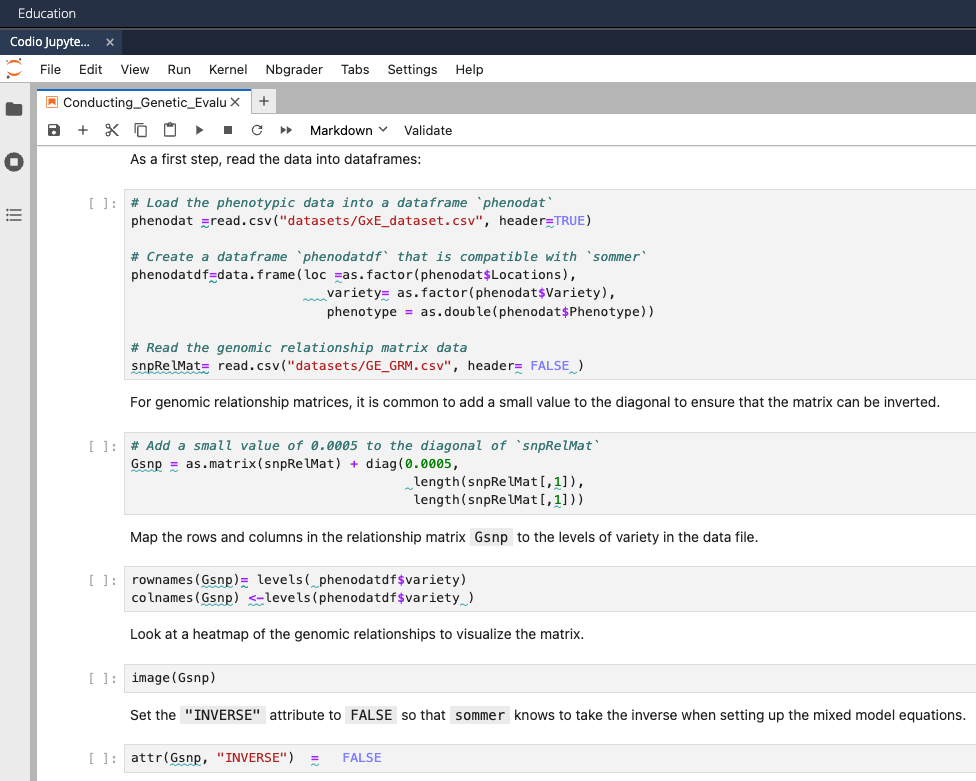
- In Preview mode, pair your
notebook.ipynbwith an R Markdown file by going to the the JupyterLab menu and selecting File > Jupytext > Pair Notebook with R Markdown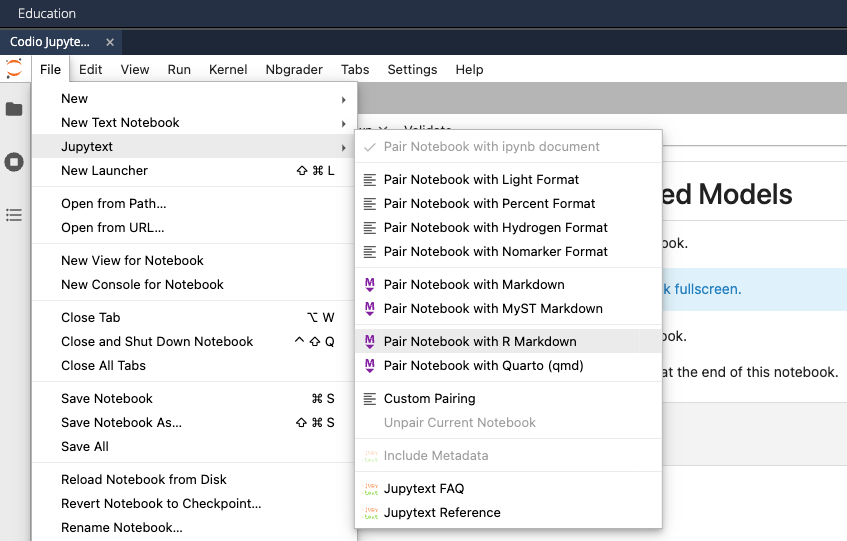
- Pairing
notebook.ipynbcreates anotebook.Rmdfile that is synchronized withnotebook.ipynb(any changes to one file be automatically propagated to the other)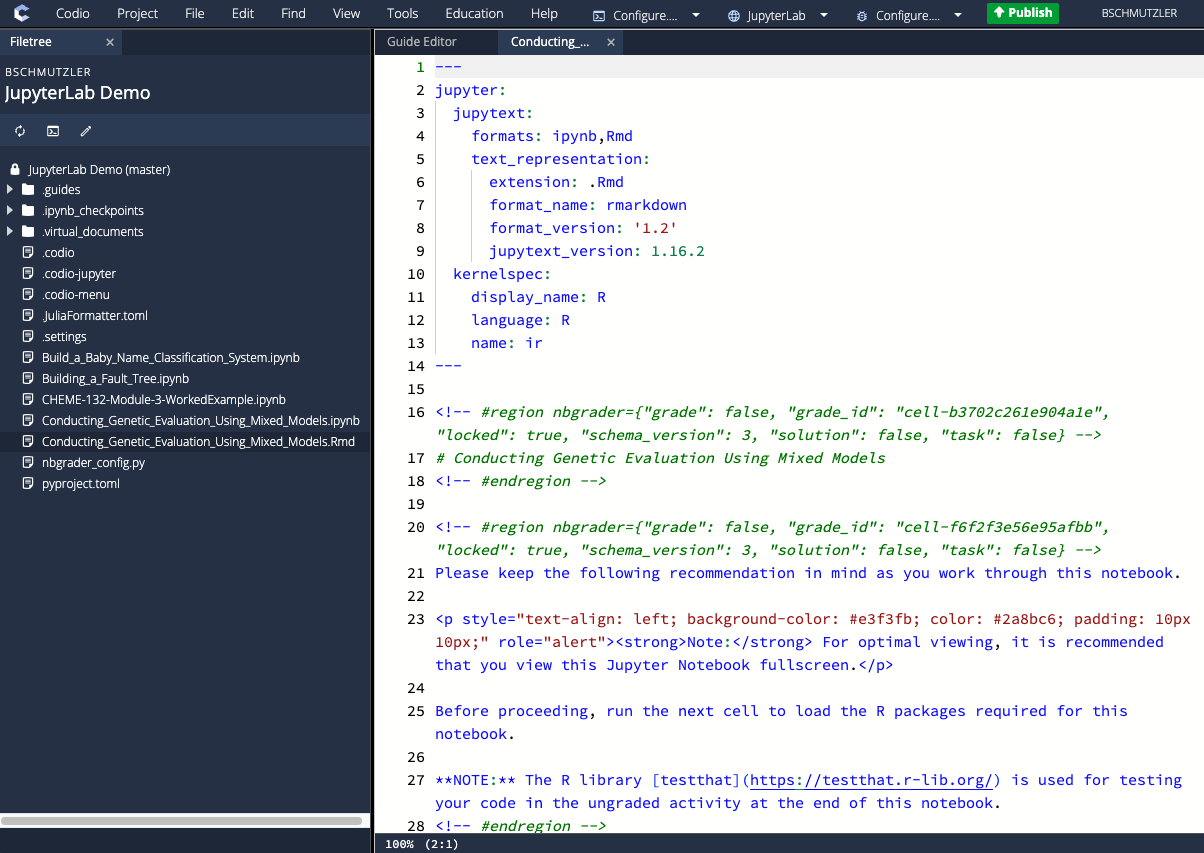
- Open a terminal and use
stylerto reformat thenotebook.Rmdfile with the following commands:$ R> library(styler)> style_file("notebook.Rmd")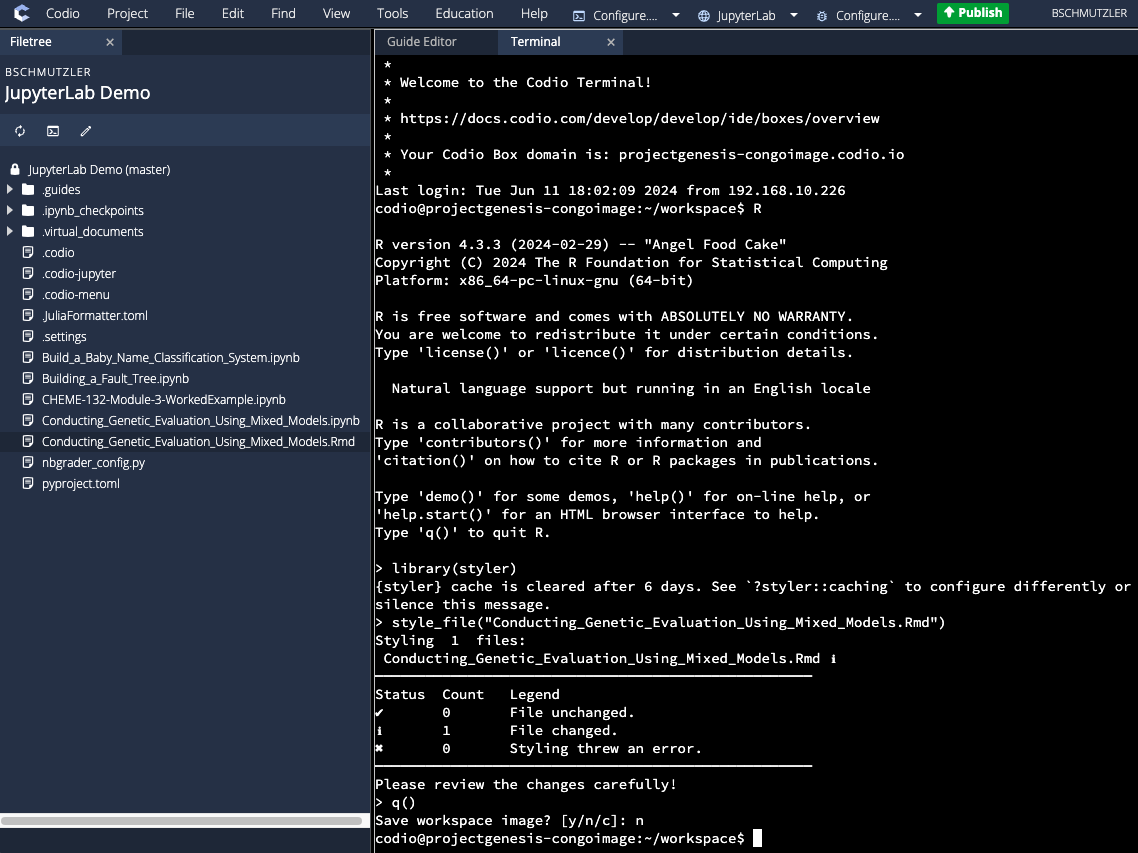
- In Preview mode, review the synchronized changes in
notebook.ipynb