Table of Contents
Using the JupyterLab Starter Pack
Updated
by Brock Schmutzler
JupyterLab is an open-source interactive development environment (created by Project Jupyter) that provides a next-generation Jupyter Notebook interface. To name a few improvements, JupyterLab has a new internal API, an accessible extension ecosystem, an integrated file tree and terminal, and a built-in table of contents for navigating Jupyter Notebooks (instead of having to install an extension). Overall, JupyterLab is very pleasant to use and the same kernels you would need for Jupyter Notebooks work agnostically with JupyterLab.
Creating Codio Assignments
The easiest way to create a Codio assignment with a JupyterLab environment is to use eCornell's JupyterLab Starter Pack because it has "starter files" pre-loaded in Codio's workspace, in addition to running eCornell's JupyterLab and RStudio stack called Ubuntu 22.04 + JupyterLab + RStudio (built from the Codio-certified JupyterLab stack for Ubuntu 22.04 LTS). The JupyterLab and RStudio stack includes several Python packages (e.g., numpy, pandas, seaborn) and R packages (e.g., ggplot2, tidyverse) that are commonly used for data science projects. The JupyterLab Starter Pack files are stored in /home/codio/workspace, whereas the JupyterLab stack is saved at the /home/codio level.
To use eCornell's JupyterLab Starter Pack, add a new Codio assignment by following these steps:
- Select Add assignment > New

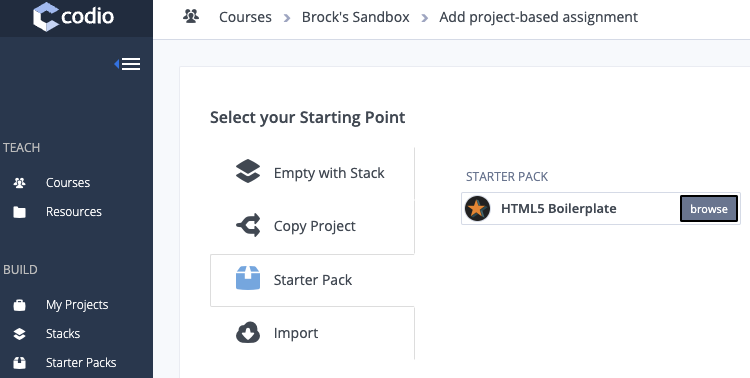
- Select the Starter Pack option as your starting point and then click browse
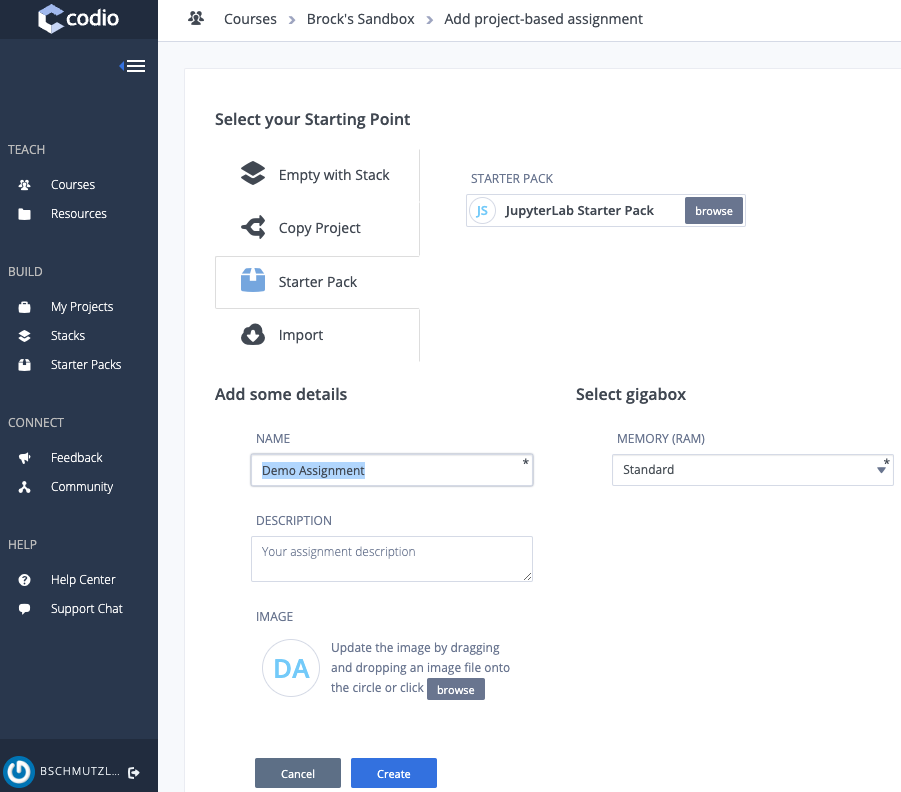
- Search All starter packs for "JupyterLab Starter Pack"

- Change your assignment name appropriately and then click Create
Editing Codio Assignments
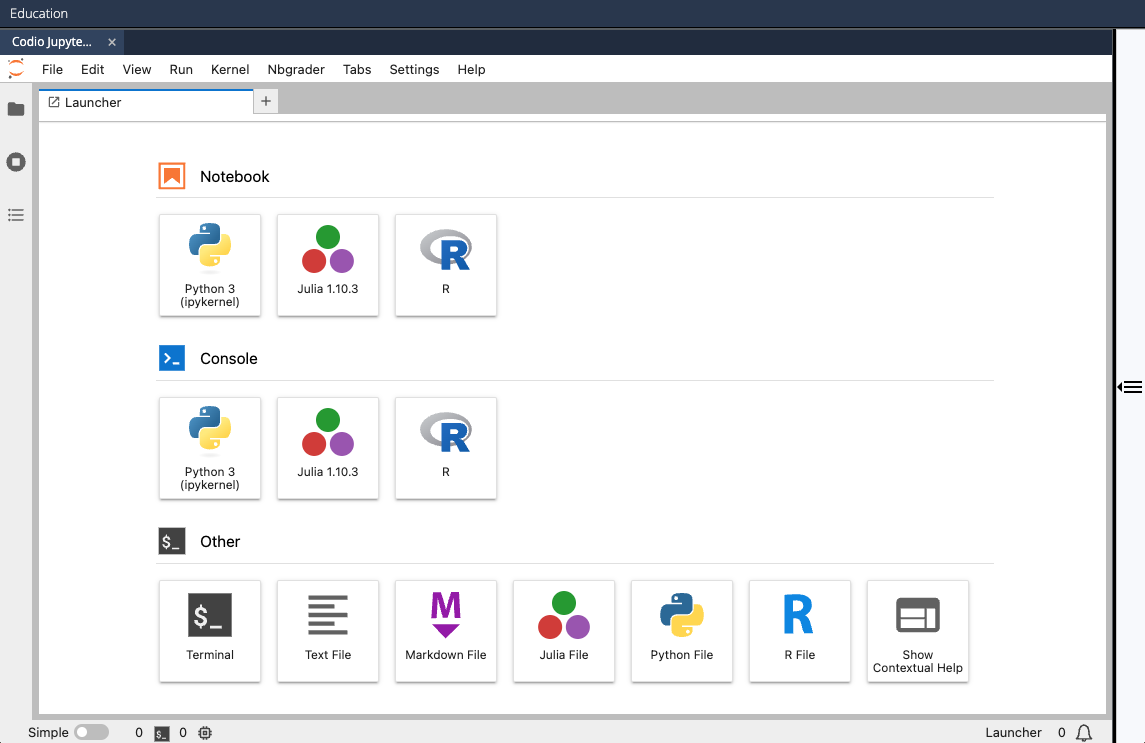
After creating a new assignment, you will be taken to a screen that looks something like this:
To edit an assignment:
- Click the right sidebar to expand the collapsed Guide page
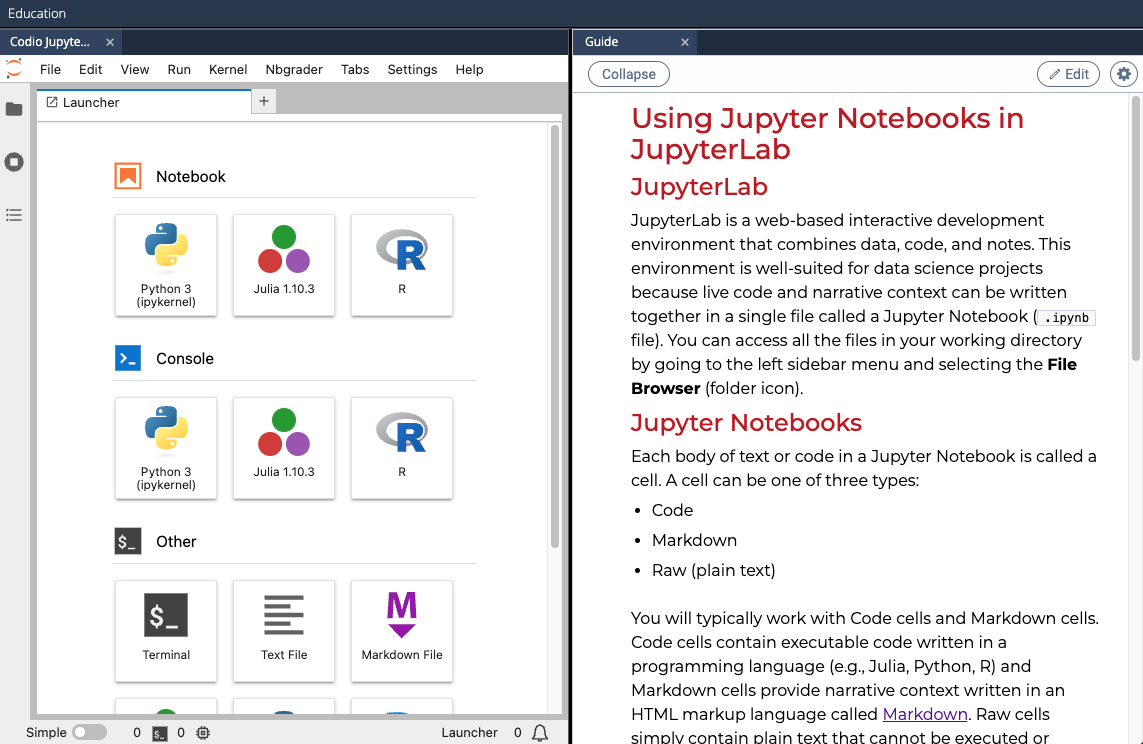
- Click Edit (upper right) to enter the Codio workspace
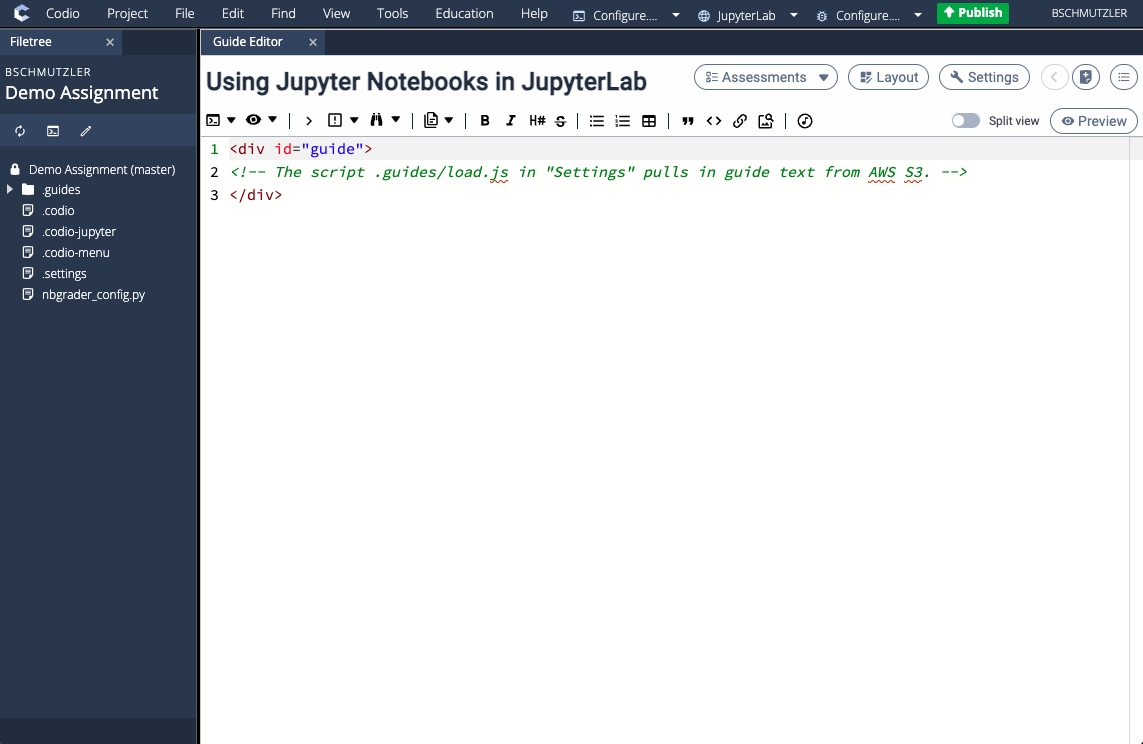
- Make your changes and then click Publish in the top Codio menu bar (if the green Publish button is available) or select Education > Publish Assignment from the Codio menu
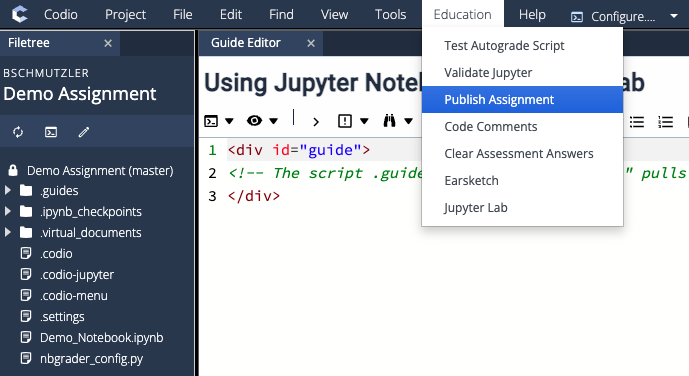
.codio-jupyter file is in the Codio workspace but there is no Jupyter Notebook (i.e., notebook.ipynb file) in the workspace, you will receive a publishing error because the presence of .codio-jupyter tells Codio to expect a Jupyter Notebook when publishing the assignment.Adding Jupyter Notebooks
To add a Jupyter Notebook to your Codio workspace:
- Drag and drop your Jupyter Notebook (e.g.,
Demo_Notebook.ipynbfile) into the workspace directory of the Filetree on the left side of your screen, or you can right-click the assignment name (e.g., Demo Assignment) and select Upload...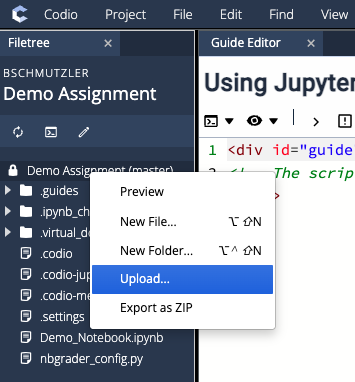
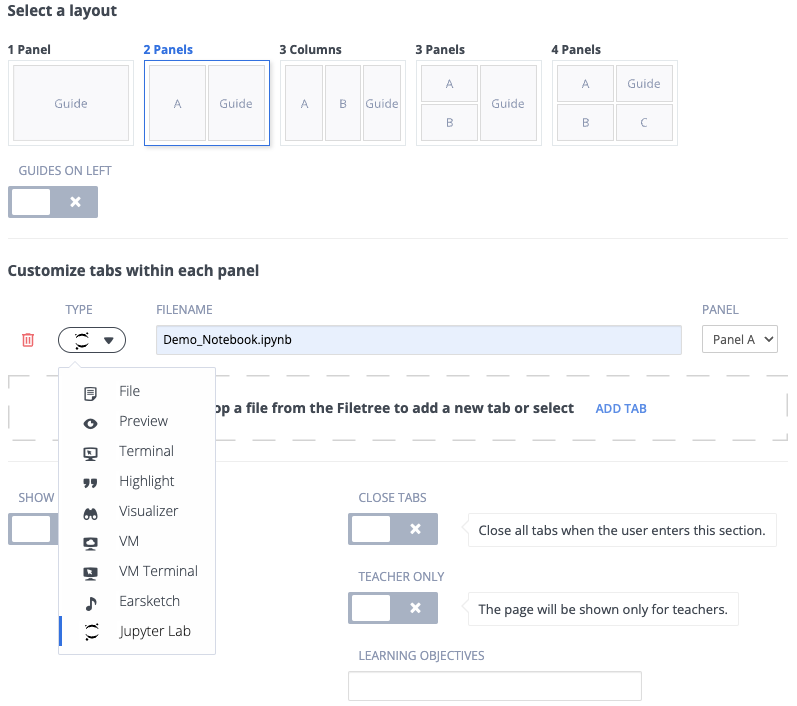
- Click the Layout button in the upper-right corner of the Guide Editor and put the name of your Jupyter Notebook file (e.g.,
Demo_Notebook.ipynbfile) in the FILENAME field of Jupyter Lab tab in the Open Tabs section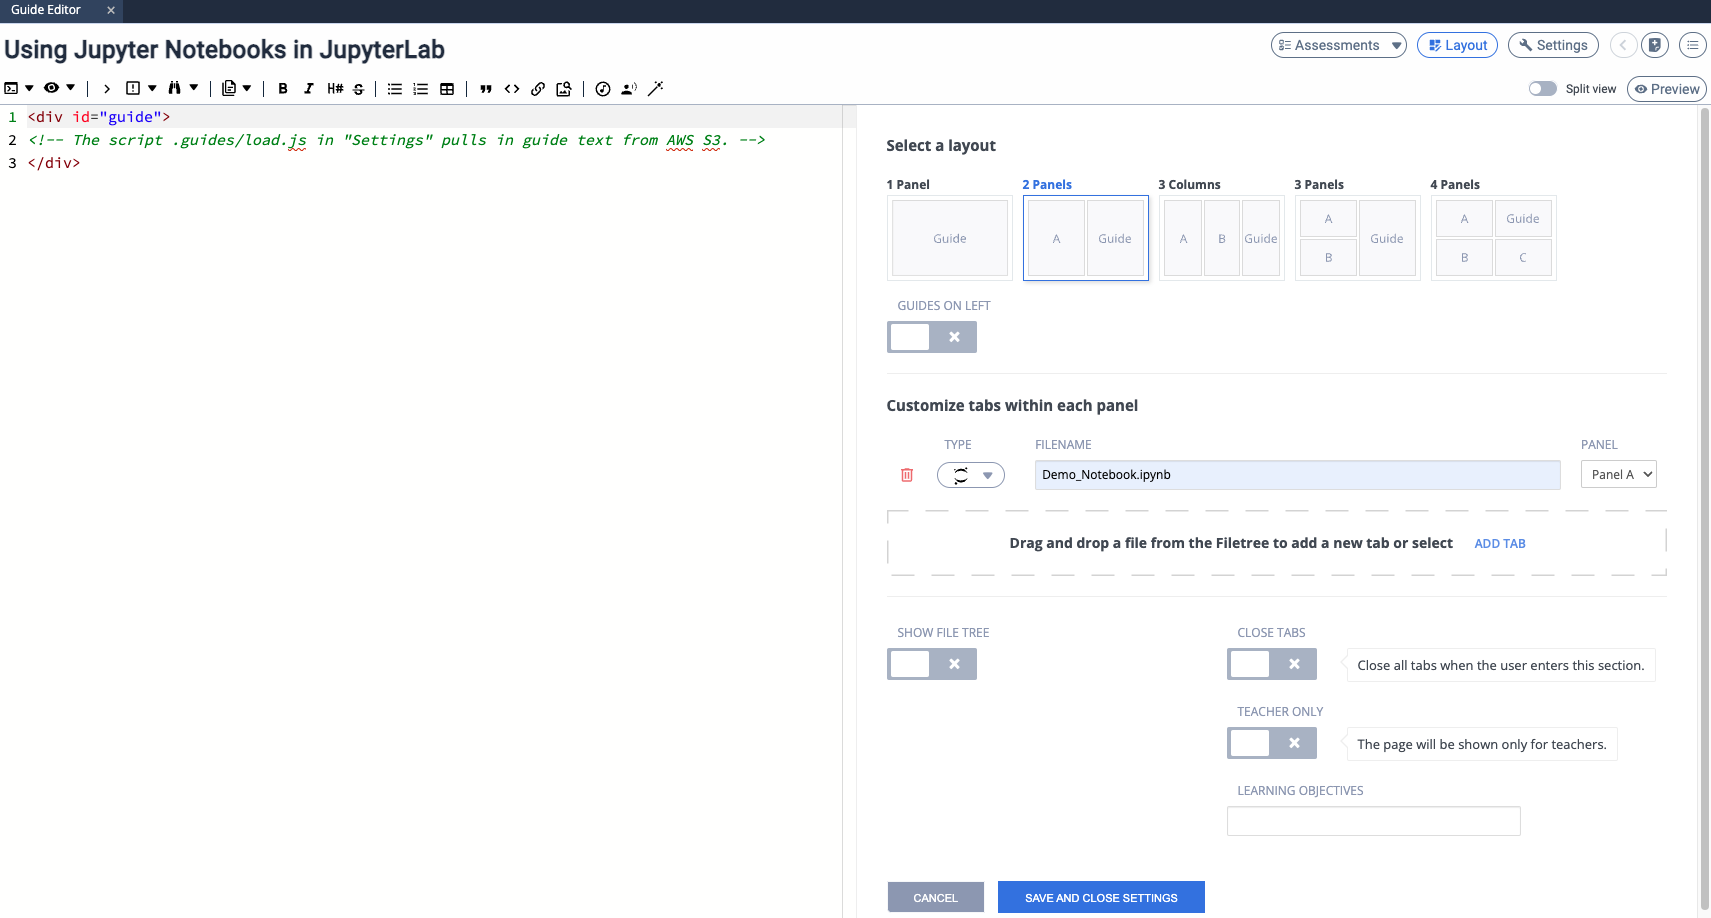
- Click SAVE AND CLOSE SETTINGS
Creating New Stacks
When you create an assignment using eCornell's JupyterLab Starter Pack, the assignment comes with an underlying software stack called Ubuntu 22.04 + JupyterLab + RStudio. Since each series of courses should have its own stack, it is important to create a new stack for your courses by following the steps below.
Before reading the steps below, please be advised of the following warning:
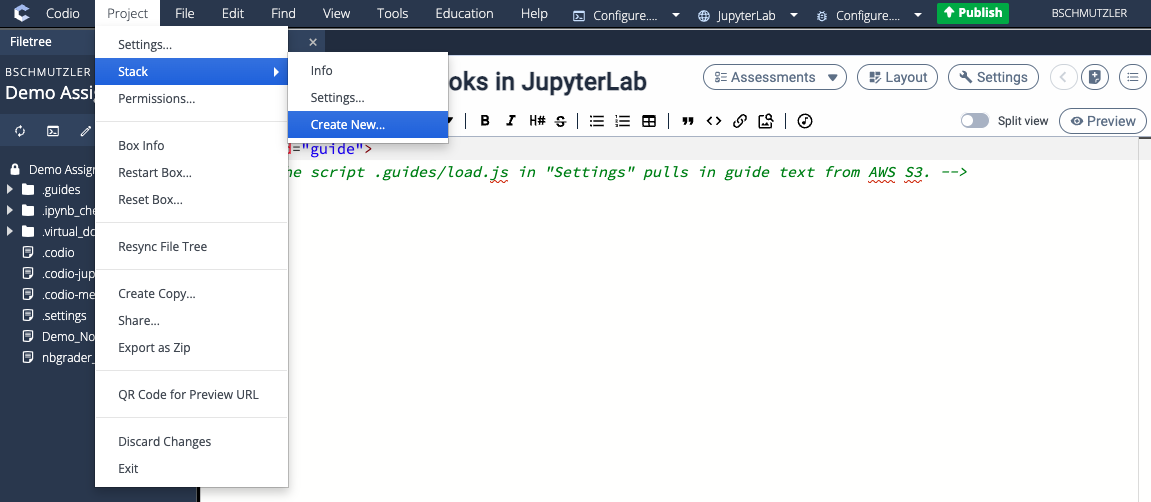
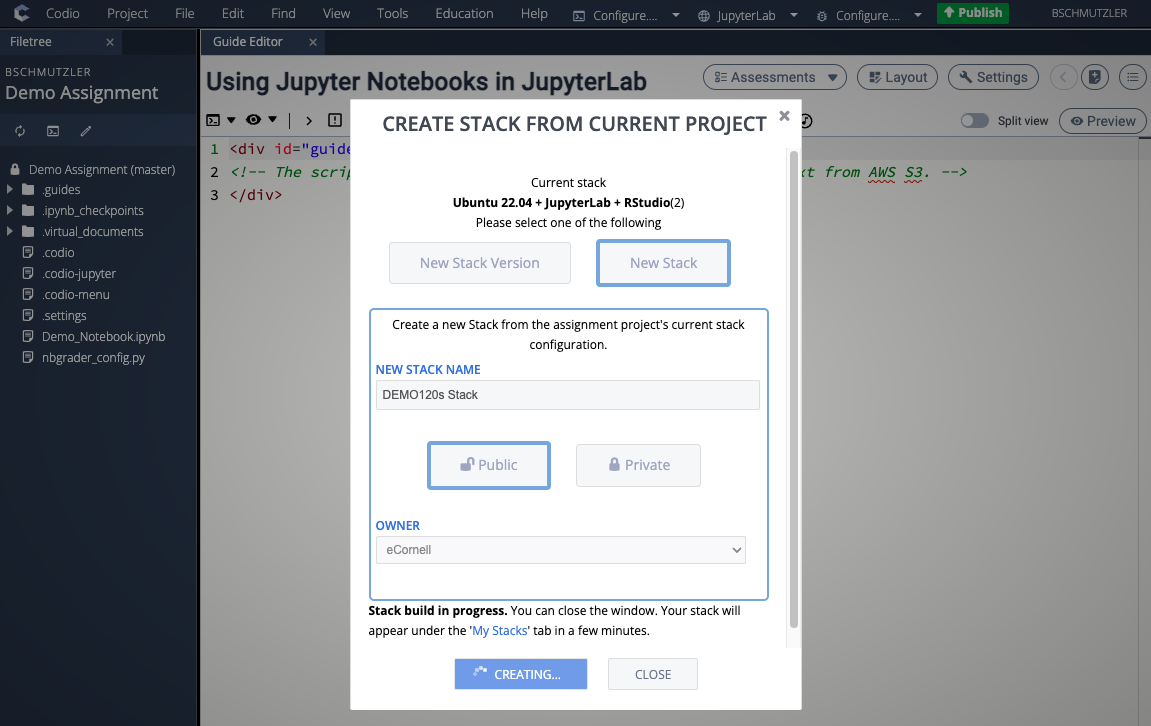
- Go to Project > Stack > Create New...
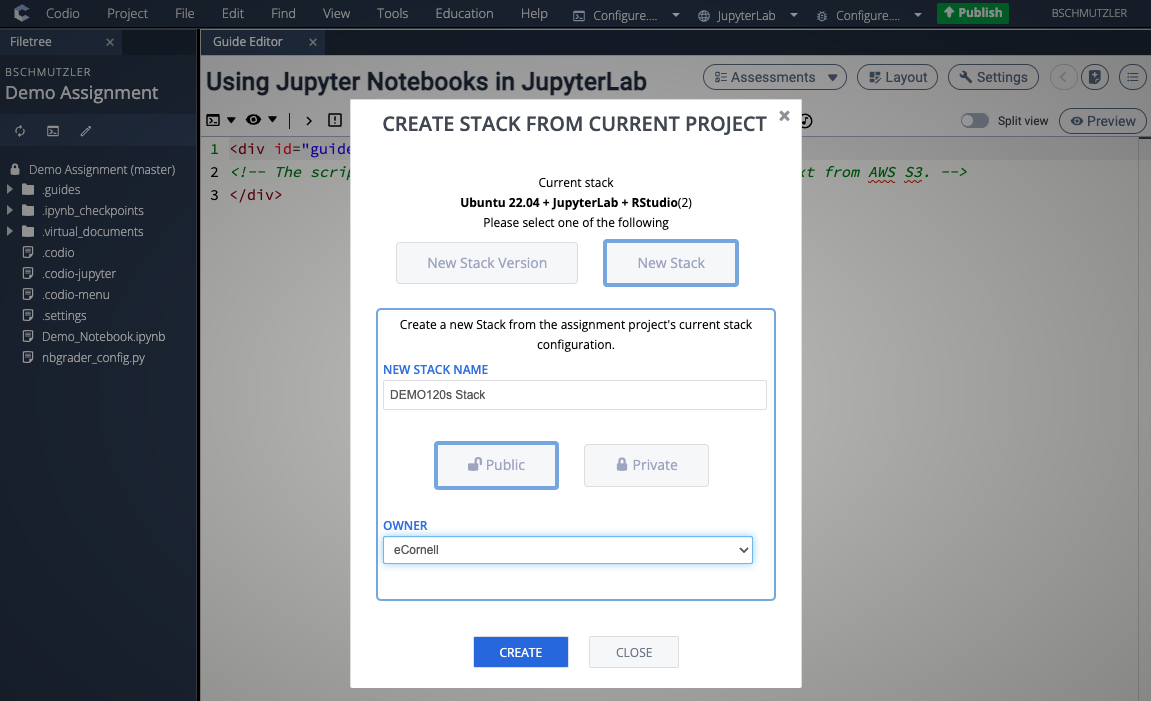
- Make sure New Stack is selected, give your stack a name that matches the series of courses (e.g., DEMO120s Stack), select Public, and make eCornell the owner
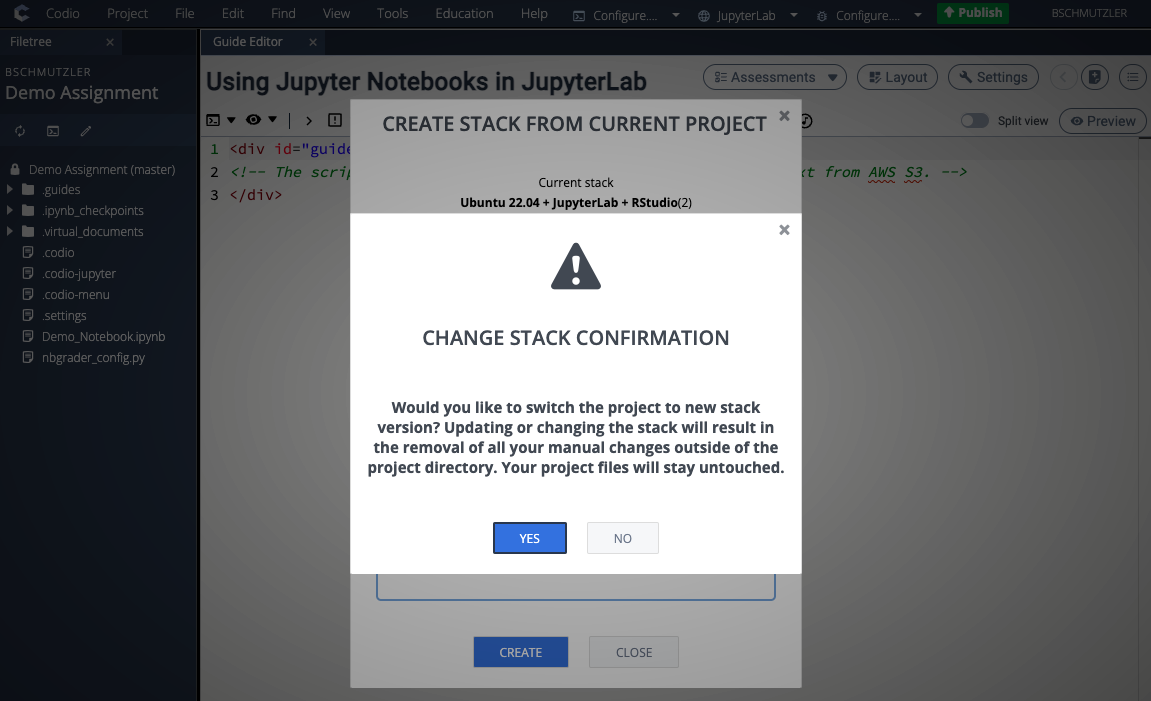
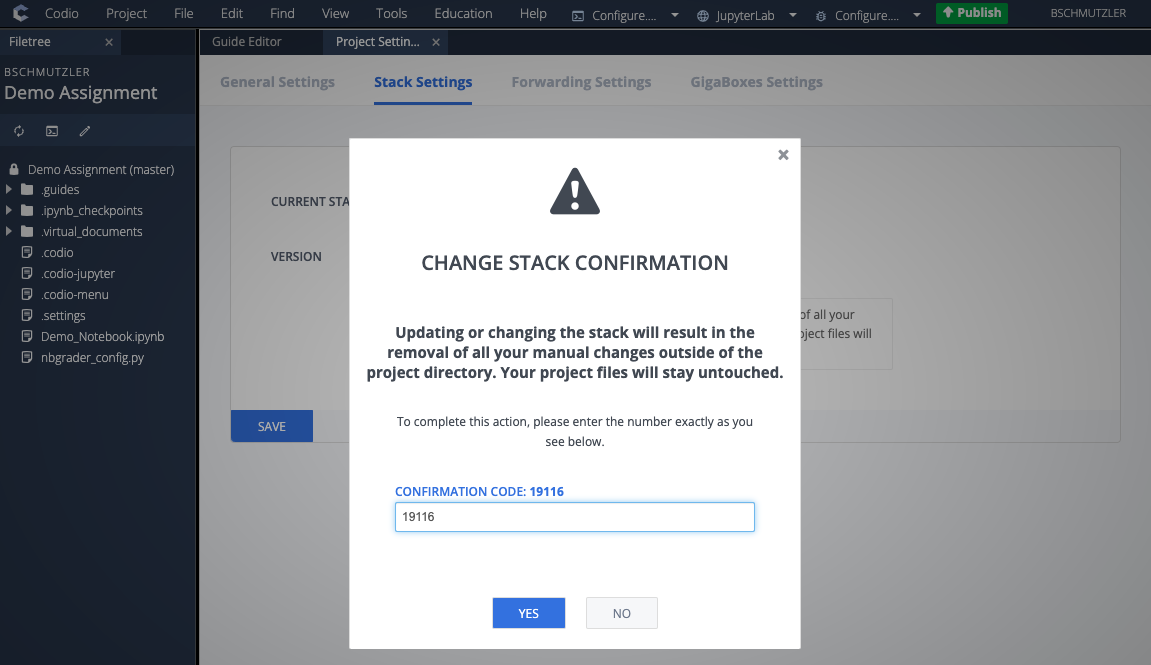
- Click CREATE and click YES when prompted with the CHANGE STACK CONFIRMATION dialog box. After clicking YES, you should see a message saying Stack build in progress. If you receive a strange error message, click CREATE again and the stack build should begin this time.
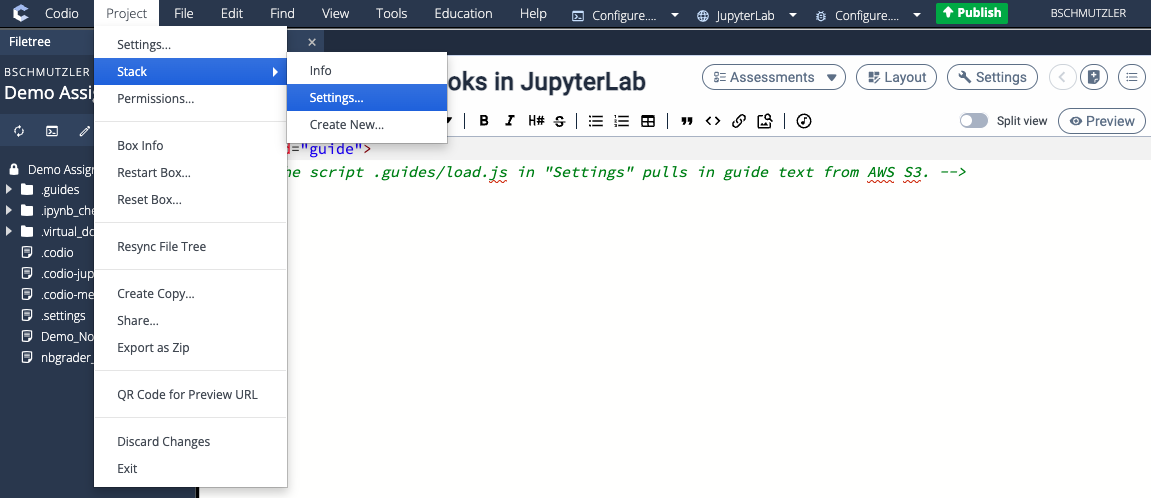
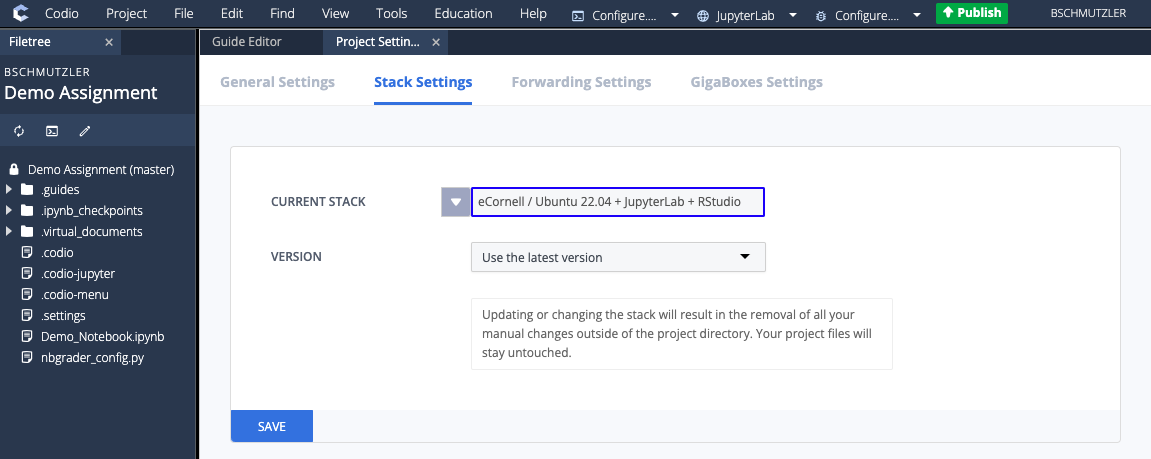
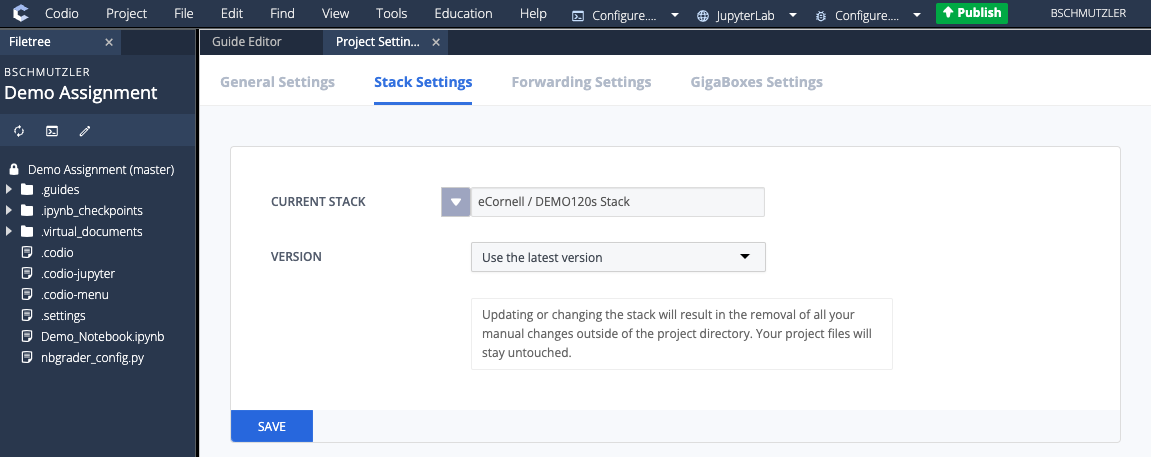
- After your stack has been created, go to Project > Stack > Settings... to make sure the assignment is using the new stack you created. If your new stack is the CURRENT STACK for your assignment, proceed to step 6. If the CURRENT STACK for your assignment is still Ubuntu 22.04 + JupyterLab + RStudio, complete step 5 before going to step 6.
- If the CURRENT STACK for your assignment is not the new stack you created, make sure you change the CURRENT STACK to your new stack before installing or updating any software. After changing the CURRENT STACK to your newly created stack, proceed to step 6.
- Click the drop-down menu to search for your new stack
- Search for your new stack (e.g., DEMO120s Stack)
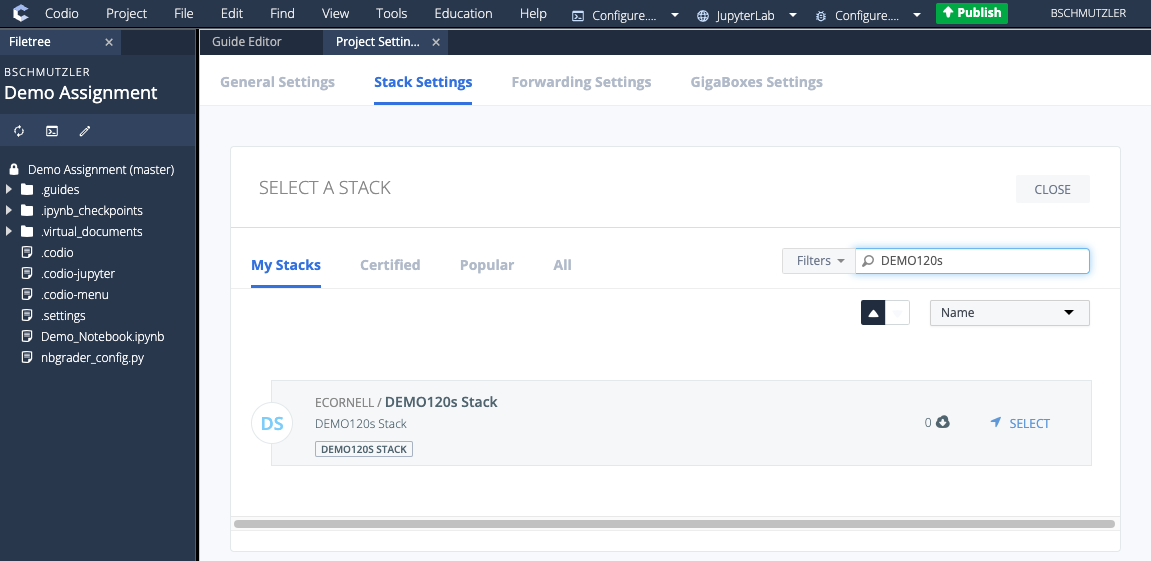
- Select your new stack (e.g., DEMO120s Stack) and click SAVE
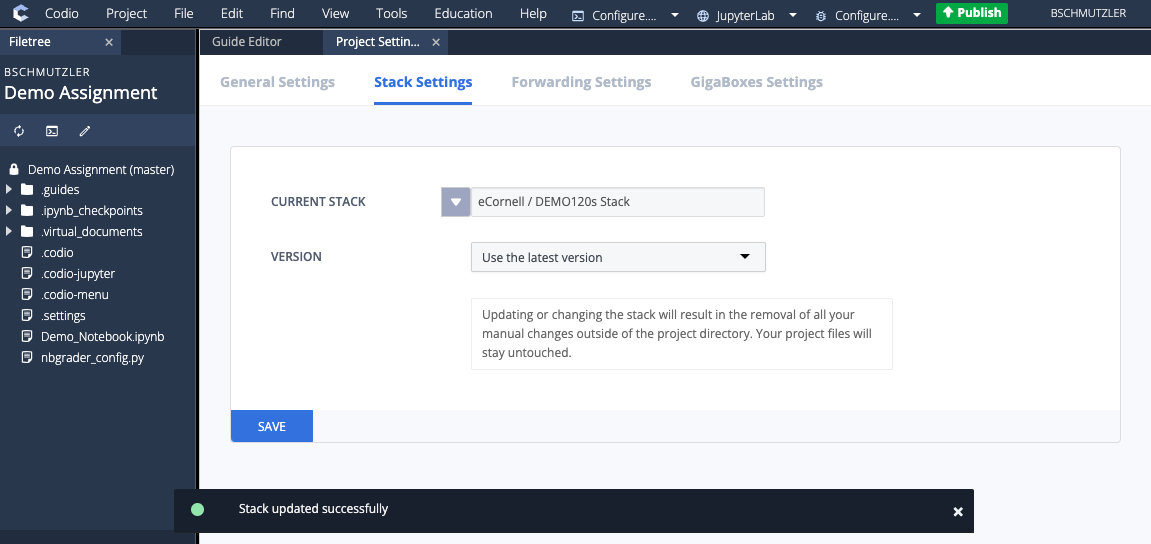
- Confirm the stack change by entering the confirmation code in the CHANGE STACK CONFIRMATION dialog box and reload your browser after you receive a message saying Stack updated successfully
- Click the drop-down menu to search for your new stack
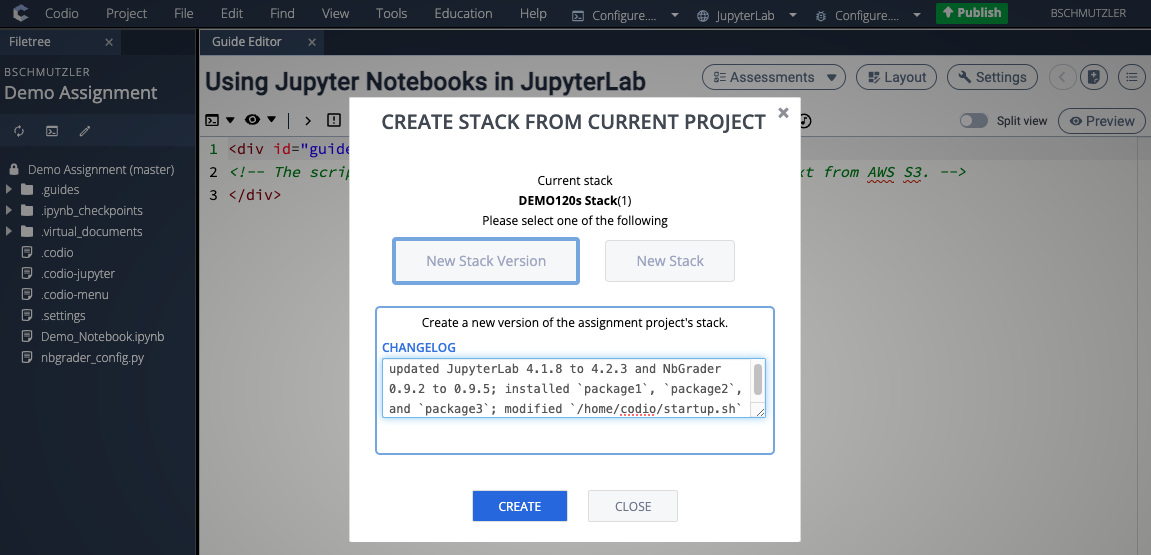
- Update and/or install software on your new stack and then create a new version by going to Project > Stack > Create New... and selecting New Stack Version. Make sure to write a concise and descriptive CHANGELOG entry.
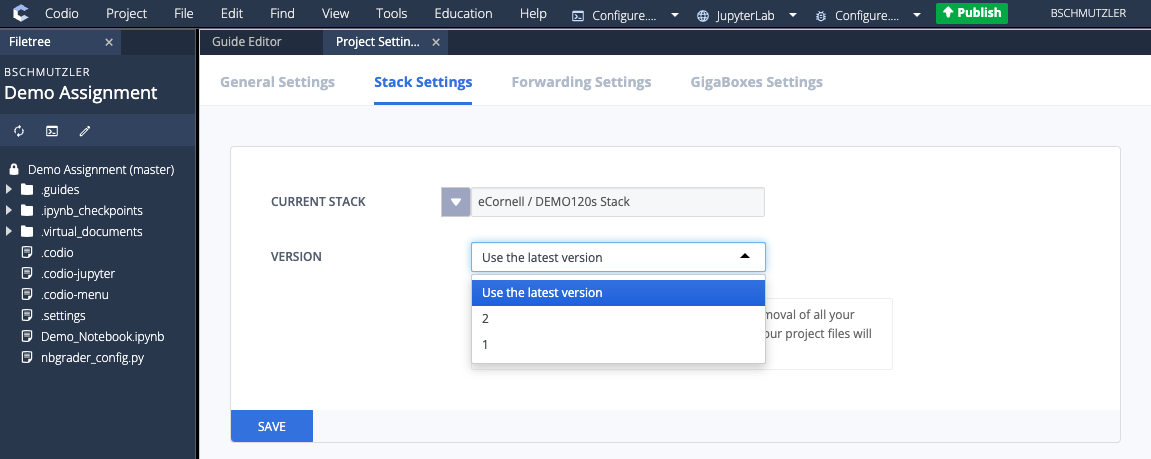
- Go to Project > Stack > Settings... to confirm that a new stack version has been created and make sure that VERSION is set to Use the latest version
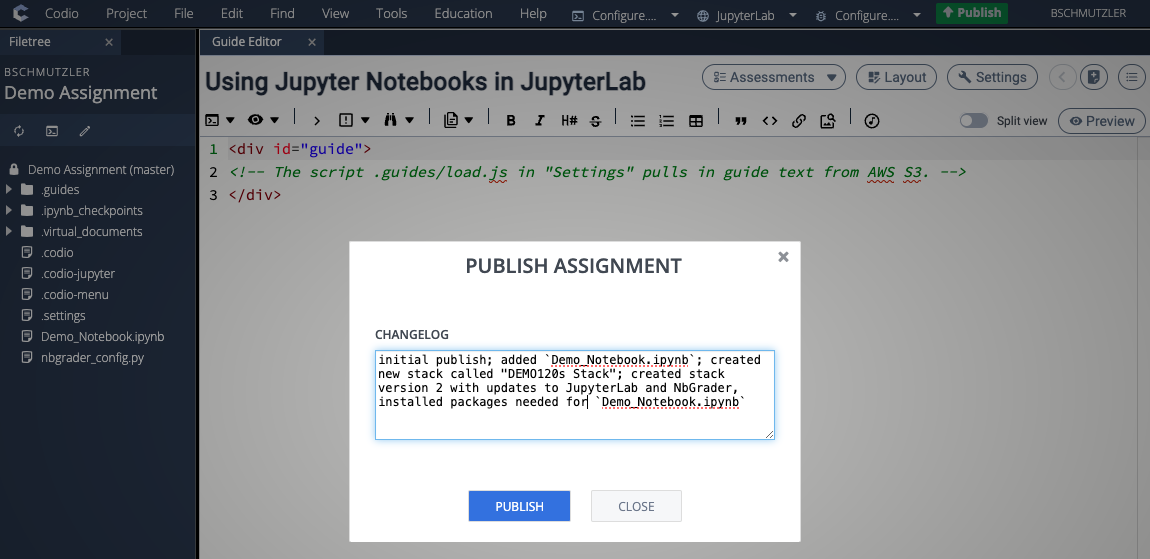
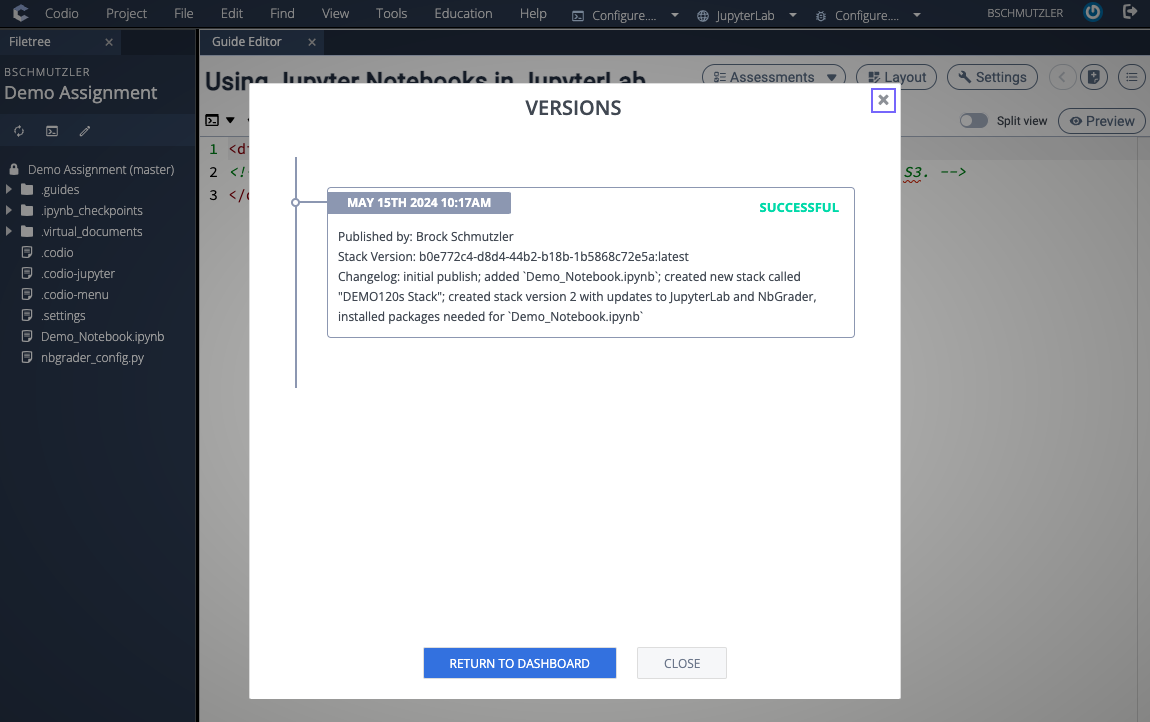
- Publish your assignment with the new stack version and write a concise and descriptive CHANGELOG entry. It may take a few minutes for the publishing process to complete and return a SUCCESSFUL message.
Configuring Workspace Starter Files
The starter files in /home/codio/workspace are:
.guides/load.js.guides/styles.css.codio.codio-jupyter.codio-menu.settingsnbgrader_config.py
For most use-cases, you will not need to modify any of these files. However, if you need modified versions for a specific course, high-level instructions are provided in the subsections below. When in doubt, please contact a member of the Instructional Technologies Group (ITG) for assistance.
.codio-jupyter file so that NbGrader does not process the Jupyter Notebooks in your Codio workspace. Even though it is not necessary to remove the .codio-jupyter file, doing so is beneficial because it will take less time to publish your assignment (since the NbGrader scripts are not running in the background). If you delete .codio-jupyter from your workspace, you should also remove the nbgrader_config.py file — otherwise, students will see the nbgrader_config.py file in their workspace when they open the assignment in Canvas. (Students do not see nbgrader_config.py when .codio-jupyter is present.).guides/load.js
The file .guides/load.js is a script that pulls guide text from AWS S3. It looks like this:
$("#guide").load("https://ecornell.s3.amazonaws.com/Codio/Reuseables/JupyterLab/JupyterLab_Guide.txt");If you need to modify the text on the collapsable Guide page, copy the text file JupyterLab_Guide.txt from the S3 folder Codio/Reusables/JupyterLab and put a modified version in a folder on S3 that is specific to your series of courses and replace the link in load.js — e.g.,
$("#guide").load("https://ecornell.s3.amazonaws.com/Codio/Courses/DEMO120s/JupyterLab_Guide.txt");JupyterLab_Guide.txt file in the S3 folder Codio/Reusables/JupyterLab because those changes will propagate to ALL courses whose guide text is linked to that file. The only people allowed to modify Codio/Reuseables/JupyterLab/JupyterLab_Guide.txt are members of the Instructional Technologies Group (ITG). Please contact ITG if you find a typo or believe the text should be changed..guides/styles.css
The file .guides/styles.css imports a CSS stylesheet from S3:
@import "https://ecornell.s3.amazonaws.com/Codio/CSS/styles.css";
The stylesheet Codio/CSS/styles.css controls the look of HTML elements in the Codio guide and is common to most Codio units developed by eCornell.
styles.css file in the S3 folder Codio/CSS because those changes will propagate to ALL courses linked to that file. In the unlikely scenario that you need to include additional styling elements, you can add them below the import statement in the .guides/styles.css file for your course-specific Codio units..codio
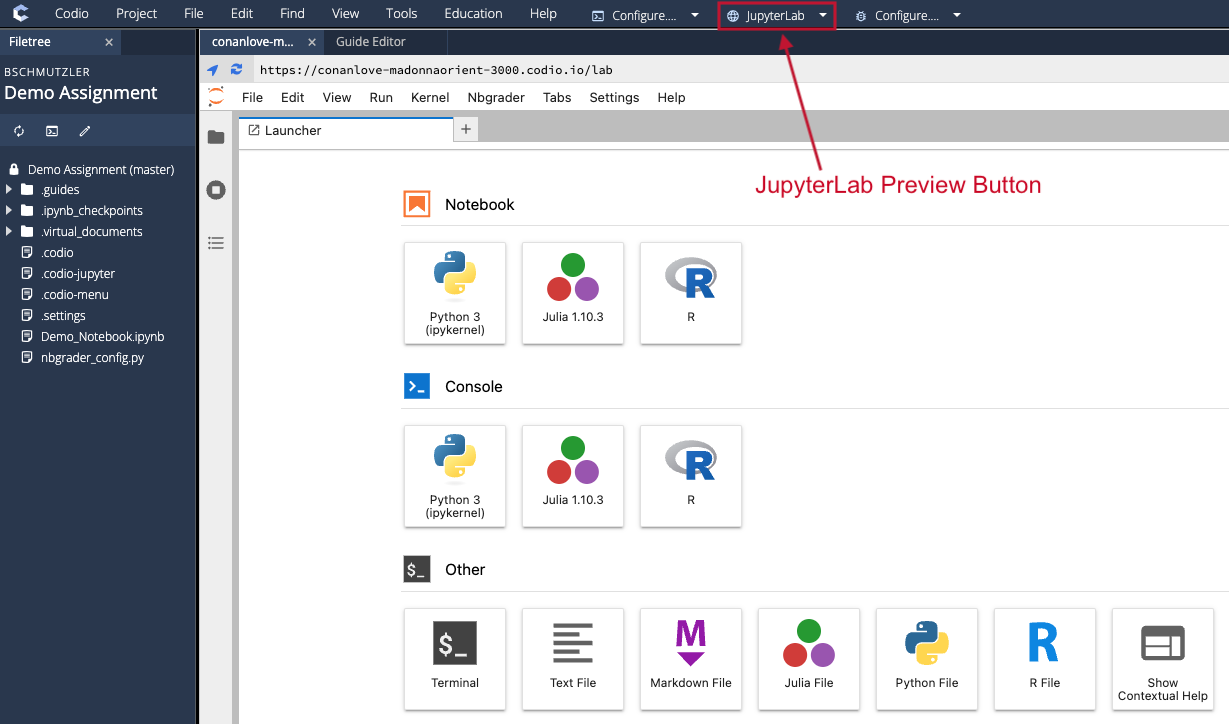
The .codio file contains code that configures the JupyterLab preview button that appears in the Codio menu bar across the top of your screen:
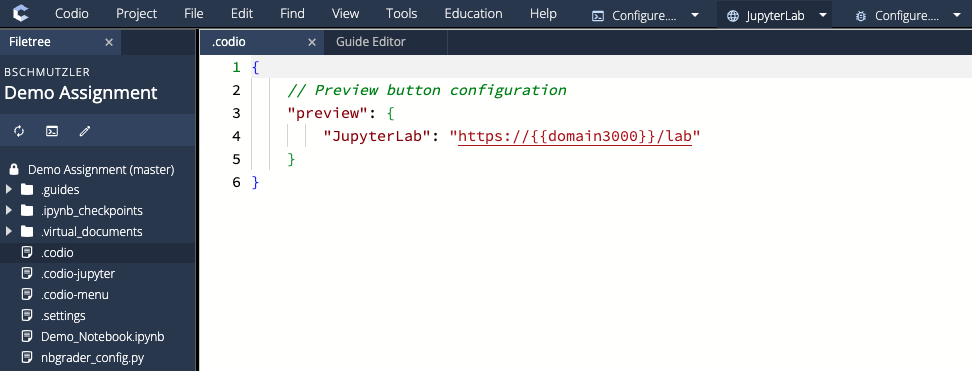
As shown in the image above, the contents of .codio look like this:
{
    // Preview button configuration
    "preview": {
        "JupyterLab": "https://{{domain3000}}/lab"
    }
}
Clicking the JupyterLab preview button opens an instance of JupyterLab while you are in Edit mode:
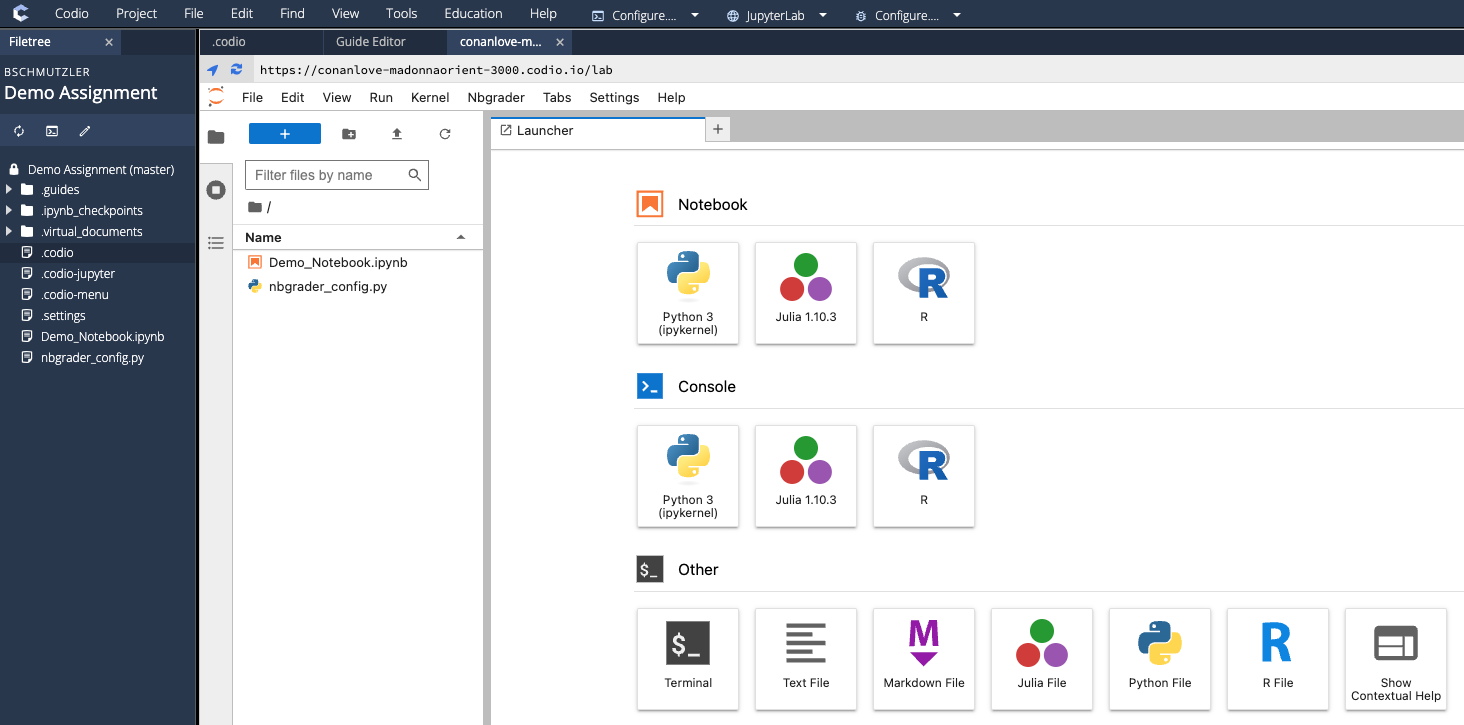
You have access to relevant JupyterLab file by opening the File Browser (click the folder icon):
Note that this JupyterLab preview tab in Edit mode is different than what you see when you are in Preview mode (i.e., when you click the Preview button in the upper-right corner of the Guide Editor tab):

Preview mode will show you what the Codio unit looks like when it is embedded in Canvas:
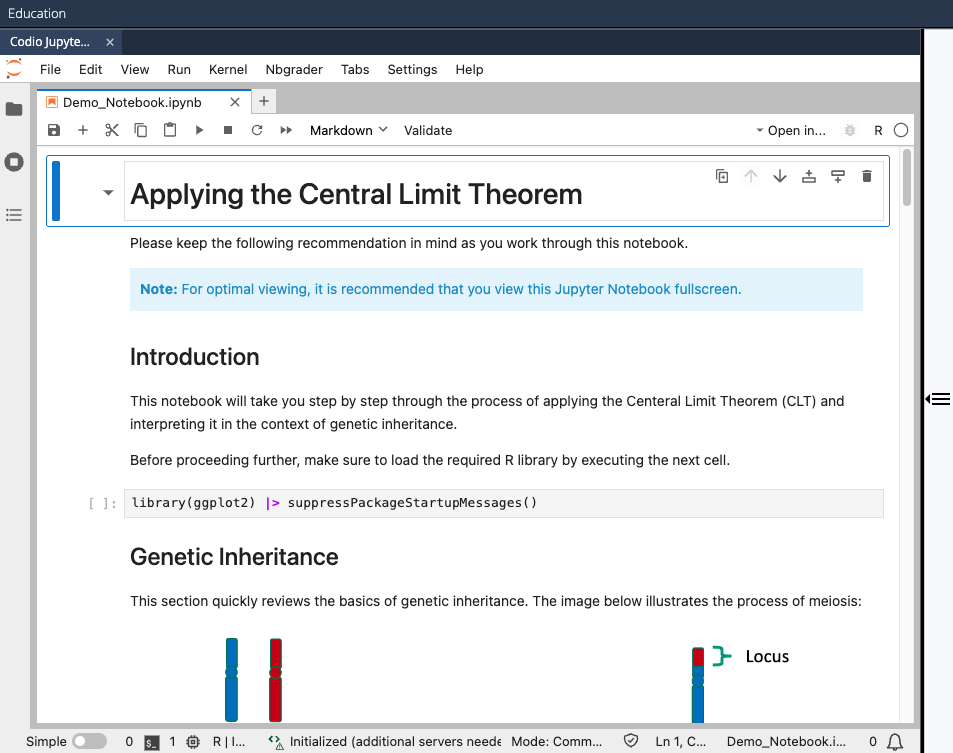
In particular, note that the open tab is labeled Codio Jupyter Lab (the name is partially cutoff in the image). This indicates that the Jupyter Notebook is being served through Codio's own JupyterLab environment because you have specified the notebook file as an Open Tab with a TYPE of Jupyter Lab, as shown in the Adding Jupyter Notebooks section of this article. You can think of the Codio Jupyer Lab environment as a wrapper that ensures JupyterLab is properly integrated with Codio (without having to configure any system level settings manually). More on this aspect in the Creating NbGrader Assignments below.
.codio-jupyter
The .codio-jupyter file is intentionally blank — its main purpose is to tell Codio to use NbGrader, but it can also be used to configure NbGrader. For more details, please see the Codio documentation on NbGrader. That being said, here is a short synopsis:
- The presence of
.codio-jupyterin/home/codio/workspacetells Codio to process all the Jupyter Notebooks in your workspace using the JupyterLab extensionnbgrader(more on NbGrader in the last section of this article). - The
.codio-jupyterfile can be left blank — with all the NbGrader configuration settings specified in thenbgrader_config.pyfile — but you can also configure NbGrader by writing code in.codio-jupyter. - Settings in
nbgrader_config.pytake precedence over configuration settings in.codio-jupyter.
.codio-jupyter blank and using nbgrader_config.py for all configuration settings because doing so offers more flexibility in your configuration (e.g., you can make custom pre-processors) and settings in nbgrader_config.py override those in .codio-jupyter..codio-jupyter file from the Codio workspace. Codio uses the presence of /home/codio/workspace/.codio-jupyter to trigger NbGrader, so removing .codio-jupyter speeds up publishing time because Codio does not run NbGrader scripts in the background. If you remove .codio-jupyter, you should also remove the nbgrader_config.py file — otherwise, students will see the nbgrader_config.py file in their workspace (students do not see it when .codio-jupyter is present)..codio-menu
The .codio-menu file controls which menu options are shown to students in Canvas:
{
    "Logo": false,
    "Codio": false,
    "Project": {
        "Restart Box...": true,
        "Resync File Tree": false,
        "Export as Zip": false,
        "Settings...": false,
        "Stack": false,
        "Permissions...": false,
        "Box Info": false,
        "Reset Box...": false,
        "Create Copy...": false,
        "Share...": false,
        "QR Code for Preview URL": false,
        "Delete...": false,
        "Exit": false
    },
    "File": false,
    "Edit": false,
    "Find": false,
    "View": false,
    "Tools": false,
    "Education": {
        "Mark as Completed": true,
        "Code Comments": false,
        "Earsketch": false,
        "Jupyter Lab": false
    },
    "Help": false,
    "Run": false,
    "Debugger": false,
    "Status": false,
    "Preview": false,
    "Toggle sections list": false,
    "Online": false
}
The configuration that comes with the JupyterLab Starter Pack only shows the options Project > Restart Box... and Education > Mark as Completed in the top Codio menu bar. These are typically the only options that are needed for a Codio unit using JupyterLab because all student work is done within the JupyterLab environment.
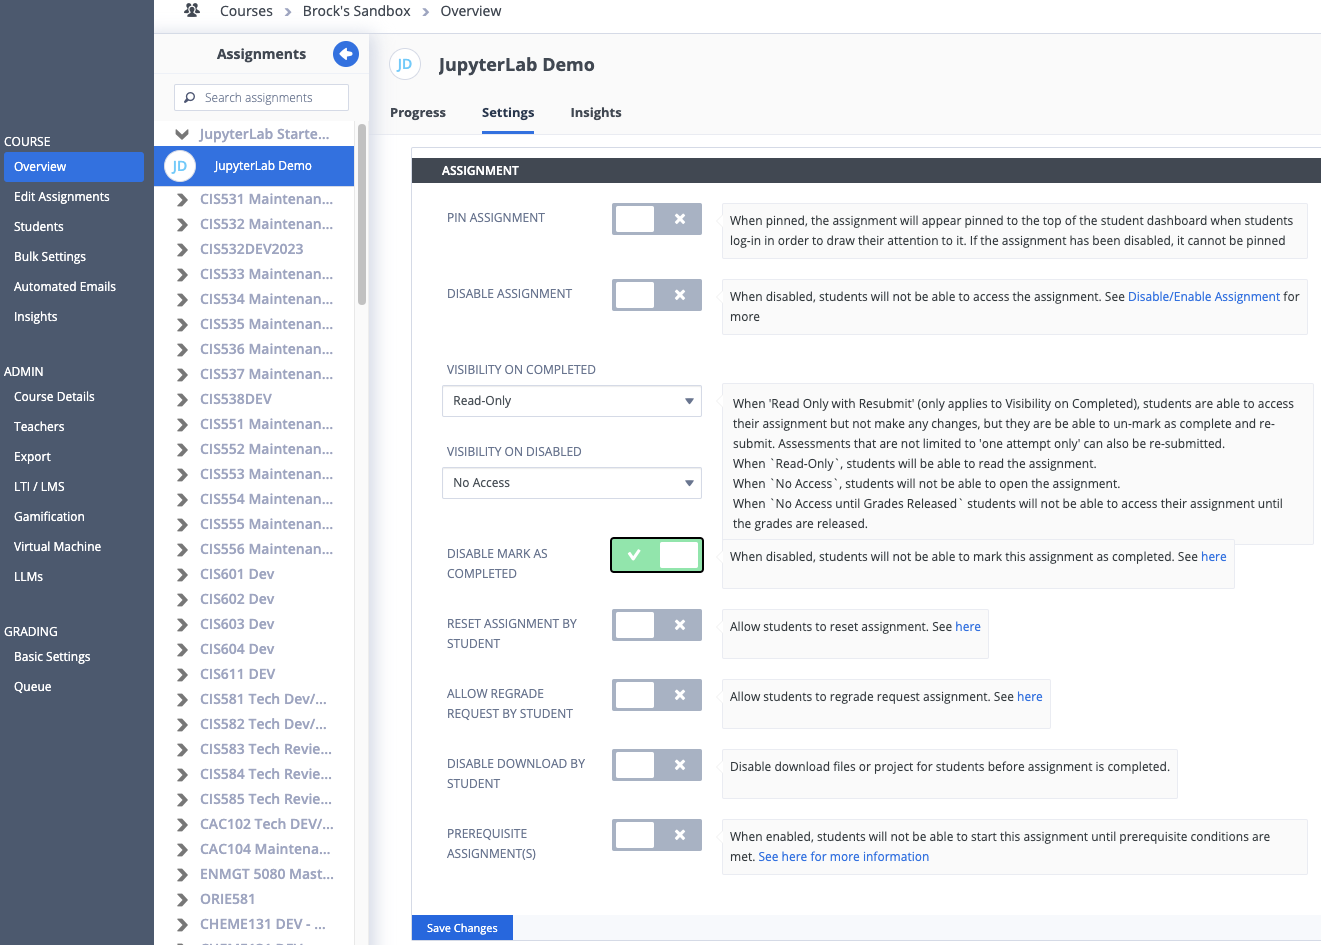
If no auto-grading is necessary and facilitators will not be reviewing the work (e.g., in an ungraded practice activity), you can disable the Education > Mark as Completed button in the ASSIGNMENT settings (Overview > Settings) by toggling on the option DISABLE MARK AS COMPLETED (make sure to click the Save Changes button afterwards):
If you need to expose more Codio menu options to students, you can follow these steps:
- Copy /Codio/Reusables/JupyterLab/codio-menu.txt
- Add
codio-menu.txtto a course-specific S3 folder (e.g.,/Codio/Courses/DEMO120s) - Modify the content of your course-specific
codio-menu.txtfile as needed - Modify the file
/home/codio/startup.shas directed in How to Centralize the .codio-menu to One Location (steps 3b, 4b, and 5) - Create a new course-specific stack version (DO NOT create a new version of Ubuntu 22.04 + JupyterLab + RStudio)
For example, here is a .codio-menu.txt file that would also expose the Project > Export as Zip menu option:
{
    "Logo": false,
    "Codio": false,
    "Project": {
        "Restart Box...": true,
        "Resync File Tree": false,
        "Export as Zip": true,
        "Settings...": false,
        "Stack": false,
        "Permissions...": false,
        "Box Info": false,
        "Reset Box...": false,
        "Create Copy...": false,
        "Share...": false,
        "QR Code for Preview URL": false,
        "Delete...": false,
        "Exit": false
    },
    "File": false,
    "Edit": false,
    "Find": false,
    "View": false,
    "Tools": false,
    "Education": {
        "Mark as Completed": true,
        "Code Comments": false,
        "Earsketch": false,
        "Jupyter Lab": false
    },
    "Help": false,
    "Run": false,
    "Debugger": false,
    "Status": false,
    "Preview": false,
    "Toggle sections list": false,
    "Online": false
}.settings
The .settings file controls the text editor settings of the Guide Editor. This file is automatically generated by Codio when the Guide is created — you will not need to make any changes to the .settings file.
nbgrader_config.py
The nbgrader_config.py file contains all (or most) of the configuration settings for NbGrader:
from nbgrader.preprocessors import NbGraderPreprocessor

class ClearTracebacks(NbGraderPreprocessor):
    """
    Custom preprocessor to either remove traceback messages (i.e., `output["traceback"] = []`)
    or replace them with another message (i.e., `output["traceback"] = ["replacement_message"]`).
    """
    def preprocess_cell(self, cell, resources, cell_index):
        # Remove or replace traceback messages in graded cells.
        if "nbgrader" in cell.metadata and cell.metadata.nbgrader.grade == True:
            for output in cell.outputs:
                if "traceback" in output:
                    output["traceback"] = ["Traceback messages have been hidden for graded cells."]
        # Remove or replace traceback messages in student answer cells.
        #if "nbgrader" in cell.metadata and cell.metadata.nbgrader.solution == True:
        #    for output in cell.outputs:
        #        if "traceback" in output:
        #            output["traceback"] = ["Traceback messages have been hidden for solution cells."]
        return cell, resources

# Retrieve the nbgrader configuration.
c = get_config()

# Configuration for the student version of the notebook that opens in Canvas.
c.ClearHiddenTests.begin_test_delimeter = "BEGIN HIDDEN TESTS"
c.ClearHiddenTests.end_test_delimeter = "END HIDDEN TESTS"
c.LockCells.lock_all_cells = False
c.LockCells.lock_grade_cells = True
c.LockCells.lock_readonly_cells = True
c.LockCells.lock_solution_cells = True
c.ExecutePreprocessor.interrupt_on_timeout = True
c.ExecutePreprocessor.timeout = 180
c.ClearSolutions.code_stub = {
    "julia": "# YOUR CODE HERE\nerror(\"Your code is missing.\")\n# END OF YOUR CODE",
    "python": "# YOUR CODE HERE\nraise NotImplementedError(\"Your code is missing.\")\n# END OF YOUR CODE",
    "R": "# YOUR CODE HERE\nstop(\"Your code is missing.\")\n# END OF YOUR CODE",
}

# Clear hidden tests and tracebacks from the student feedback report
# that students see after their assignments are Marked as Completed.
c.GenerateFeedback.preprocessors = [
    "nbgrader.preprocessors.GetGrades",
    "nbconvert.preprocessors.CSSHTMLHeaderPreprocessor",
    "nbgrader.preprocessors.ClearHiddenTests",
    ClearTracebacks,
]
If you want to remove traceback messages from student answer cells in Codio's student feedback report, uncomment the four lines of code below the comment # Remove or replace traceback messages in student answer cells (not recommended for most use cases). If you do not want to clear hidden tests and tracebacks from Codio's student feedback report, comment out the last six lines. For more details, see the NbGrader documentation on the nbgrader_config.py file.
Creating NbGrader Assignments
You can perform auto-grading in Jupyter Notebooks using a JupyterLab extension called NbGrader (i.e., nbgrader).
.codio-jupyter and nbgrader_config.py files. This is not necessary, but the advantage is that publishing your Codio assignment will take less time because the absence of a .codio-jupyter file tells Codio to bypass the NbGrader processing that happens in the background when you publish an assignment with the .codio-jupyter file in /home/codio/workspace. The process for creating an ungraded activity in Canvas in the similar to the one described in the Ungraded Activities in Canvas section of Using the RStudio Starter Pack.Codio Assignment
To create an NbGrader assignment in Codio:
- Add a Jupyter Notebook (see Adding Jupyter Notebooks section) that contains all the "solution code" needed to successfully run all the cells in the entire notebook
- Put
### BEGIN SOLUTIONand### END SOLUTIONdelimiters around the "solution code" you want students to provide when they work through the notebook in Canvas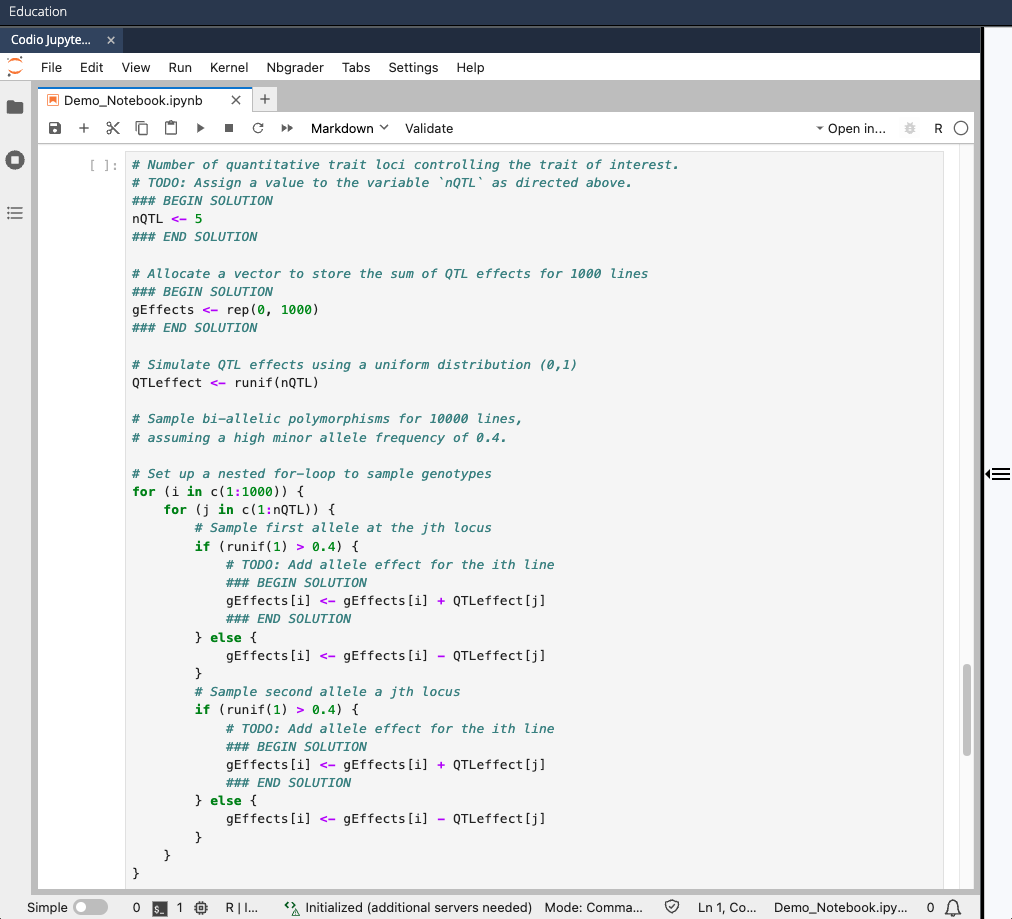
- In Preview mode, select Nbgrader > Create assignment from the JupyterLab menu
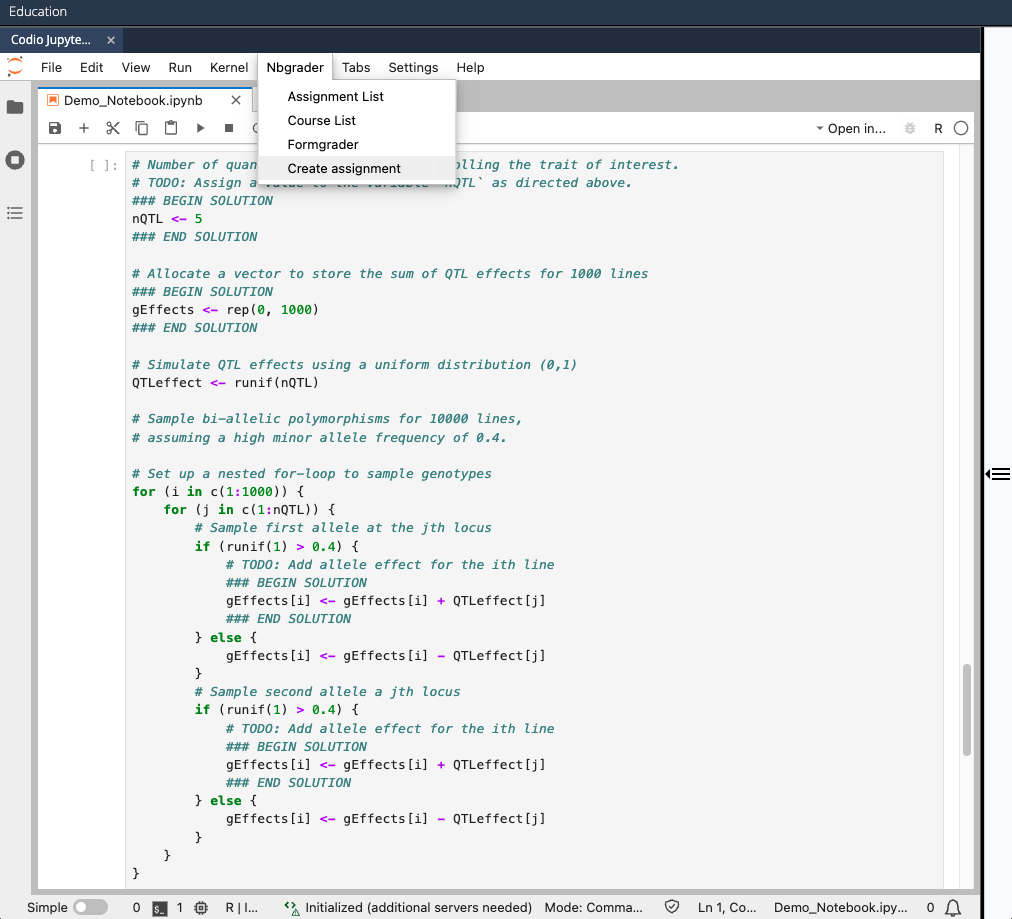
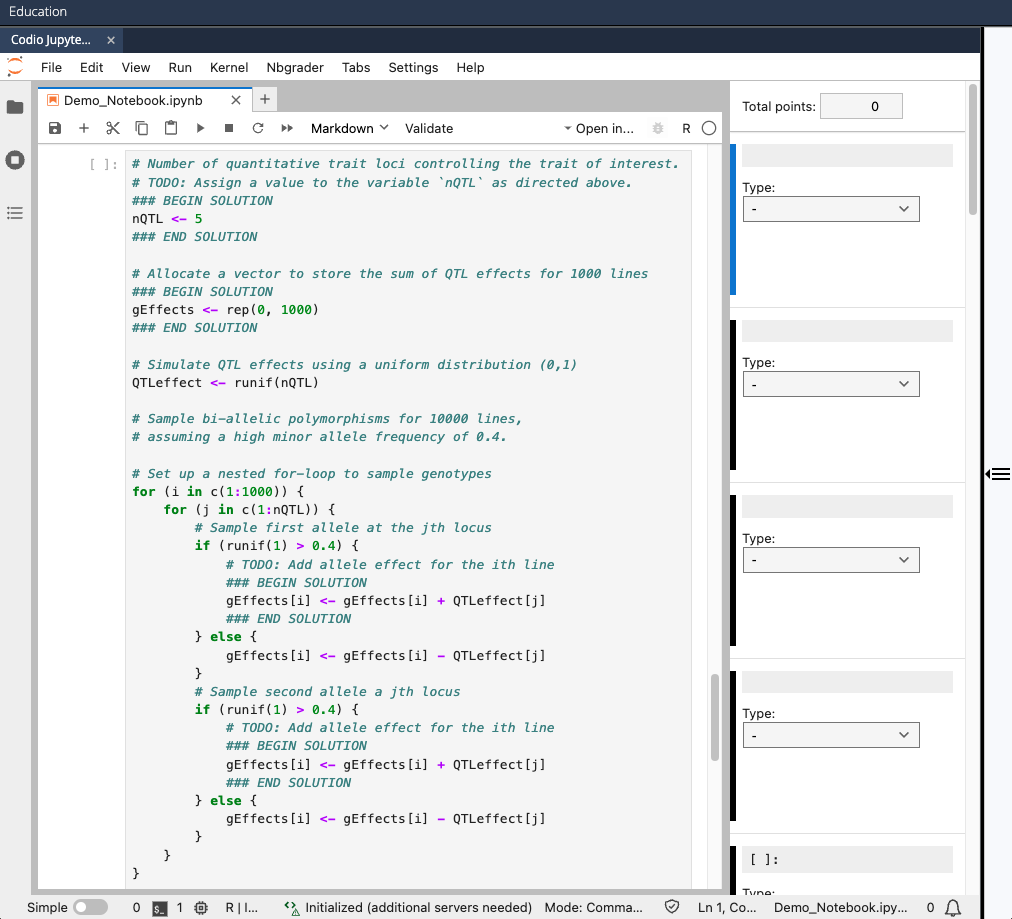
- In the right sidebar that appears, specify each cell as either "Autograded answer" type or "Read-only" type:
- "Autograded answer" type for each cell with
### BEGIN SOLUTIONand### END SOLUTION - "Read-only" type for all other cells (to prevent students from modifying or deleting the cell)
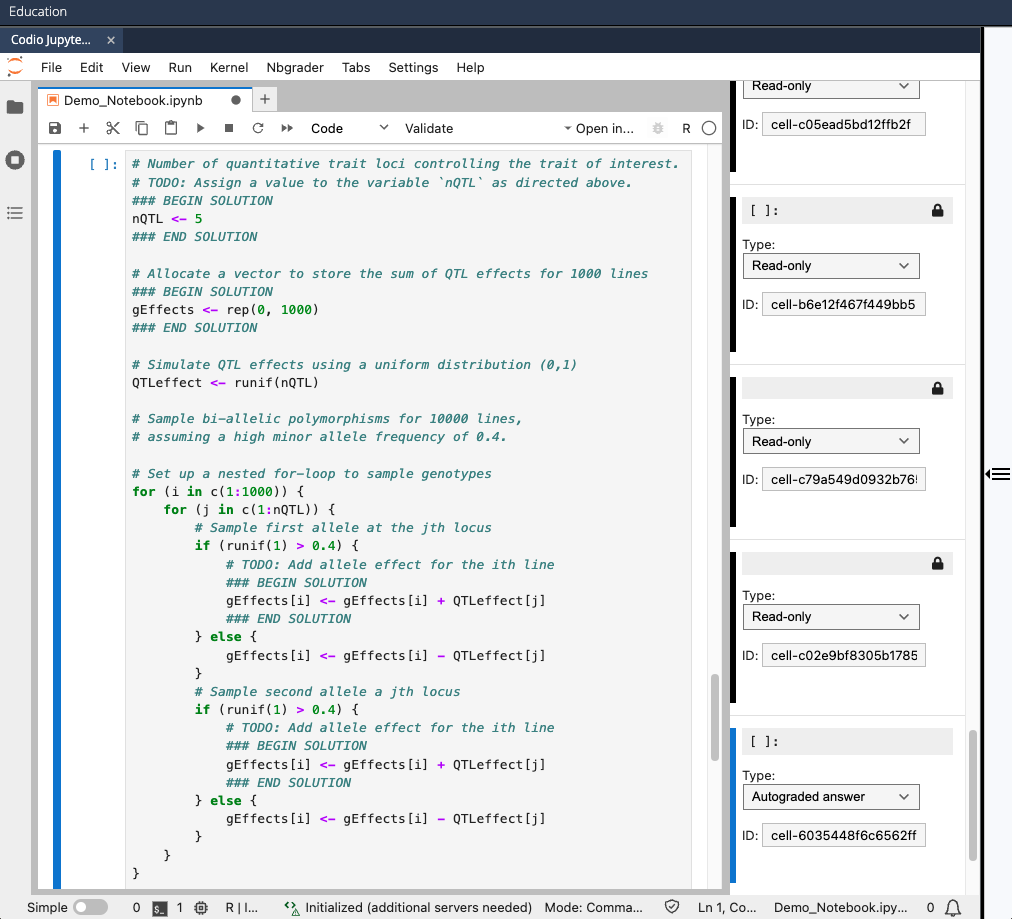
- Below each "Autograded answer" cell you want to test, add a Code cell of "Autograded tests" type — make each "Autograded tests" cell worth one point even if there are multiple tests in the cell. NOTE: If you want some (or all) tests to be hidden from students in Canvas, put the code for those tests between
### BEGIN HIDDEN TESTSand### END HIDDEN TESTSdelimiters (similar to putting solution code between### BEGIN SOLUTIONand### END SOLUTIONdelimiters).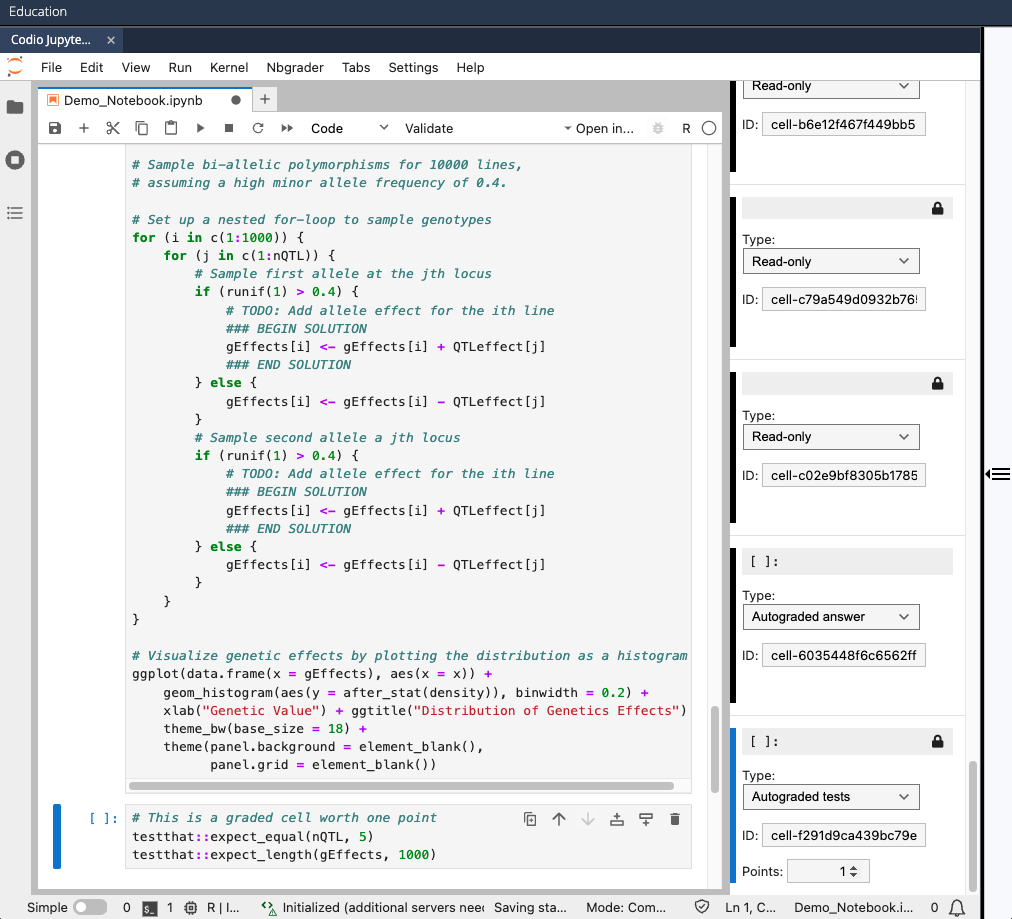
- "Autograded answer" type for each cell with
- Unselect View > Appearance > Show Right Sidebar to close "Create assignment" sidebar (or press
command+J)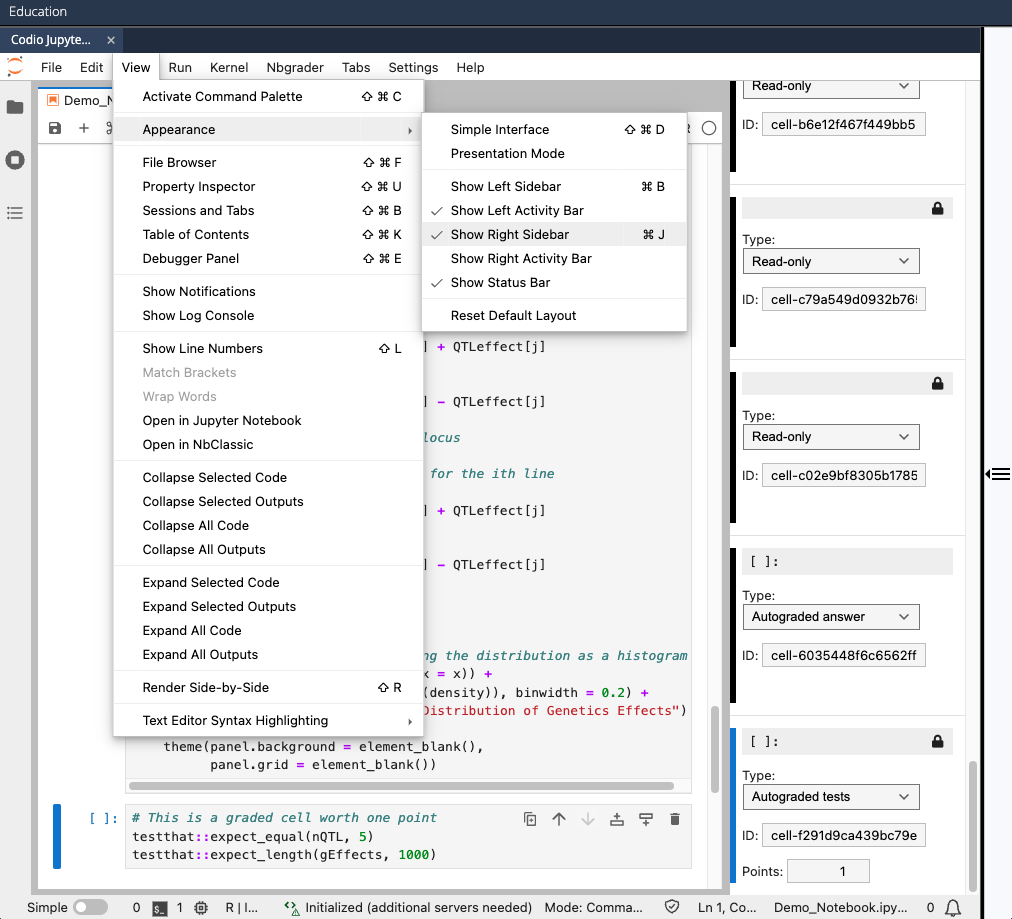
- Save and checkpoint your changes by clicking the disk icon in the upper-left corner of your notebook tab (or press
command+S)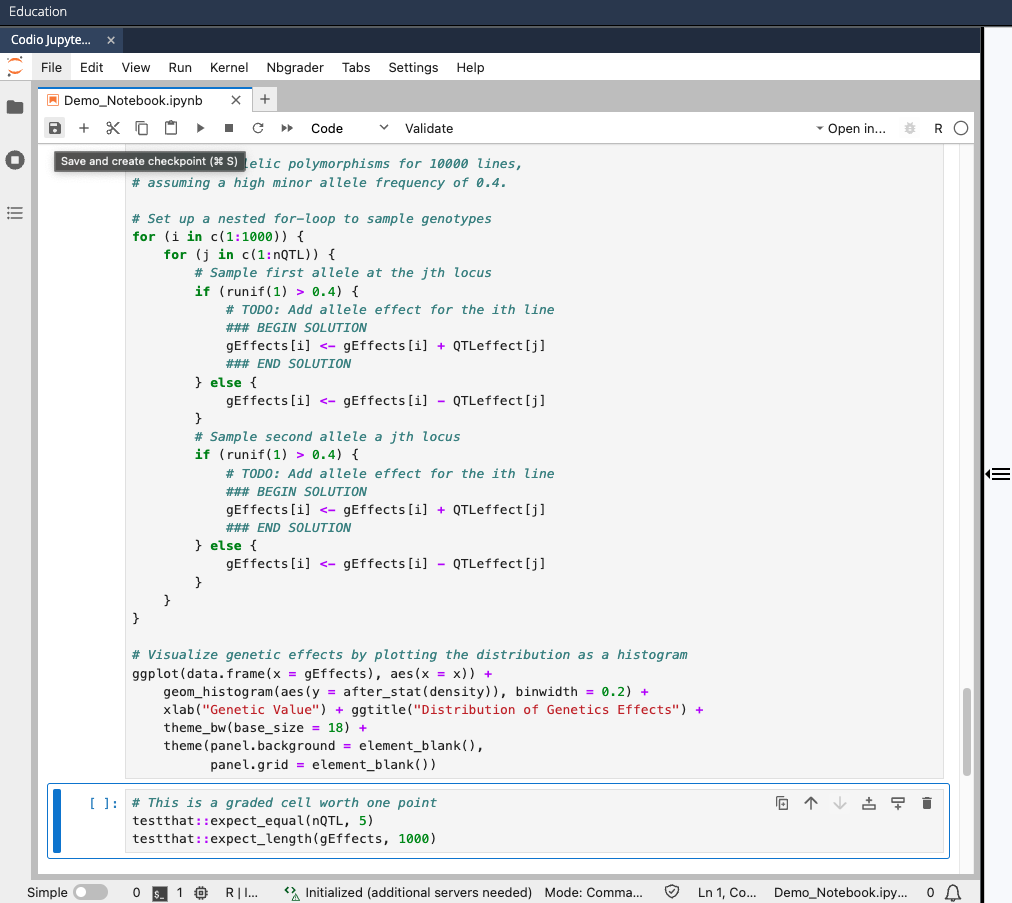
- Check that all your tests successfully pass by clicking the Validate button in the top menu bar of your notebook tab

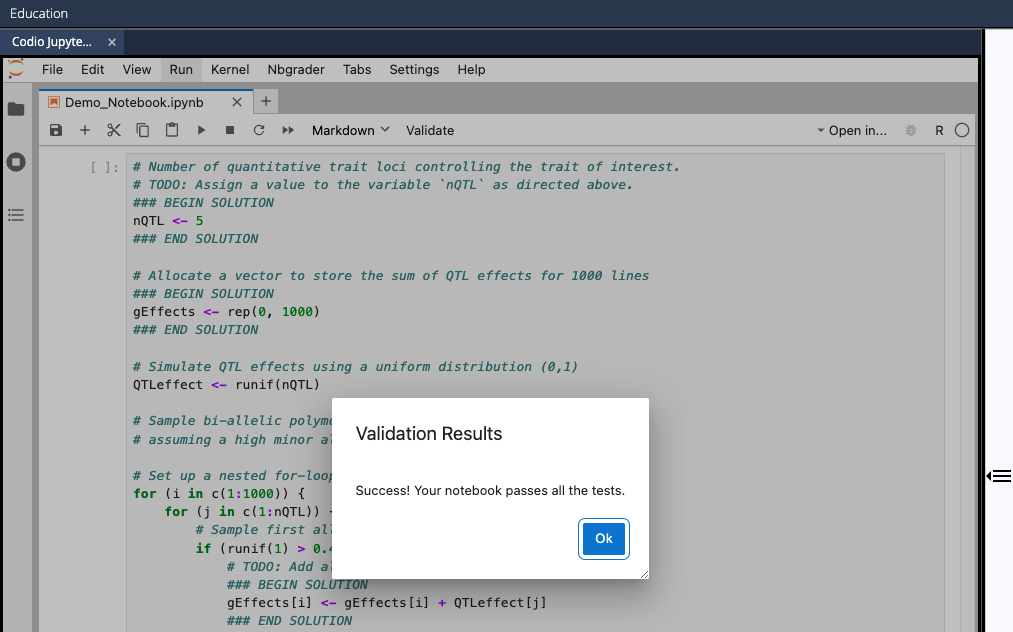
- Publish your assignment by selecting Education > Publish Assignment from the top Codio menu

### BEGIN SOLUTION ... ### END SOLUTION delimiters, then the entire contents of the cell will be replaced with ### YOUR CODE HERE ... ### END OF YOUR CODE.### BEGIN SOLUTION ... ### END SOLUTION appears in a cell that is not marked as an "Autograded answer" cell, you will receive a publishing error.Canvas Assignment
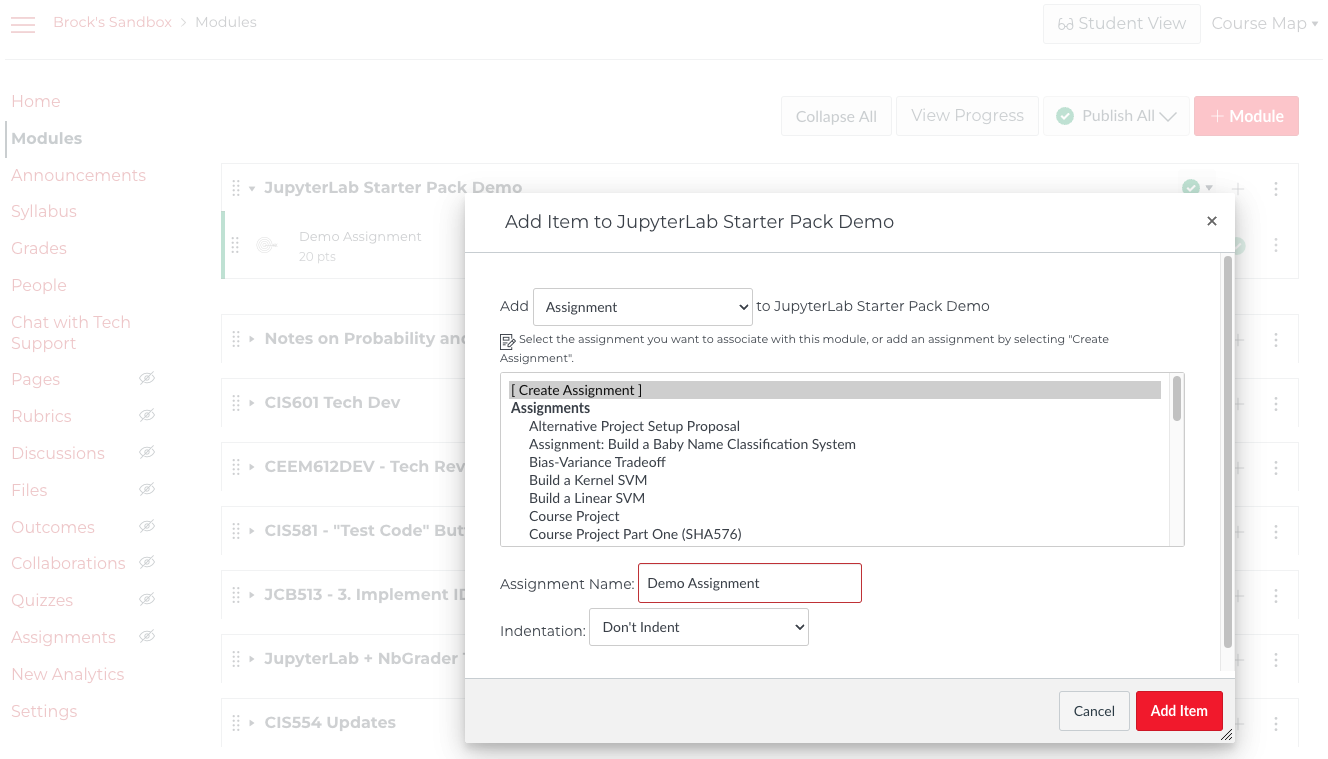
To set up your Codio assignment in Canvas:
- Create a new Canvas assignment page
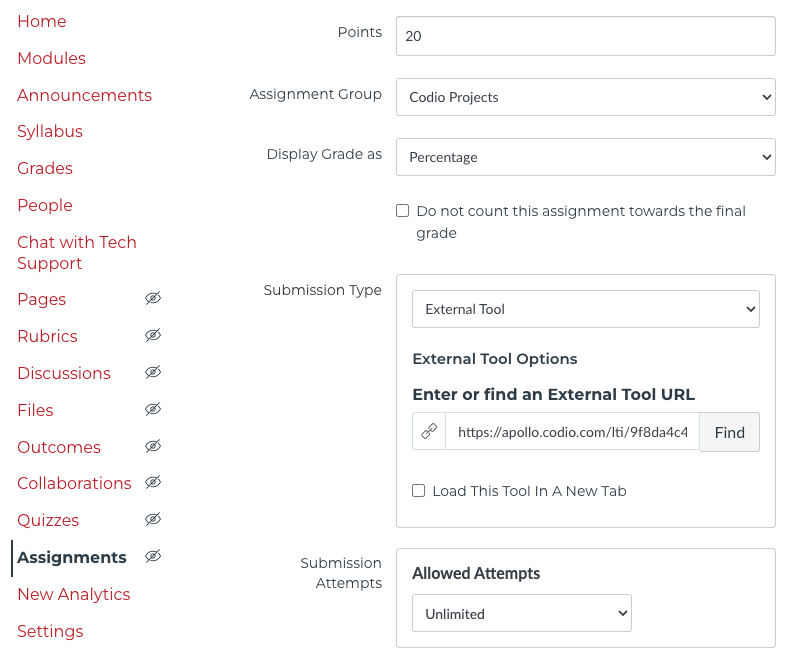
- Configure assignment settings
- Use External Tool submission
- Create Codio Projects group
- Display grade as Percentage
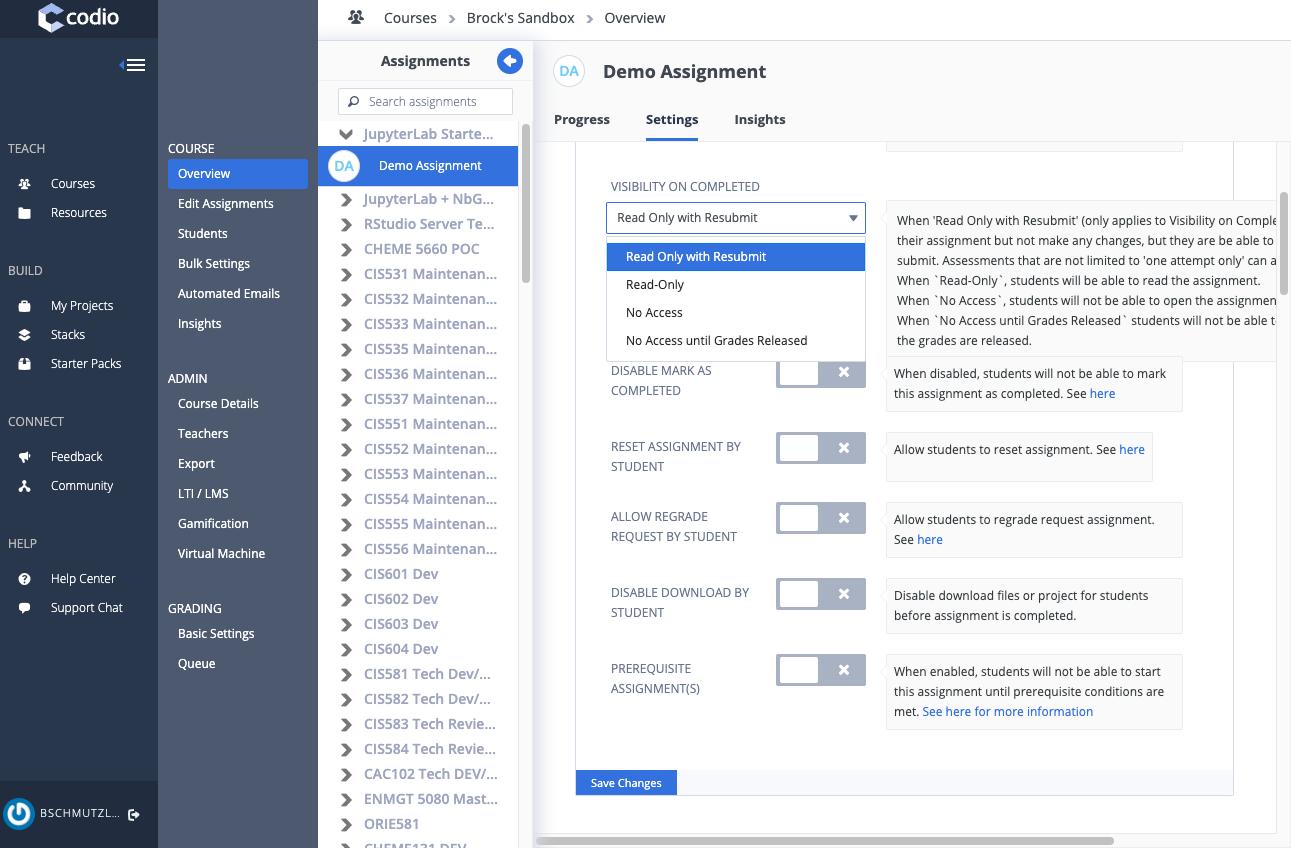
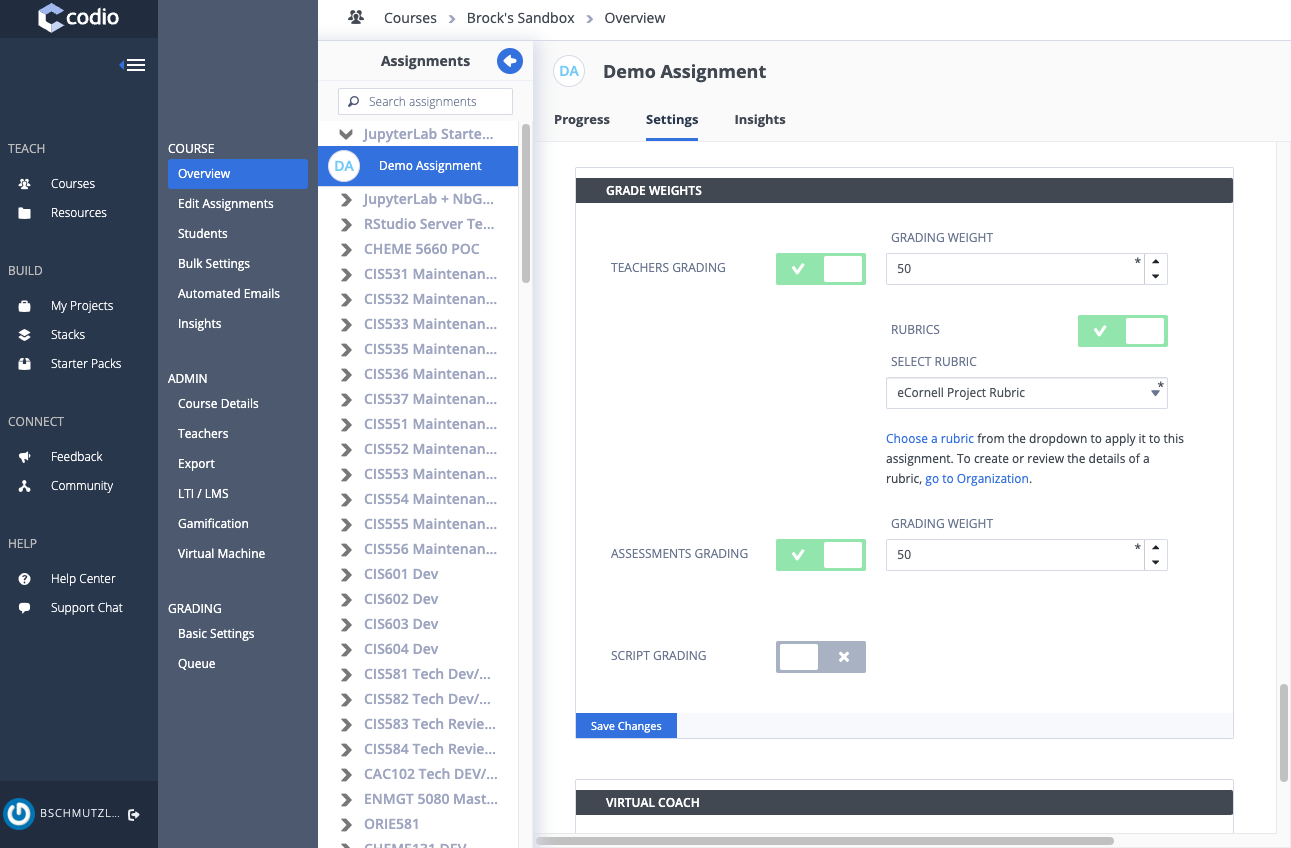
- Configure Codio assignment settings (make sure to Save Changes for each setting)
- Read Only with Resubmit
- ASSESSMENTS GRADING
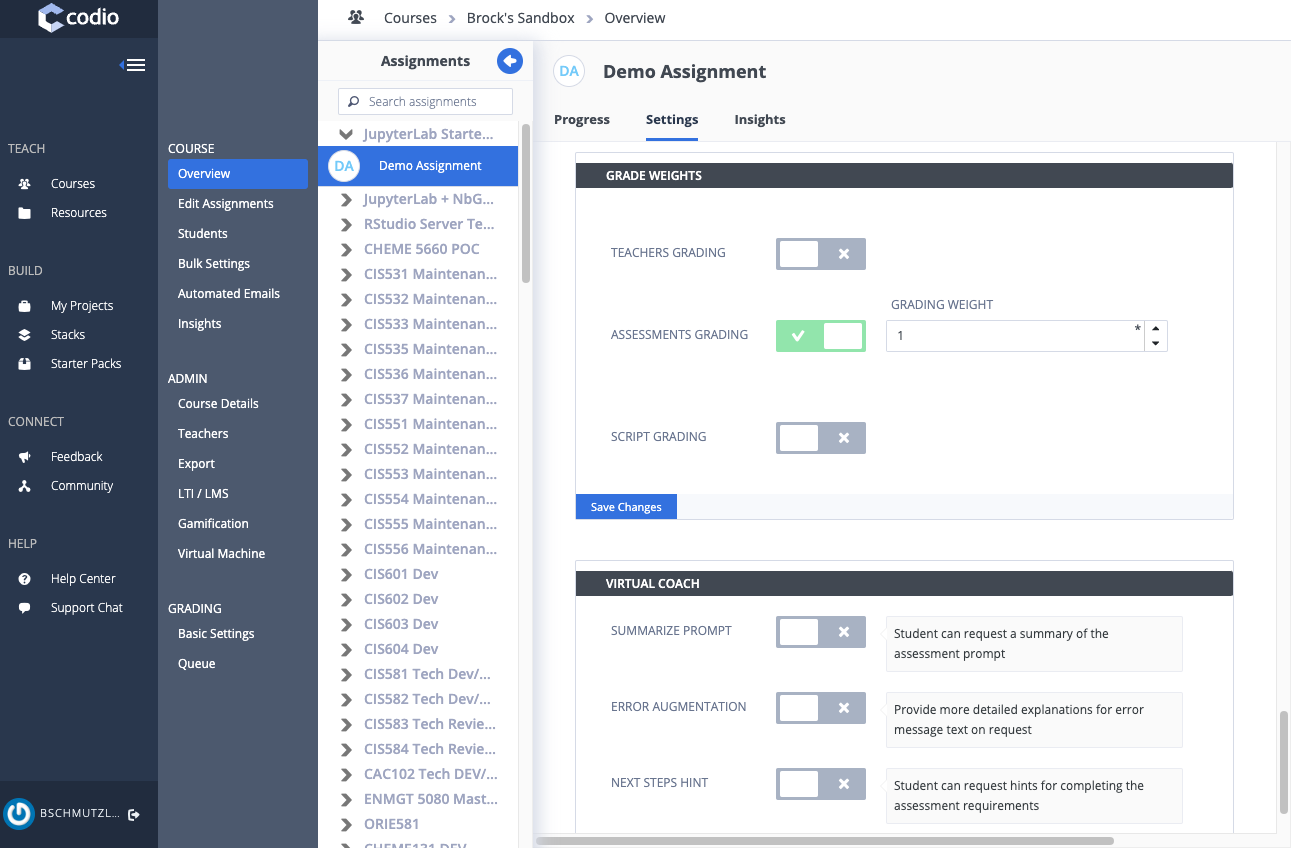
- ASSESSMENTS GRADING and TEACHERS GRADING (does not have to be 50/50)
- Read Only with Resubmit
- Test in Student View
- Enter solution code between
# YOUR CODE HEREand# END OF YOUR CODE(delete thestop("Your code is missing.")command)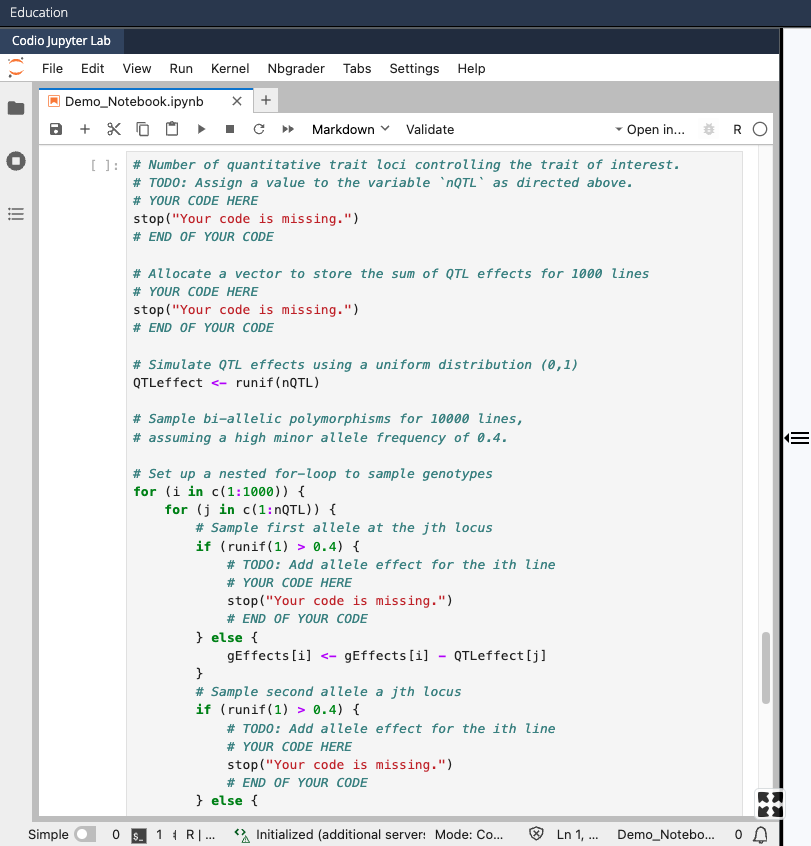
- Save your changes by pressing
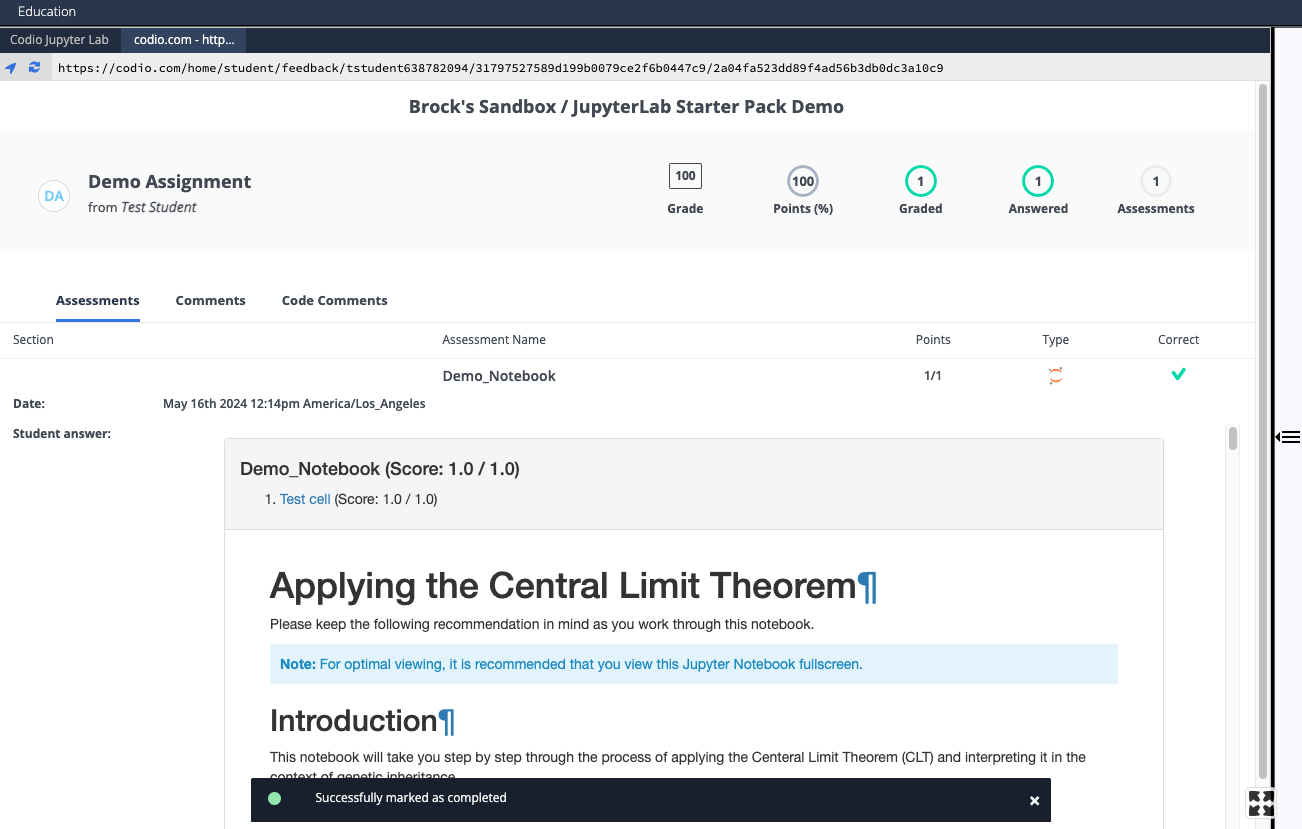
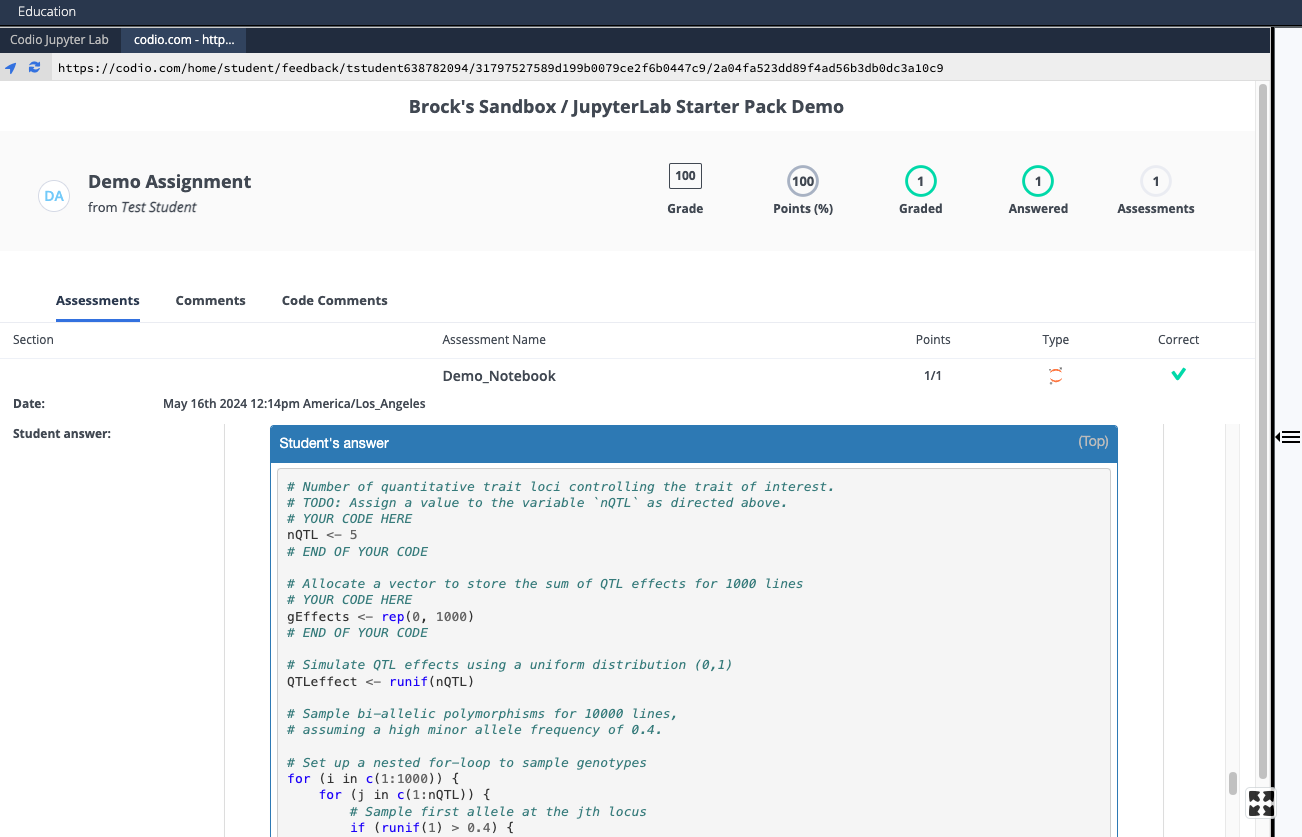
command+S - Go to the Education menu and select Mark as Completed
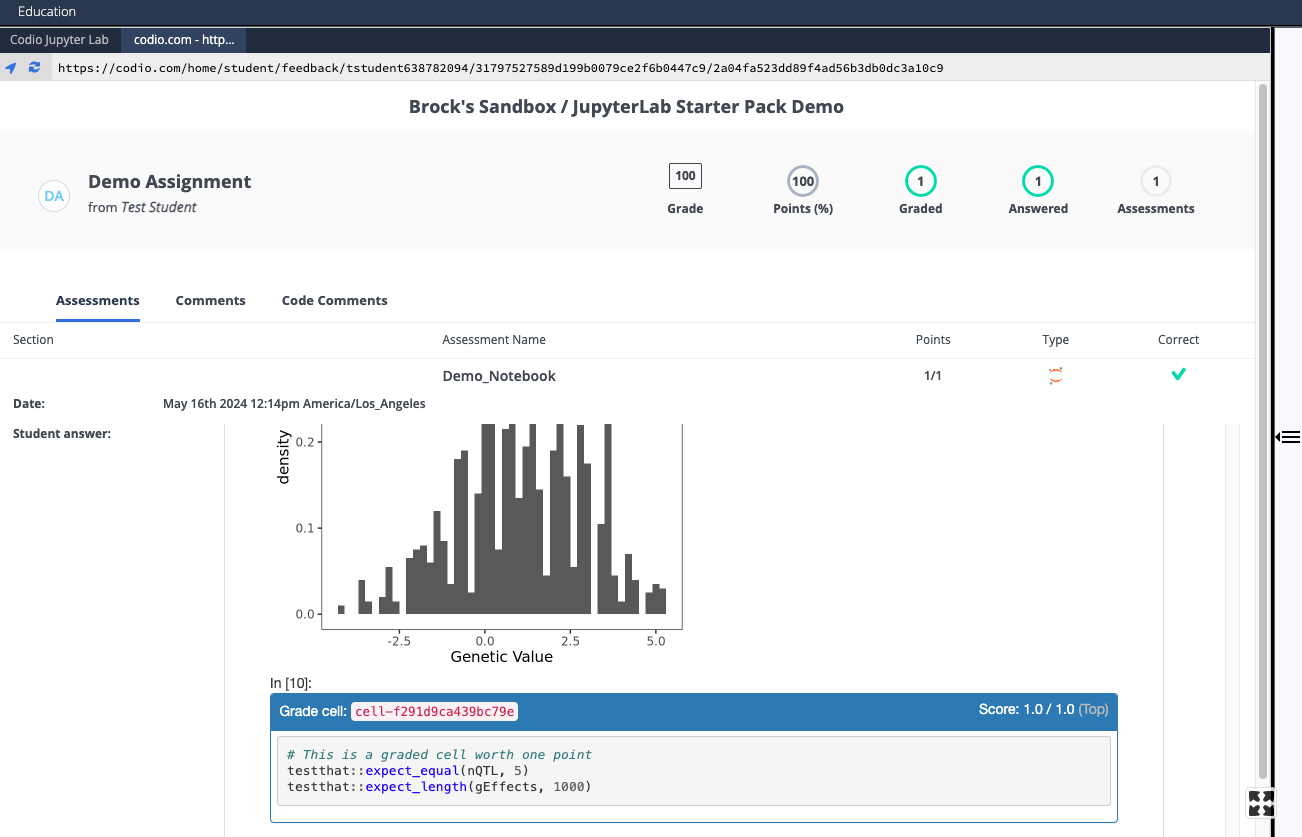
- Check that Codio's student feedback report has the expected output
- Enter solution code between
Ungraded Assignments
You can also use NbGrader to create ungraded assignments. One advantage of doing this is that NbGrader provides an easy way to control whether a cell can be edited or deleted by simply changing the cell type. The steps are similar to creating a graded assignment with the following tweaks.
- Modify all the "Autograded tests" cells in the notebook in one of two ways:
- Make all "Autograded tests" cells worth zero points (with no hidden tests) in the notebook
- Change all "Autograded tests" cells to "Read-only" cells in the notebook
- Toggle off all the grading settings (i.e., Teachers, Assessments, Script) for the Codio unit
In Canvas, embed the Codio unit in a Canvas page using the Rich Content Editor (as opposed to creating a Canvas assignment), as described in the Ungraded Canvas Assignments section of Using the RStudio Starter Pack.
