Departmental Standards
Company-Wide
eCornell Styleguide & Branding
Cornell University Branding
Writing and Editing Style Guide
Faculty and Expert Naming Conventions in Courses
Cornell School and Unit Names
Tips for Campus Engagements
LSG
Legal Policies
CSG
Updating Wrike Due Dates
Photography Style Guide
eCornell Mini Visual Style Guide
The Pocket Guide to Multimedia Design Thinking (*as It Pertains to Your Job Here)
Creative Services (CSG) Handbook
Administrative
LSG Meeting Recordings and Notes
Sending Faculty Sign-Off Forms in Adobe Sign
Weekly Faculty Status Emails
Animation/Motion Design
Instructional Design
Required Course Elements
The Pocket Guide to Instructional Design Thinking at eCornell
Adding AER to Canvas
Grading
D&D Newsletter
LSG Newsletter (LSGN) - February 2024
LSG Newsletter (LSGN) - March 2022 Edition
LSG Newsletter (LSGN) - December 2023
LSG Newsletter (LSGN) - October 2021 Edition
LSG Newsletter (LSGN) - June 2022 Edition
D&D Newsletter November 2024
LSG Newsletter (LSGN) - August 2022 Edition
LSG Newsletter (LSGN) - June 2023
LSGN Newsletter April 2023
LSG Newsletter (LSGN) - February 2022 Edition
LSG Newsletter (LSGN) - October 2022 Edition
LSGN Newsletter February 2023
LSGN Newsletter March 2023
D&D Newsletter September 2024
LSG Newsletter (LSGN) - August 2023
LSG Newsletter (LSGN) - March 2024
LSG Newsletter (LSGN) - April 2022 Edition
D&D Newsletter - August 2024
LSGN Newsletter January 2023
LSG Newsletter (LSGN) - October 2023 article
LSGN Newsletter (LSGN) - April 2024
LSG Newsletter (LSGN) - November 2021 Edition
D&D Newsletter February 2025
LSG Newsletter (LSGN) - January 2022 Edition
LSGN Newsletter December 2022
D&D Newsletter April 2025
LSG Newsletter (LSGN) - July 2022 Edition
LSG Newsletter (LSGN) - September 2022 Edition
Course Development
Image Uploads for Inline Projects
How to Install the Firefox Canvas Utilities Extension
Revising a Course/ Creating a Redux Version/ Course Updates
Creating a Perma Link With Perma.cc
Course Content Deletion Utility — Removing All Course Content
Teleprompter Slide Template
Course Names
Requesting High Resolution Video Uploads
Technical Talking Points Template
Writing Discussions: Guidelines for IDs
Online Resources in Credit-Bearing Courses
Hiring Actors for an eCornell Project
Marketing
Operations
Tech
Master Course Template Differences (8675309s)
Non-CSG File Uploads
Mentored Learning Conversion Process and Resources
Doc-Based Master Course Template and Standards (8675309-DOC)
Pedagogical Guidelines for Implementing AI-Based Interactives: AER
Coding Master Course Template and Standards (8675309-CODE)
Practice Quiz Standards
Hero Image
Platform Training
Administrative Systems
ADP
Google Drive
Downloadables Process
Embed a Document from Google Drive
Adding Google Links to Canvas
File Naming and Storage Convention Standards
Google Drive for Desktop Instructions
Storing Documents in Multiple Locations
Wrike
Wrike System Fundamentals
Field Population
1.0 to 2.0 Wrike Project Conversion
Blocking Time Off in Work Schedule (Wrike)
Wrike Custom Field Glossary
Wrike "Custom Item Type" Definitions
How to Create a Private Dashboard in Wrike
Using Timesheets in Wrike
Importing Tasks into a Wrike Project
Wrike Project Delay Causes Definitions
Setting OOO Coverage for Roles in Wrike
How to Change a Project's Item Type in Wrike
Using Search in Wrike
How to Create a Custom Report in Wrike
@ Mentioning Roles in Wrike
Automate Rules
Using Filters in Wrike
Managing Exec Ed Programs in Wrike
External Collaborators
Wrike for External Collaborators: Getting Started
Wrike for External Collaborators: Views
Wrike for External Collaborators: Tasks in Detail
Wrike Updates
New Experience Update in Wrike
Wrike Course Development Template 2.0 - What's New
Wrike - Course Development Template 3.0 Release Notes
Wrike Process Training
Course Development & Delivery Platforms
Canvas
Development
Adding Custom Links to Course Navigation
Adding Comments to PDFs from Canvas Page Links
Setting Module Prerequisites and Requirements in Canvas
Canvas Page Functionality
Create a New Course Shell From 8675309
Using LaTeX in Canvas
Search in Canvas Using API Utilities - Tutorial
Reverting a Page to a Previous Version
Student Groups
Create Different Canvas Pages
Importing Specific Parts of a Canvas Course
Canvas HTML Allowlist/Whitelist
Understanding Canvas Customizations/Stylesheets
Operations
Discussion Page Standards
How to import a CU course containing NEW quizzes
Canvas LMS: NEW Quiz compatibility
Faculty Journal
Course Content Style Guide
Click-To-Reveal Accordions in Canvas
Course Maintenance Issue Resolution Process
Meet the Experts
Codio
Codio Operations
Managing Manually Graded “Reflect and Submit” Codio Exercises
Codio Structure and Grading for Facilitators
Premade Codio Docs for Ops & Facilitators
Codio Remote Feedback Tools for Facilitators
Developers
Development Processes
Creating a New Codio Course
Creating a New Codio Unit
Integrating a Codio Course into Canvas Using LTI 1.1
Embedding a Codio Unit into Canvas
Setting Up the Class Fork
Jasmine Autograde Unit Testing
Setting Up the Class Fork (LTI 1.3)
R Studio - Exclusion List for R Code
Mocha/Selenium Autograding
Starter Packs in Codio
Configuring Partial Point Autograders in Codio
Launch a Jupyter Notebook from VM
AI Extensions
Program-Specific Developer Notes
Codio Functionality
Jupyter Notebooks
Jupyter Notebooks - nbgrader tweaks
Jupyter Notebooks Style Guide
Adding Extensions to Jupyter Notebooks
Setting up R with Jupyter Notebooks
Change Jupyter Notebook Auto Save Interval
How to Change CSS in Jupyter Notebook
RStudio in Codio
How To Centralize the .codio-menu File to One Location
Codio Fundamentals for LSG
Using the JupyterLab Starter Pack
Using Code Formatters
Using the RStudio Starter Pack
Conda Environments in Codio
Updating Codio Change Log
Codio Basics: Student Support
eC Facilitator Guide to Codio
Migrating to Updated Codio Courses
Qualtrics
Ally
Ally Institutional Report Training
Ally Features Overview Training
Using the Ally Report in a Course
Ally Vendor Documentation/Training Links
Adobe
Other Integrations
Pendo Overview
How to Add VitalSource eBooks in Canvas
Enabling Zoom/"Live Sessions" in a Course
Pendo Guide Creation
H5P
Modifying Subtitles in H5P Interactive Videos
Embedding H5P Content Into Canvas
Troubleshooting H5P Elements in Canvas
Inserting Kaltura Videos into H5P Interactive Videos
Adding Subtitles to H5P Interactive Videos
S3
BugHerd
Instructional Technologies & Tools Inventory
Canvas API Utilities
Getting started with the MOP Bot
eCornell Platform Architecture
HR & Training Systems
Product Development Processes
Accessibility
What Is Accessibility?
What Is Accessibility?
Accessibility Resources
Accessibility Considerations
Accessibility Support and Assistive Technology
Structural Accessibility
Accessibility Design and Development Best Practices
Accessible Images Using Alt Text and Long Descriptions
Accessible Excel Files
Accessibility and Semantic Headings
Accessible Hyperlinks
Accessible Tables
Creating Accessible Microsoft Files
Mathpix: Accessible STEM
Design and Development General Approach to Accessibility
Integrating Content Authored by a Third Party
Planning for Accessible Tools
Accessibility Considerations for Third Party Tools
Studio Accessibility
Designing for Accessible Canvas Courses
Accessibility: Ongoing Innovations
Course Development
Planning
Development
0. Design
1. Codio Units
1. Non-Video Assets
3. Glossary
4. Canvas Text
4. Tools
4. Tools - Wrike Task Definitions
3. Review And Revise Styled Assets
ID/A to Creative Team Handoff Steps
General Overview of Downloadables Process
Course Project: Draft and Final
Excel Tools: Draft and Final
eCornell LSG HTML Basics
1. Non-Video Assets - Wrike Task Definitions
2. Video
Multifeed Video
2. Video (Standard) - Wrike Task Definitions
Studio Tips
Tips for Remote Video Recording Sessions
Who to Tag for Video Tasks
3. Animation
3. Animation - Wrike Task Definitions
2. Artboard Collab Doc Prep
6b. Motion Design Review and Revise
Who to Tag for Animations Tasks
3. Artboard Collab Process Walkthrough
DRAFT - FrameIO Process Walkthrough
Motion Contractor Guide for IDAs / IDDs
Requesting / Using Stock Imagery (Getty Images and Shutterstock)
3. Ask the Experts
5. On-Demand Conversion
5. Review
5. Review - Wrike Task Definitions
1. Prep Course for Reviews
2. Conduct Student Experience Review
3. Implement Creative Director Edits
3. Implement IDD Edits
3. Implement Student Experience Review Edits
4. CSG - Revise Tools Export 1
5. Conduct Faculty Review
6. Implement Faculty Edits
7. Conduct Technical Review of Course (STEM-only)
Technical Student Experience (Tech SE) Review Process
2. Conduct IDD or Sr ID Review
6. Alpha
6. Alpha - Wrike Task Definitions
Alpha Review Process
Prepare a course for Alpha review
Schedule & Conduct Alpha Triage Meeting
7. QA
7. QA - Wrike Task Definitions
1. Prep Course for QA
2. Copy Edit Captions
2. Copy Edit Course & Files
4. Conduct Content QA of Course
4. Final Creative Review and Export
Adding Chat With Tech Support to Course Navigation
5. Implement QA Edits
Working With Video Captions That Contain Special Characters
Copy Edit Captions in SubPLY
Creating a Course Style and Settings Guide
Copy Editing Content in Frame.io
1. Complete Dev to QA Checklist
Copy Edit Captions in 3Play
Tag a Video for Transcription by 3Play
Course QA Checklists
8. Deployment
8. Deployment - Wrike Task Definitions
1. Finalize Master Version of Course
2. Create & Add Course Transcript (CT) to Course
Replace a Master -M With a Redux Version of the Course
3. Create -T (Training Course) and Associate With Master Blueprint
Canvas Blueprint Course Functionality
Project Management in Wrike
Managing Project Reporting in Wrike
Managing Task Needs/Schedule in Wrike
Adding Tasks
Comments and Communication
Statuses
Updating Task Start and Due Dates
Predecessors
Durations
Rollups
Calculating Project Schedule by Deadline in Wrike
Creating Course Project Plans in Wrike
Setting Custom Capacity for Resources
Customizing Effort in a New Project Plan
Marking Projects Complete in Wrike
How to Set Up Workload Charts to Track Effort in Wrike
For-Credit Considerations
1-Sheet Population
Post-Development
AI Simulations
Program Facilitation & Operational Guidelines
Data Science
Facilitator Resources
Canvas Navigation
Adding Events to the Course Calendar
Navigating Canvas and the Dashboard
How Do I View Previous Courses I Have Taken or Facilitated?
Why Am I Receiving Duplicate Canvas Emails?
How Do I Edit My Canvas Profile?
Send Students a Direct Message on Canvas
Adding Notes to Canvas Gradebook
How Do I Send Students Nudges from the Gradebook?
Overview of 2024 Changes- Course Layout and Structure
How Can I Update My Canvas Notification Preferences?
Ursus Navigation
How Do I Access My Offer in Ursus?
How Do I Edit My Ursus Profile?
How Do I Request Time Off (Blackout Dates)?
How Can I Request to Learn More Courses?
Live Sessions
Enabling Student Use of Closed Captioning in Zoom
When Should I Schedule My Live Sessions For?
Changing Live Session Date and Time After Created with Facil Tool
Help! I Need to Reschedule a Live Session
Live Session Information page
Set up Live Sessions with the Facil Tool
Combining Live Sessions with Facil Tool
Course Set-Up
Course Set Up: Getting Ready for Live Sessions
Recording and Posting a Welcome Video
Course Set Up: When can I begin to edit my course?
Course Set Up: Reviewing Due Dates
Course Set Up: Reviewing Announcements
What Do I Need to Do to Make Sure My Course is Set Up Correctly?
How Do I Customize My Course Sections?
Course Announcements and Messages Templates
Facilitator Focus
Zoom and other Technical Support
Reporting Spam/Phishing
How Do I Set Up My Zoom Account?
Support Resources for Facilitators
Live Session/Zoom Trouble Shooting Guide & Technical Readiness
How to Upload Videos to Zoom On-Demand
Student Survey FAQs
How Do I Save and Refer Back to Zoom Recordings?
How Do I Find My Personal ID Meeting link in Zoom?
Benefits as an eCornell Employee
Do I Have Access to Microsoft Office as a Cornell Employee?
Taking Courses as a Student
Professional Development Benefit
Student Success
Help! My Students Can't View a Video Within My Course
Extensions and Retakes
Policies and Navigation Resources for Students
Symposium Access Extension- Fall 2025
Students enrolled through special groups: Corporate and VA
Unique Circumstances for Student Extensions and Retakes
Communicating with Students via Canvas
Can I Provide Students with a Letter of Recommendation?
Understanding and Addressing Instances of Plagiarism
Support Resources for Students
Understanding and Addressing Use of AI
Help! My Student is Having a Hard Time Uploading a Video
Unique Student Situations
I Have a Student Requesting Accommodations- How Should I Proceed?
Canvas Mobile App
Messaging Students via the Canvas Mobile App
Setting up and Navigating the Canvas Mobile app
Setting up Push Notifications on Canvas Mobile
Canvas App Features for eCornell courses
New Facilitator Onboarding and Quick References
Facilitator Onboarding at eCornell
Why Do I Have Multiple eCornell email and Canvas Accounts?
Quick reference: Systems and Accounts we use at eCornell
Quick reference guide: Key eCornell Personnel
How do I Log Onto Canvas and Access FACT101?
How Do I Add eCornell to My Email Signature?
Training Course Review & Facilitation Authorization
What to Expect During Live Shadowing Experience
Setting up Email Forwarding
Facilitator Expectations and Grading Help
Changes in Grading Scheme: Incomplete/Complete and 75% to 85%
New (Embedded/Inline Format) How do I grade Course Projects?
Navigating the Gradebook and Accessing the Speedgrader
Quick Reference: Sort assignments in the Speedgrader
How do I Grade Quizzes?
(Old format) How Do I Grade Course Projects and Add Annotations?
Rubrics for Effective Facilitation
Is There an Answer Key for my Course?
How to Monitor and Promote Student Progress
How Do I Grade Discussions?
Adding an Attempt to a Course Project
How Quickly Do I Need to Provide Grading to Students?
Payroll and the Monthly Scheduling Process
Codio References
Manually Graded “Reflect and Submit” Codio Exercises
Codio Quick Resources
Codio Reference: Embedded quiz questions (H5P)
Codio Reference: Checking for Completion Status
Codio Reference: Manually Graded Exercises
Codio Remote Feedback Tools
Codio Reference: Ungraded exercises
Codio Reference: Autograded Exercises
Archived
Table of Contents
- All Categories
- Platform Training
- Course Development & Delivery Platforms
- BugHerd
- BugHerd Basics - Members
BugHerd Basics - Members
Overview
Think of Members as your core team, usually comprising of your Devs, PMs, QAs, etc.
Members can...
- Do almost everything (except what's listed below)
Members can't...
- Create new projects.
- Manage user access (outside of projects they have access to)
- Manage BugHerd Billing & Account settings.
Bugherd Invite and Chrome Browser Extension
BugHerd is organized into Projects, with a one-to-one relationship between Canvas courses and BH Projects. When you are added to a BugHerd Project as a member, you will receive an automated email message informing you. In this message will be a link and instructions for installing the BugHerd browser extension, which is the main point of access for eCornell BugHerd projects (here is the direct link: https://www.bugherd.com/extensions)
Once you have installed the extension, you’ll be able to see the BugHerd logo in your browser; when you navigate to the course in Canvas, it will appear active (with a green checkmark) and will show the course/Project information when clicked:
Viewing Bugs With BugHerd
Once you have installed the extension, you’ll be able to see the BugHerd logo in your browser, in the lower right corner of the browser window.

- Click the logo to expand the toolbar.

- Click the Task icon to see existing
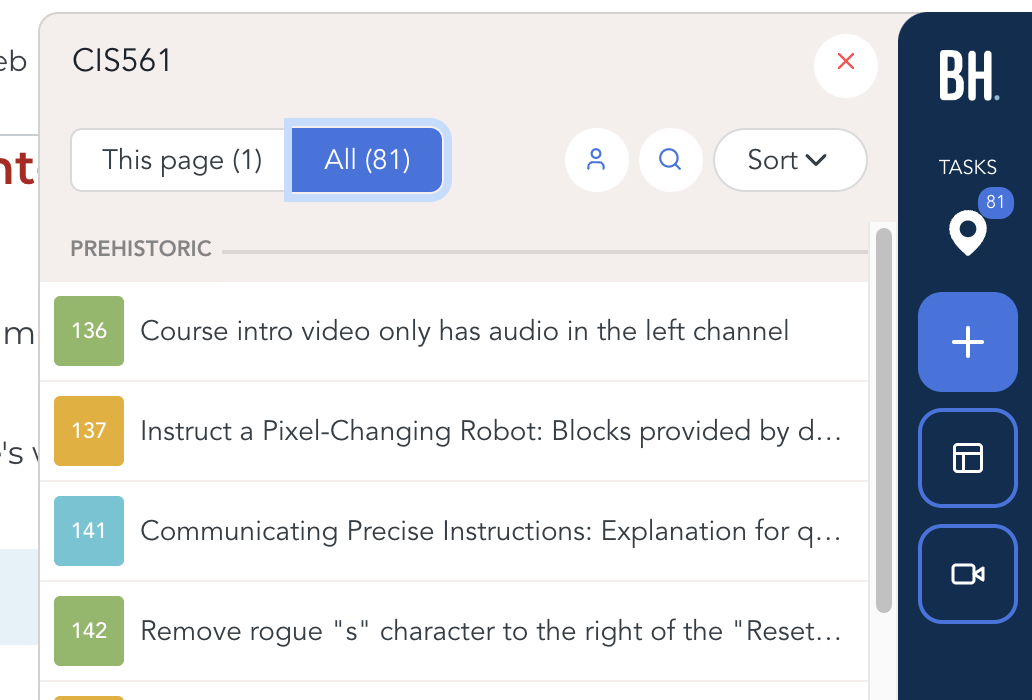
When you navigate to the course in Canvas, it will appear active (with a green checkmark) and will show the course/Project information when clicked:
- Task Details: This is the overall description of the bug, issue or suggestions: free-form text entry.
- Assignee: this is the person to whom the bug is assigned. You can leave this “unassigned” initially.
- Severity: you can set this to one of the four options “Critical; Important; Normal; and Minor”) or leave it on “not set” if you’re not sure.
- Tags: you can create new tags or use already-existing ones (these will appear if you search for them). If the project owner has established a list of tags, try to stick to these.
- Attach fIle(s): You can attach files if necessary; i.e., if there is a replacement for a file students need to download from this page.
Logging Bugs
- On the BugHerd sidebar, click the plus (+) button.
- Click on the website where you want to leave feedback. A new task box appears.
- Type your feedback in the box and click Create Task. Your feedback is saved and a pin appears on the webpage.
- If you want to edit your feedback, click the pin where you left feedback. The details of the task slide out from the sidebar.
Add annotations
You can open and add basic annotations to the automatically-created screenshot, like arrows, highlight boxes and callouts.If you have a bug, issue or suggestion that applies overall to the entire course, you can log it directly in the BugHerd project window by clicking the “ADD A NEW TASK” button in the upper right. This issue will have all the areas listed above except for “Add annotations” (since there is no screenshot or direct link). For working in Canvas when you have both an Admin and a Student user in a course, where your Canvas Admin user is the same as your BugHerd user (email/login ID):
- Log into Canvas with the Admin user (i.e., the one whose ID is the same as your BugHerd user;)
- Use Canvas’ “Act As User” functionality to test as a Student user (yours or someone else’s) and log issues into Beta Video (Screen Record) Feature: Bugherd has implemented a video recording feature to allow for capturing clips of movement or action on screen. This is useful to provide walkthroughs on interactions, animations, and anything else that's difficult-to-describe with written words alone. To use this feature:
- Click the video button from the bugherd sidebar.

- Agree to the screen sharing permissions, and select which screen you would like to record. You can select a specific window or individual tab from these options.

- Bugherd will begin recording, and you can interact with the webpage however you need to. Try to recreate the bug or issue in a way that clearly depicts or demonstrates the issue on screen.
- When you're done, hit the stop button from the control panel in the bottom left. Bugherd will proceed with the typical annotation logging window with the same features listed above. Fill out the remaining relevant information, and your recorded screen capture will be included when you click 'Create Task'.
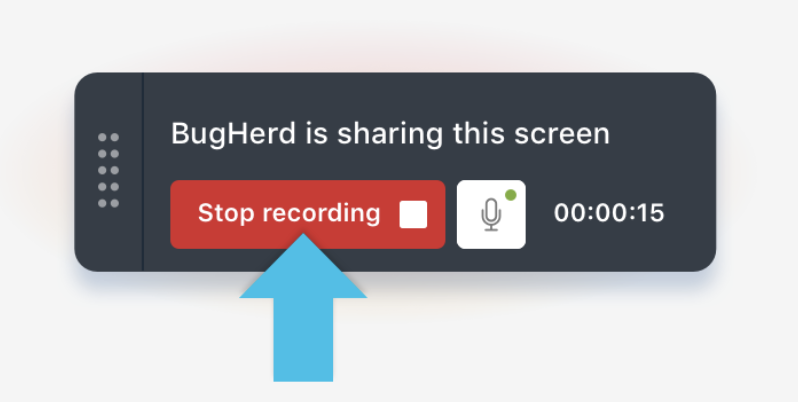

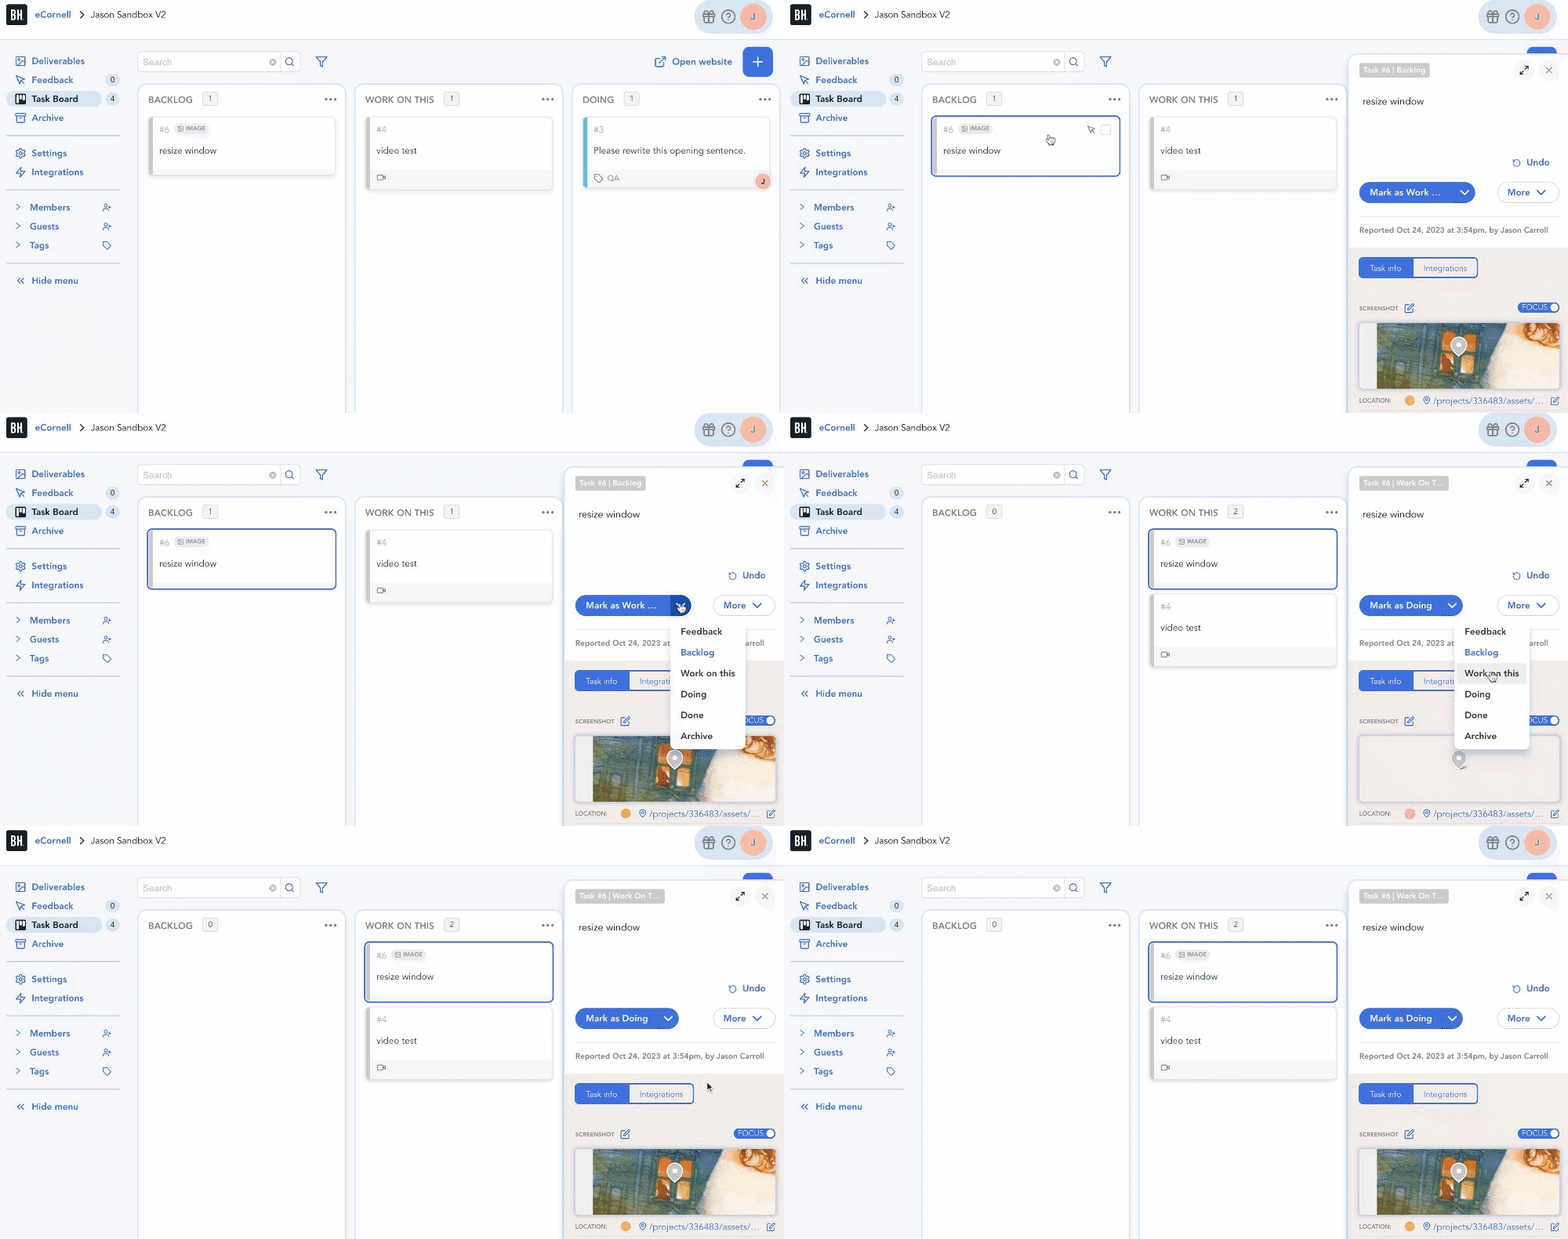
- Swim Lanes / Statuses: Within BugHerd projects tasks are assorted into different "Swim Lanes" which represent the different task statuses for that specific project.
- Standard Statuses: Most projects will contain a set of "standard" task statuses (Backlog, To Do, Doing, Done).
- Custom Statuses: Projects may also contain specified custom statuses for tasks. A common example is a status representing a particular individual's review.
- Changing Statuses: When a bug/task is created, it will be given the project's default status, which will appear is the leftmost swim lane (usually "Backlog"). To change the status of the task either drag the task from it's current lane to the desired lane. Or, click the task to open the details view, from which you can change the task's status.
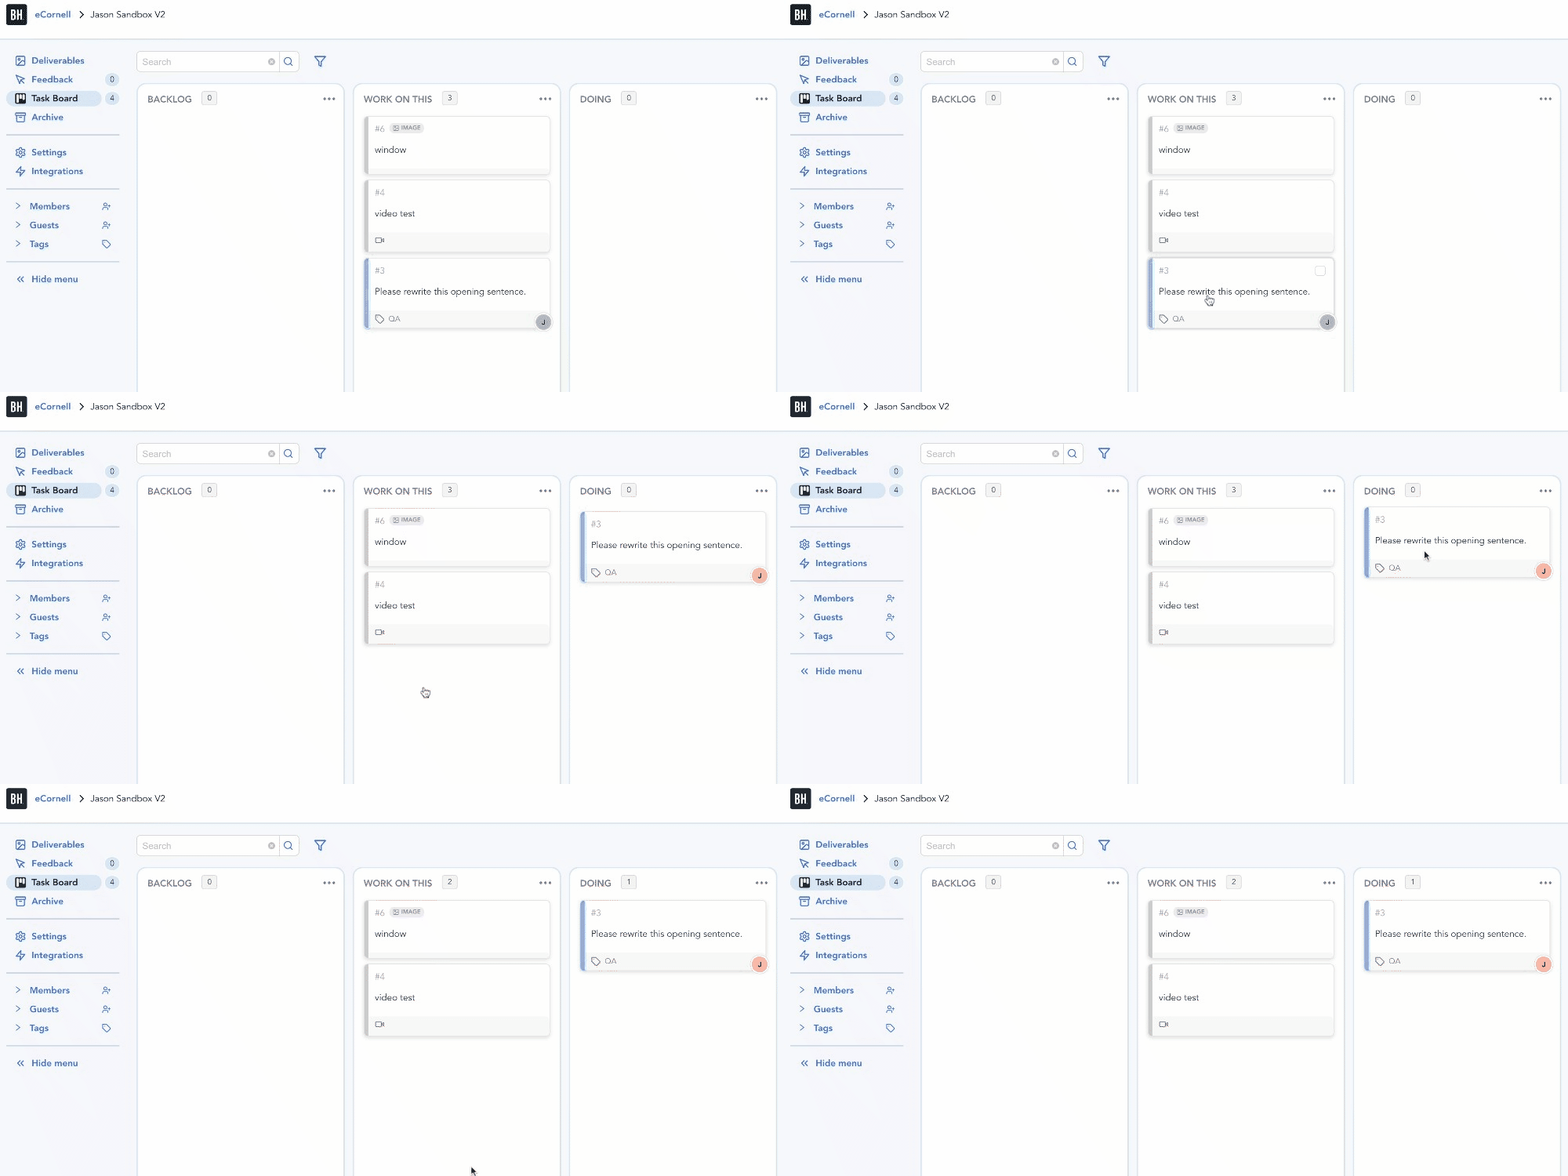
- Archive: Archiving a task will signify that that task/bug has been fully completed, and will now be stored in the separate "Archive" tab.
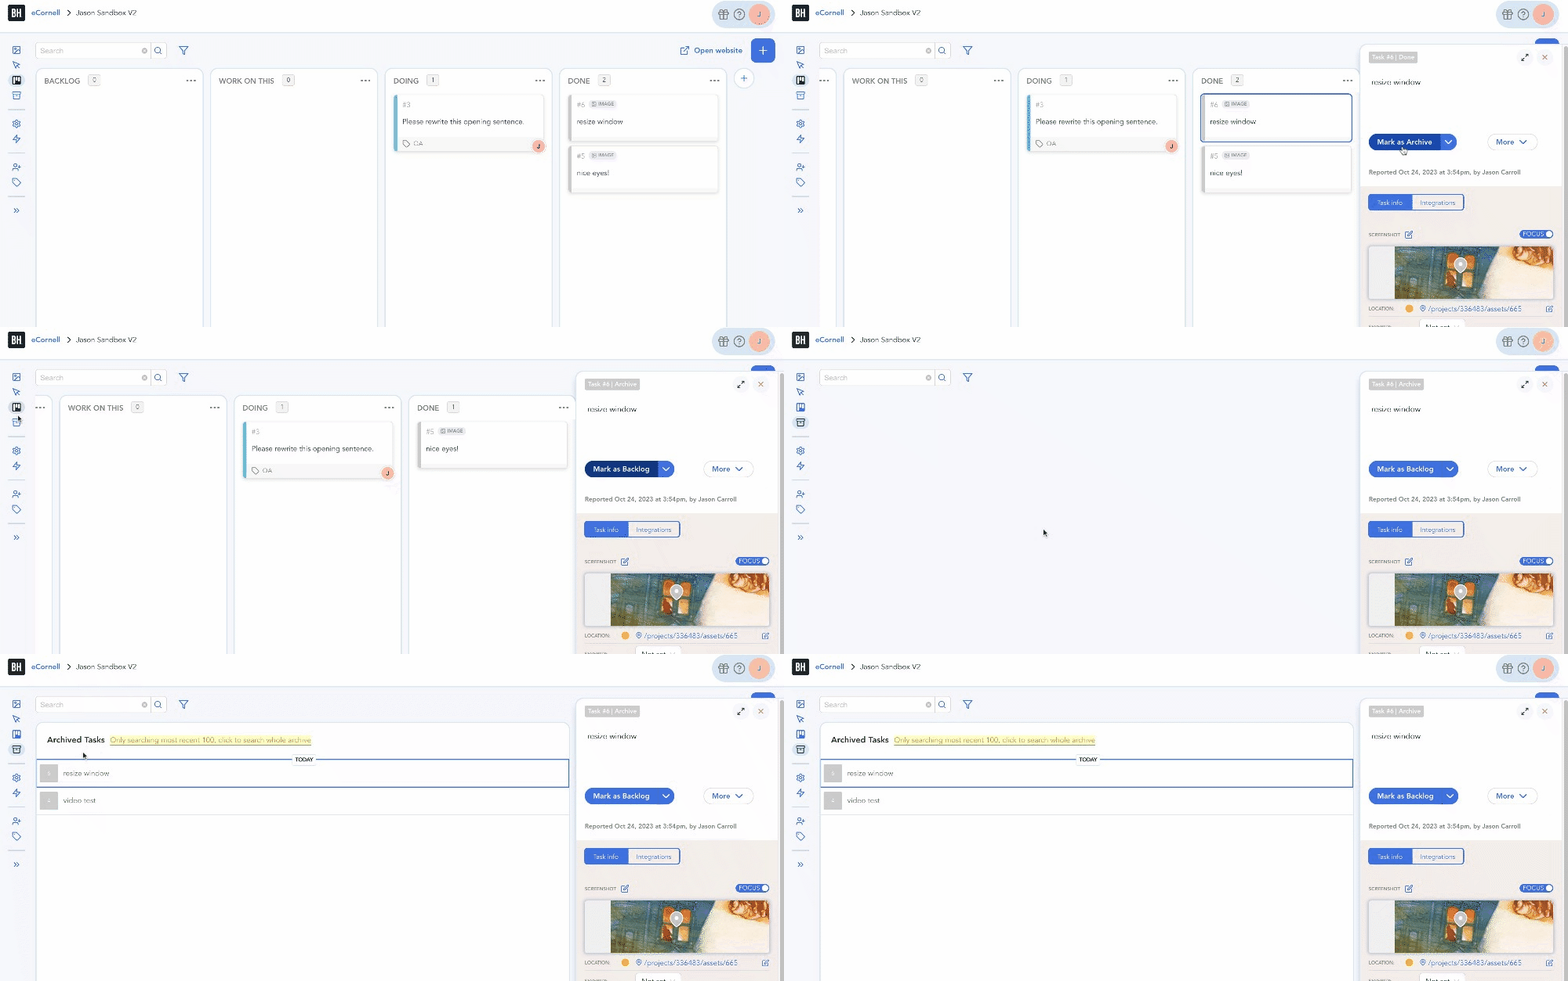
- Archived tasks can also be moved back to the project board, but selecting "Move to task board" while hovering over the task in the archive tab. Selecting this will place the task in the original default status ("Backlog" for the above demo project).Clicking the blue "Open Website" button in the upper right corner of the project page may possibly take you to incorrect version of the course. This occasionally happens after the Alpha course is created in Canvas. Please be sure to confirm you are in the correct course if you visit the course from the "Open Website" button.Task DetailsWhen a task in a BugHerd project is clicked, a separate right hand details pane will open (users can also click the expand button to open a full screen details view). Below are the pieces of information that can be found/updated.
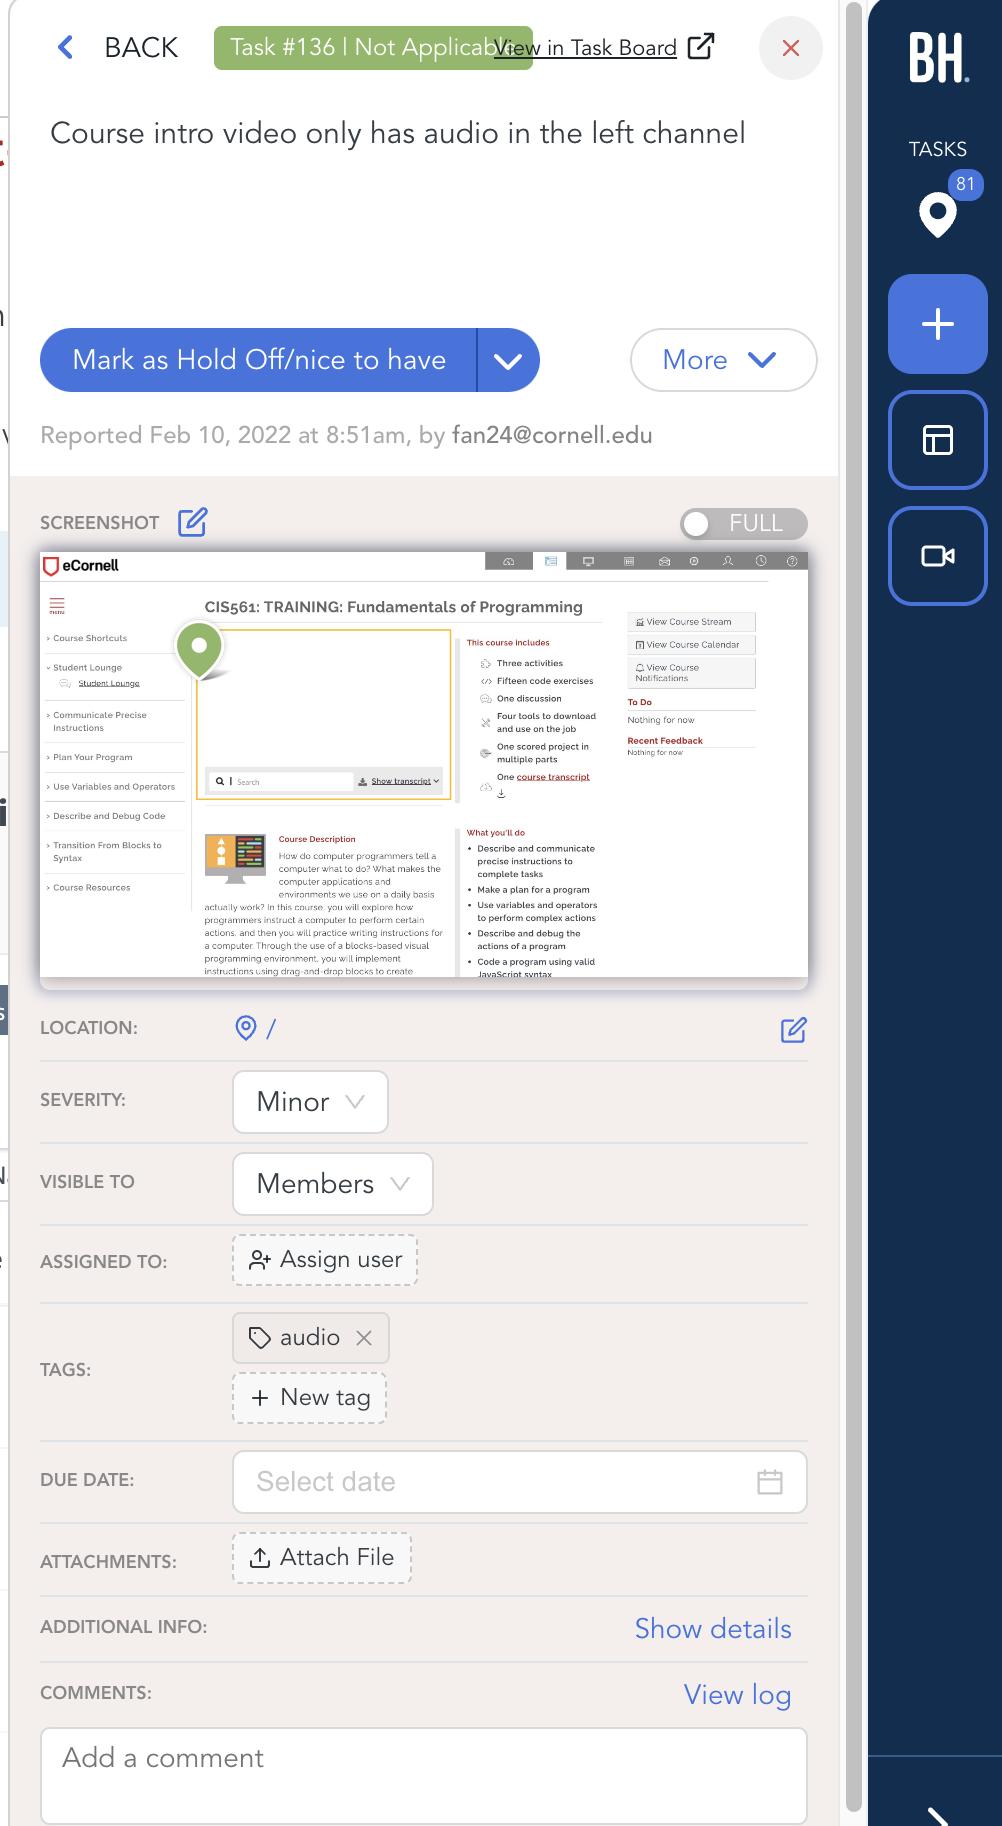
- Status: This, as discussed above, is where the task's current status can be seen and/or changed.
- Severity: Changing a task/bug's "severity" will change the color of the task within the BugHerd project, as well as the color of the marker from the original page that the bug was reported on. Severity can be set to one of five system based options (Not Set, Minor, Normal, Important, Critical) which will help illustrate the urgency associated with that specific bug.
- Assignee: This will be the BugHerd member(s) tasked with the bug. Only members who have been added to the project can be assigned.
- Tags: Tags are a form of meta data that can be applied to all bugs/tasks in a project. Currently we are not using the tagging feature extensively.
- Due date: Represents the date that the task should be completed by.
- Attachments: Files from your local computer can be uploaded and attached to individual tasks using the "Attach File" button.
- Additional Info (User details): This section will show the individual's (who reported the bug) machine details at the time of logging. Such as browser version, hardware details, etc. This will only needed for specific circumstances.
- Comments: Any member within the project can post a comment on a task in it's details view. @mentions can be used to ensure a notification is sent directly to a team member.Tip: Make sure to visit your notification settings in your account's "Settings" tab to ensure your notification preferences are customized as needed.
- More actions: Here you can copy the direct url link to this task, move the task to another project in the eCornell account, or delete the task all together.
- Page SS: A screenshot of the original web page that the bug was reported on will be visible while in the details view of the task.
- Page Link: The link to the original page that the bug was reported on will appear on the task details view.Note: If a Canvas page's title changes during the dev process, the url link to the page will also change. Meaning the page link on the task details view will need to be manually updated to the new Canvas page url.Interacting w/ Guests
- From within the project, you can also add guests for review within the guests tab/box.
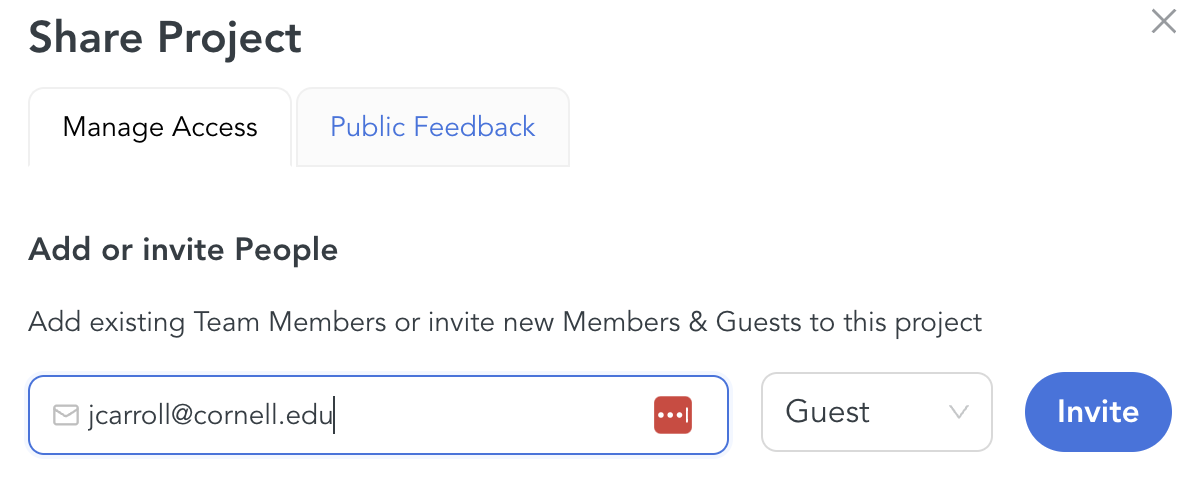
- Guests will not be able to access the backend of the BugHerd project to get to the swim lanes or collective set of tasks/bugs.
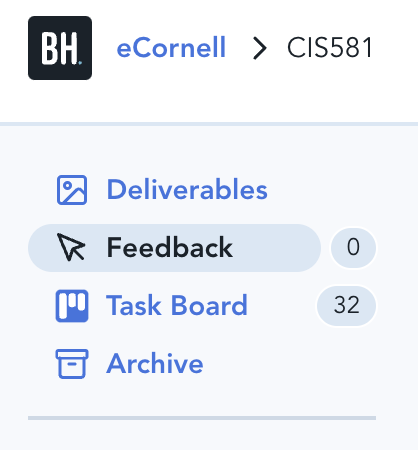
- But will have access to the course associated with the project, and will be able to log bugs when reviewing the course. All bugs/comments from guests will appear in the separate "Feedback" tab in the project.
- The dashboard within BugHerd is a new concept introduced to pull together all tasks/bugs that the current user is assigned to, across all projects on the account.
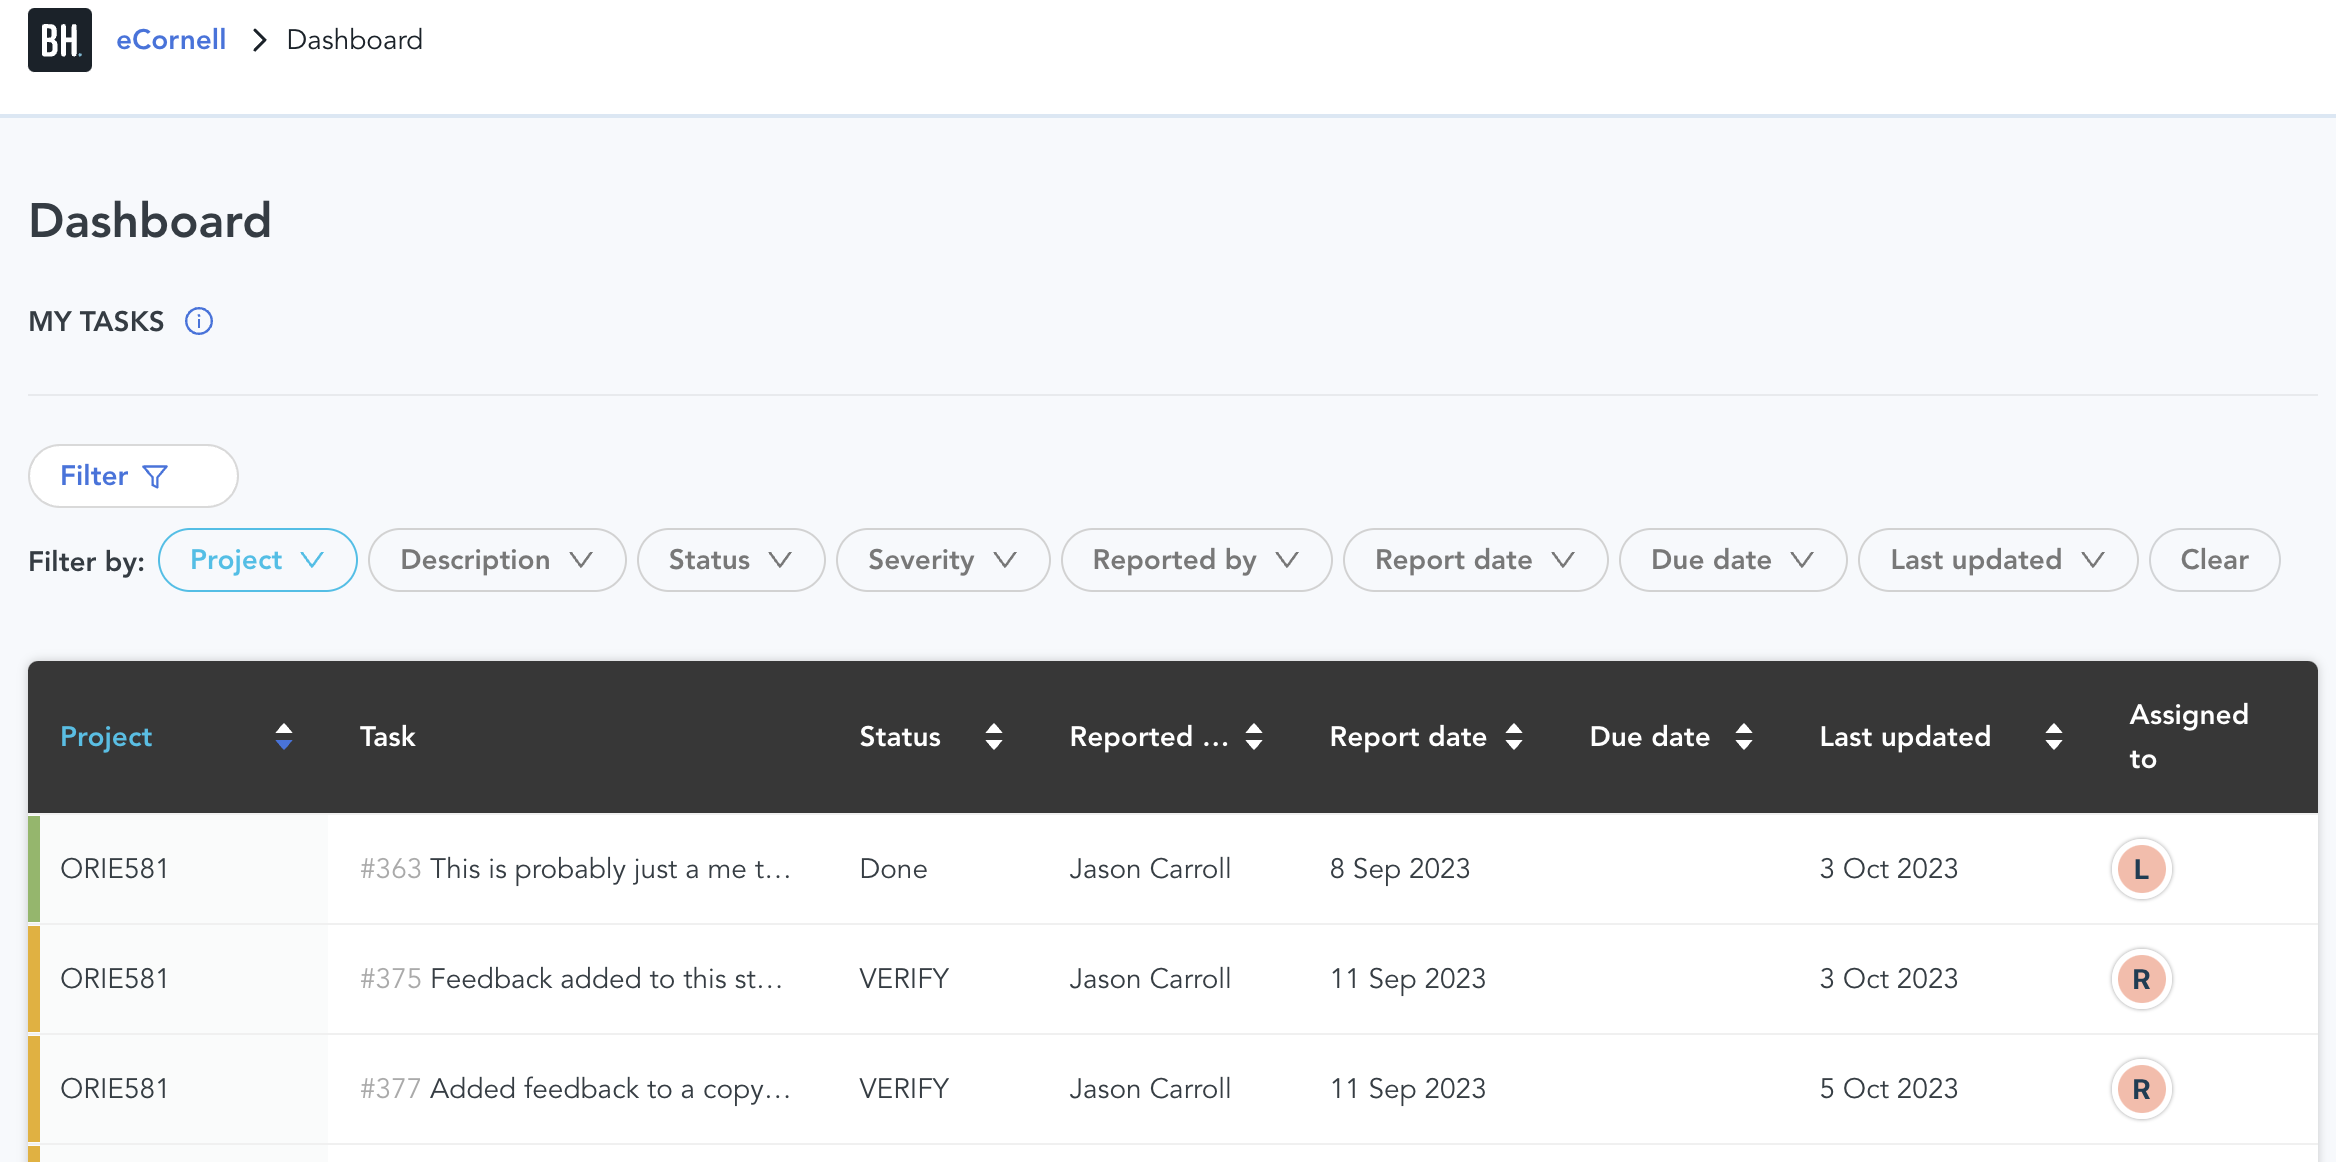
- When one of the tasks is clicked in the dashboard, the user will be brought into that task's project, and the task/bug details view will be opened.
- In the dashboard, you can click the filter button in the top left to show specific tasks that are assigned to you in the system.
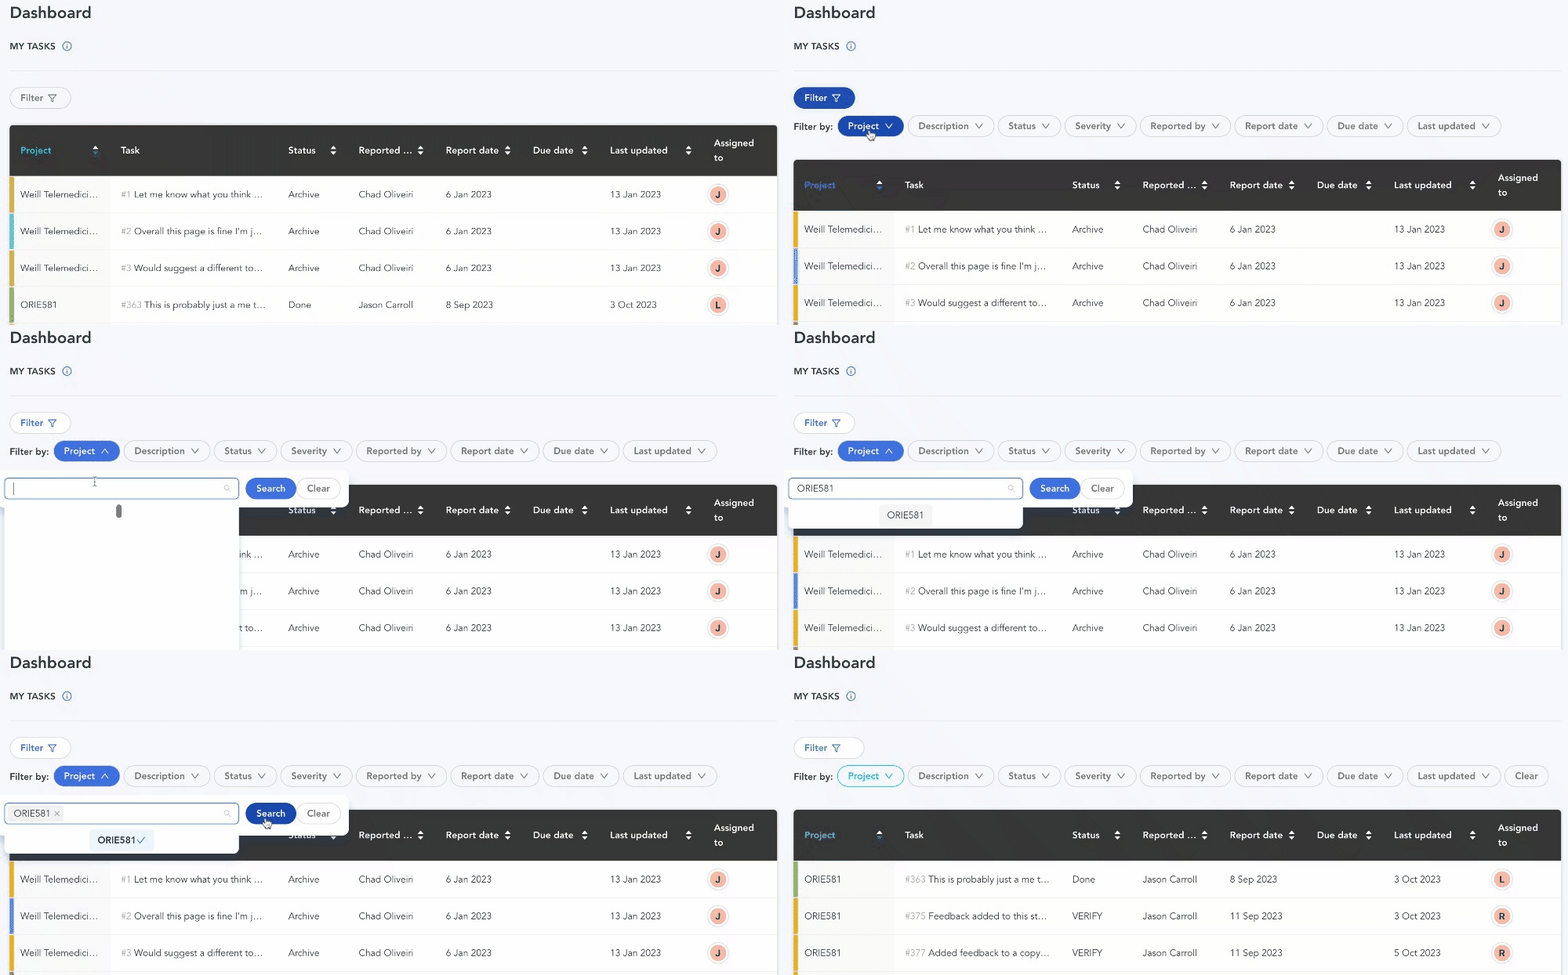
- Currently you can filter based off the following criteria:
- Project - Search for a specific project(s)
- Description - Search task descriptions for a specific word or phrase
- Status - Show tasks in a specific status(s)
- Severity- Show tasks in a specific severity
- Reported by - Show tasks reported by a specific individual
- Report date - Show tasks reported within a specific date range
- Due date - Show tasks due within a specific date range
- Last updated date - Show tasks last updated within a specific date range
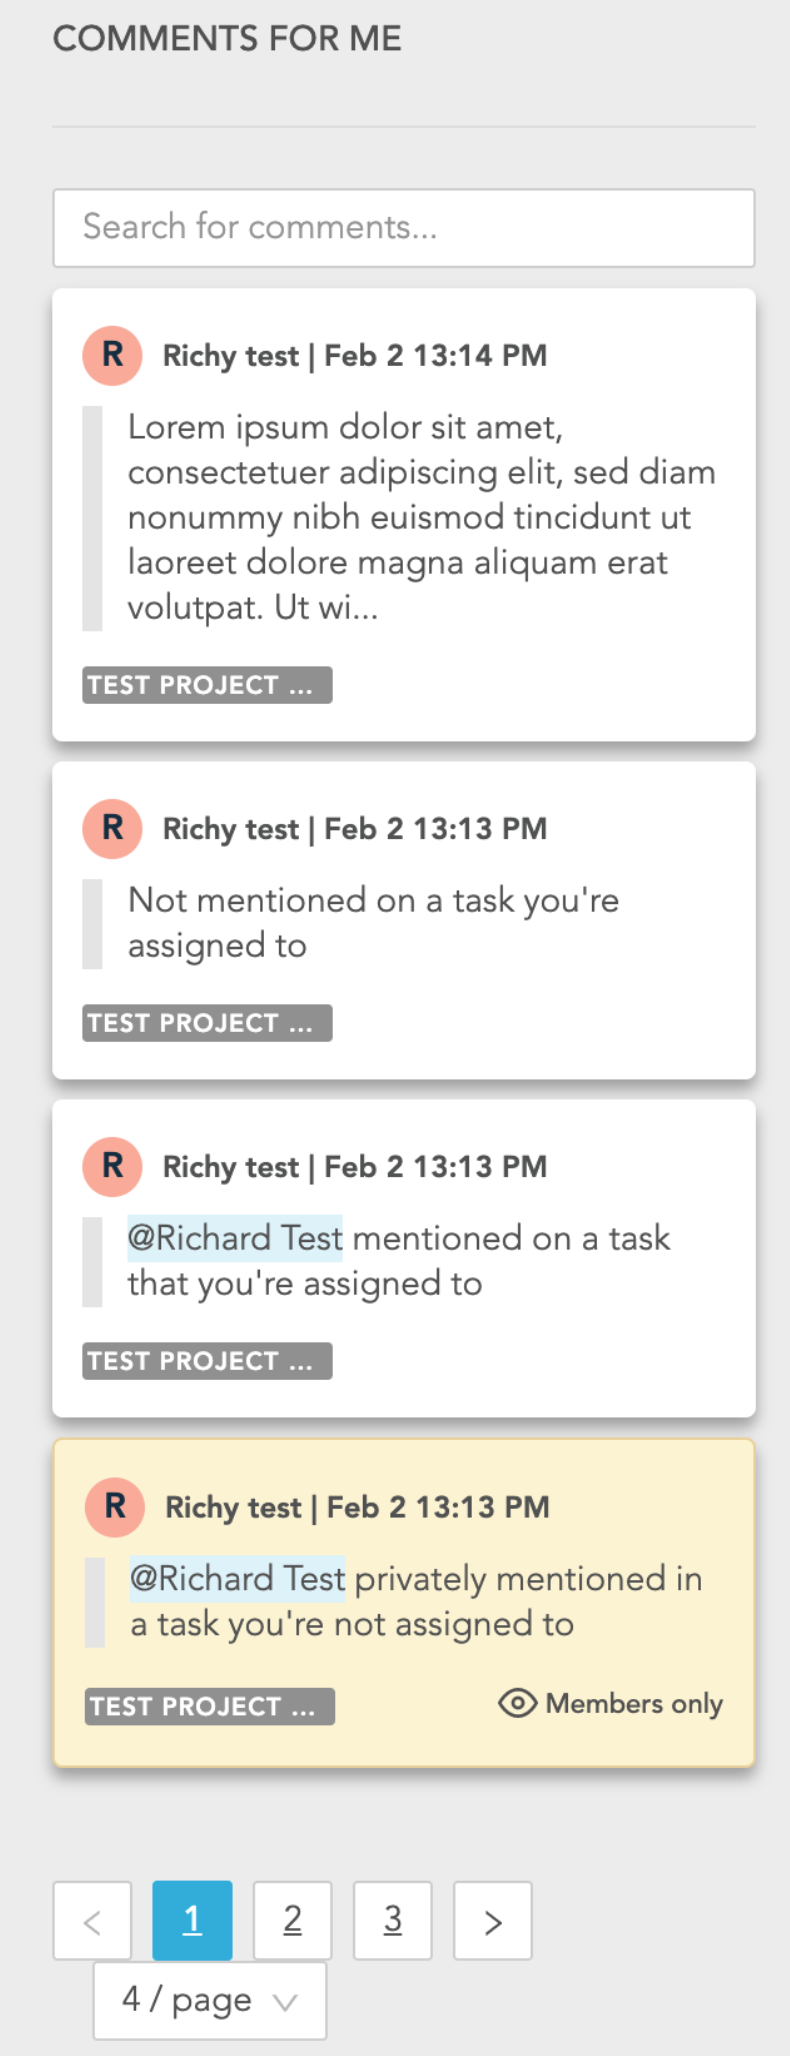
- In Comments for me you’ll be able to view comments that you’ve been mentioned in and comments on tasks you’re assigned to. You can also search comments using the search field. Users can simply use the search bar in the dashboard and enter their username, and BugHerd will pull up all the comments that were addressed to them.
- Currently you can filter based off the following criteria:
- In the dashboard, you can click the filter button in the top left to show specific tasks that are assigned to you in the system.
- When one of the tasks is clicked in the dashboard, the user will be brought into that task's project, and the task/bug details view will be opened.
- The dashboard within BugHerd is a new concept introduced to pull together all tasks/bugs that the current user is assigned to, across all projects on the account.
- From within the project, you can also add guests for review within the guests tab/box.
- Swim Lanes / Statuses: Within BugHerd projects tasks are assorted into different "Swim Lanes" which represent the different task statuses for that specific project.
