Departmental Standards
Company-Wide
eCornell Styleguide & Branding
Cornell University Branding
Writing and Editing Style Guide
Faculty and Expert Naming Conventions in Courses
Cornell School and Unit Names
Tips for Campus Engagements
LSG
Legal Policies
CSG
Updating Wrike Due Dates
Photography Style Guide
eCornell Mini Visual Style Guide
The Pocket Guide to Multimedia Design Thinking (*as It Pertains to Your Job Here)
Creative Services (CSG) Handbook
Administrative
LSG Meeting Recordings and Notes
Sending Faculty Sign-Off Forms in Adobe Sign
Weekly Faculty Status Emails
Animation/Motion Design
Instructional Design
Required Course Elements
The Pocket Guide to Instructional Design Thinking at eCornell
Adding AER to Canvas
Grading
D&D Newsletter
LSG Newsletter (LSGN) - February 2024
LSG Newsletter (LSGN) - March 2022 Edition
LSG Newsletter (LSGN) - December 2023
LSG Newsletter (LSGN) - October 2021 Edition
LSG Newsletter (LSGN) - June 2022 Edition
D&D Newsletter November 2024
LSG Newsletter (LSGN) - August 2022 Edition
LSG Newsletter (LSGN) - June 2023
LSGN Newsletter April 2023
LSG Newsletter (LSGN) - February 2022 Edition
LSG Newsletter (LSGN) - October 2022 Edition
LSGN Newsletter February 2023
LSGN Newsletter March 2023
D&D Newsletter September 2024
LSG Newsletter (LSGN) - August 2023
LSG Newsletter (LSGN) - March 2024
LSG Newsletter (LSGN) - April 2022 Edition
D&D Newsletter - August 2024
LSGN Newsletter January 2023
LSG Newsletter (LSGN) - October 2023 article
LSGN Newsletter (LSGN) - April 2024
LSG Newsletter (LSGN) - November 2021 Edition
D&D Newsletter February 2025
LSG Newsletter (LSGN) - January 2022 Edition
LSGN Newsletter December 2022
D&D Newsletter April 2025
LSG Newsletter (LSGN) - July 2022 Edition
LSG Newsletter (LSGN) - September 2022 Edition
Course Development
Image Uploads for Inline Projects
How to Install the Firefox Canvas Utilities Extension
Revising a Course/ Creating a Redux Version/ Course Updates
Creating a Perma Link With Perma.cc
Course Content Deletion Utility — Removing All Course Content
Teleprompter Slide Template
Course Names
Requesting High Resolution Video Uploads
Technical Talking Points Template
Writing Discussions: Guidelines for IDs
Online Resources in Credit-Bearing Courses
Hiring Actors for an eCornell Project
Marketing
Operations
Tech
Master Course Template Differences (8675309s)
Non-CSG File Uploads
Mentored Learning Conversion Process and Resources
Doc-Based Master Course Template and Standards (8675309-DOC)
Pedagogical Guidelines for Implementing AI-Based Interactives: AER
Coding Master Course Template and Standards (8675309-CODE)
Practice Quiz Standards
Hero Image
Platform Training
Administrative Systems
ADP
Google Drive
Downloadables Process
Embed a Document from Google Drive
Adding Google Links to Canvas
File Naming and Storage Convention Standards
Google Drive for Desktop Instructions
Storing Documents in Multiple Locations
Wrike
Wrike System Fundamentals
Field Population
1.0 to 2.0 Wrike Project Conversion
Blocking Time Off in Work Schedule (Wrike)
Wrike Custom Field Glossary
Wrike "Custom Item Type" Definitions
How to Create a Private Dashboard in Wrike
Using Timesheets in Wrike
Importing Tasks into a Wrike Project
Wrike Project Delay Causes Definitions
Setting OOO Coverage for Roles in Wrike
How to Change a Project's Item Type in Wrike
Using Search in Wrike
How to Create a Custom Report in Wrike
@ Mentioning Roles in Wrike
Automate Rules
Using Filters in Wrike
Managing Exec Ed Programs in Wrike
External Collaborators
Wrike for External Collaborators: Getting Started
Wrike for External Collaborators: Views
Wrike for External Collaborators: Tasks in Detail
Wrike Updates
New Experience Update in Wrike
Wrike Course Development Template 2.0 - What's New
Wrike - Course Development Template 3.0 Release Notes
Wrike Process Training
Course Development & Delivery Platforms
Canvas
Development
Adding Custom Links to Course Navigation
Adding Comments to PDFs from Canvas Page Links
Setting Module Prerequisites and Requirements in Canvas
Canvas Page Functionality
Create a New Course Shell From 8675309
Using LaTeX in Canvas
Search in Canvas Using API Utilities - Tutorial
Reverting a Page to a Previous Version
Student Groups
Create Different Canvas Pages
Importing Specific Parts of a Canvas Course
Canvas HTML Allowlist/Whitelist
Understanding Canvas Customizations/Stylesheets
Operations
Discussion Page Standards
How to import a CU course containing NEW quizzes
Canvas LMS: NEW Quiz compatibility
Faculty Journal
Course Content Style Guide
Click-To-Reveal Accordions in Canvas
Course Maintenance Issue Resolution Process
Meet the Experts
Codio
Codio Operations
Managing Manually Graded “Reflect and Submit” Codio Exercises
Codio Structure and Grading for Facilitators
Premade Codio Docs for Ops & Facilitators
Codio Remote Feedback Tools for Facilitators
Developers
Development Processes
Creating a New Codio Course
Creating a New Codio Unit
Integrating a Codio Course into Canvas Using LTI 1.1
Embedding a Codio Unit into Canvas
Setting Up the Class Fork
Jasmine Autograde Unit Testing
Setting Up the Class Fork (LTI 1.3)
R Studio - Exclusion List for R Code
Mocha/Selenium Autograding
Starter Packs in Codio
Configuring Partial Point Autograders in Codio
Launch a Jupyter Notebook from VM
AI Extensions
Program-Specific Developer Notes
Codio Functionality
Jupyter Notebooks
Jupyter Notebooks - nbgrader tweaks
Jupyter Notebooks Style Guide
Adding Extensions to Jupyter Notebooks
Setting up R with Jupyter Notebooks
Change Jupyter Notebook Auto Save Interval
How to Change CSS in Jupyter Notebook
RStudio in Codio
How To Centralize the .codio-menu File to One Location
Codio Fundamentals for LSG
Using the JupyterLab Starter Pack
Using Code Formatters
Using the RStudio Starter Pack
Conda Environments in Codio
Updating Codio Change Log
Codio Basics: Student Support
eC Facilitator Guide to Codio
Migrating to Updated Codio Courses
Qualtrics
Ally
Ally Institutional Report Training
Ally Features Overview Training
Using the Ally Report in a Course
Ally Vendor Documentation/Training Links
Adobe
Other Integrations
Pendo Overview
How to Add VitalSource eBooks in Canvas
Enabling Zoom/"Live Sessions" in a Course
Pendo Guide Creation
H5P
Modifying Subtitles in H5P Interactive Videos
Embedding H5P Content Into Canvas
Troubleshooting H5P Elements in Canvas
Inserting Kaltura Videos into H5P Interactive Videos
Adding Subtitles to H5P Interactive Videos
S3
BugHerd
Instructional Technologies & Tools Inventory
Canvas API Utilities
Getting started with the MOP Bot
eCornell Platform Architecture
HR & Training Systems
Product Development Processes
Accessibility
What Is Accessibility?
What Is Accessibility?
Accessibility Resources
Accessibility Considerations
Accessibility Support and Assistive Technology
Structural Accessibility
Accessibility Design and Development Best Practices
Accessible Images Using Alt Text and Long Descriptions
Accessible Excel Files
Accessibility and Semantic Headings
Accessible Hyperlinks
Accessible Tables
Creating Accessible Microsoft Files
Mathpix: Accessible STEM
Design and Development General Approach to Accessibility
Integrating Content Authored by a Third Party
Planning for Accessible Tools
Accessibility Considerations for Third Party Tools
Studio Accessibility
Designing for Accessible Canvas Courses
Accessibility: Ongoing Innovations
Course Development
Planning
Development
0. Design
1. Codio Units
1. Non-Video Assets
3. Glossary
4. Canvas Text
4. Tools
4. Tools - Wrike Task Definitions
3. Review And Revise Styled Assets
ID/A to Creative Team Handoff Steps
General Overview of Downloadables Process
Course Project: Draft and Final
Excel Tools: Draft and Final
eCornell LSG HTML Basics
1. Non-Video Assets - Wrike Task Definitions
2. Video
Multifeed Video
2. Video (Standard) - Wrike Task Definitions
Studio Tips
Tips for Remote Video Recording Sessions
Who to Tag for Video Tasks
3. Animation
3. Animation - Wrike Task Definitions
2. Artboard Collab Doc Prep
6b. Motion Design Review and Revise
Who to Tag for Animations Tasks
3. Artboard Collab Process Walkthrough
DRAFT - FrameIO Process Walkthrough
Motion Contractor Guide for IDAs / IDDs
Requesting / Using Stock Imagery (Getty Images and Shutterstock)
3. Ask the Experts
5. On-Demand Conversion
5. Review
5. Review - Wrike Task Definitions
1. Prep Course for Reviews
2. Conduct Student Experience Review
3. Implement Creative Director Edits
3. Implement IDD Edits
3. Implement Student Experience Review Edits
4. CSG - Revise Tools Export 1
5. Conduct Faculty Review
6. Implement Faculty Edits
7. Conduct Technical Review of Course (STEM-only)
Technical Student Experience (Tech SE) Review Process
2. Conduct IDD or Sr ID Review
6. Alpha
6. Alpha - Wrike Task Definitions
Alpha Review Process
Prepare a course for Alpha review
Schedule & Conduct Alpha Triage Meeting
7. QA
7. QA - Wrike Task Definitions
1. Prep Course for QA
2. Copy Edit Captions
2. Copy Edit Course & Files
4. Conduct Content QA of Course
4. Final Creative Review and Export
Adding Chat With Tech Support to Course Navigation
5. Implement QA Edits
Working With Video Captions That Contain Special Characters
Copy Edit Captions in SubPLY
Creating a Course Style and Settings Guide
Copy Editing Content in Frame.io
1. Complete Dev to QA Checklist
Copy Edit Captions in 3Play
Tag a Video for Transcription by 3Play
Course QA Checklists
8. Deployment
8. Deployment - Wrike Task Definitions
1. Finalize Master Version of Course
2. Create & Add Course Transcript (CT) to Course
Replace a Master -M With a Redux Version of the Course
3. Create -T (Training Course) and Associate With Master Blueprint
Canvas Blueprint Course Functionality
Project Management in Wrike
Managing Project Reporting in Wrike
Managing Task Needs/Schedule in Wrike
Adding Tasks
Comments and Communication
Statuses
Updating Task Start and Due Dates
Predecessors
Durations
Rollups
Calculating Project Schedule by Deadline in Wrike
Creating Course Project Plans in Wrike
Setting Custom Capacity for Resources
Customizing Effort in a New Project Plan
Marking Projects Complete in Wrike
How to Set Up Workload Charts to Track Effort in Wrike
For-Credit Considerations
1-Sheet Population
Post-Development
AI Simulations
Program Facilitation & Operational Guidelines
Data Science
Facilitator Resources
Canvas Navigation
Adding Events to the Course Calendar
Navigating Canvas and the Dashboard
How Do I View Previous Courses I Have Taken or Facilitated?
Why Am I Receiving Duplicate Canvas Emails?
How Do I Edit My Canvas Profile?
Send Students a Direct Message on Canvas
Adding Notes to Canvas Gradebook
How Do I Send Students Nudges from the Gradebook?
Overview of 2024 Changes- Course Layout and Structure
How Can I Update My Canvas Notification Preferences?
Ursus Navigation
How Do I Access My Offer in Ursus?
How Do I Edit My Ursus Profile?
How Do I Request Time Off (Blackout Dates)?
How Can I Request to Learn More Courses?
Live Sessions
Enabling Student Use of Closed Captioning in Zoom
When Should I Schedule My Live Sessions For?
Changing Live Session Date and Time After Created with Facil Tool
Help! I Need to Reschedule a Live Session
Live Session Information page
Set up Live Sessions with the Facil Tool
Combining Live Sessions with Facil Tool
Course Set-Up
Course Set Up: Getting Ready for Live Sessions
Recording and Posting a Welcome Video
Course Set Up: When can I begin to edit my course?
Course Set Up: Reviewing Due Dates
Course Set Up: Reviewing Announcements
What Do I Need to Do to Make Sure My Course is Set Up Correctly?
How Do I Customize My Course Sections?
Course Announcements and Messages Templates
Facilitator Focus
Zoom and other Technical Support
Reporting Spam/Phishing
How Do I Set Up My Zoom Account?
Support Resources for Facilitators
Live Session/Zoom Trouble Shooting Guide & Technical Readiness
How to Upload Videos to Zoom On-Demand
Student Survey FAQs
How Do I Save and Refer Back to Zoom Recordings?
How Do I Find My Personal ID Meeting link in Zoom?
Benefits as an eCornell Employee
Do I Have Access to Microsoft Office as a Cornell Employee?
Taking Courses as a Student
Professional Development Benefit
Student Success
Help! My Students Can't View a Video Within My Course
Extensions and Retakes
Policies and Navigation Resources for Students
Symposium Access Extension- Fall 2025
Students enrolled through special groups: Corporate and VA
Unique Circumstances for Student Extensions and Retakes
Communicating with Students via Canvas
Can I Provide Students with a Letter of Recommendation?
Understanding and Addressing Instances of Plagiarism
Support Resources for Students
Understanding and Addressing Use of AI
Help! My Student is Having a Hard Time Uploading a Video
Unique Student Situations
I Have a Student Requesting Accommodations- How Should I Proceed?
Canvas Mobile App
Messaging Students via the Canvas Mobile App
Setting up and Navigating the Canvas Mobile app
Setting up Push Notifications on Canvas Mobile
Canvas App Features for eCornell courses
New Facilitator Onboarding and Quick References
Facilitator Onboarding at eCornell
Why Do I Have Multiple eCornell email and Canvas Accounts?
Quick reference: Systems and Accounts we use at eCornell
Quick reference guide: Key eCornell Personnel
How do I Log Onto Canvas and Access FACT101?
How Do I Add eCornell to My Email Signature?
Training Course Review & Facilitation Authorization
What to Expect During Live Shadowing Experience
Setting up Email Forwarding
Facilitator Expectations and Grading Help
Changes in Grading Scheme: Incomplete/Complete and 75% to 85%
New (Embedded/Inline Format) How do I grade Course Projects?
Navigating the Gradebook and Accessing the Speedgrader
Quick Reference: Sort assignments in the Speedgrader
How do I Grade Quizzes?
(Old format) How Do I Grade Course Projects and Add Annotations?
Rubrics for Effective Facilitation
Is There an Answer Key for my Course?
How to Monitor and Promote Student Progress
How Do I Grade Discussions?
Adding an Attempt to a Course Project
How Quickly Do I Need to Provide Grading to Students?
Payroll and the Monthly Scheduling Process
Codio References
Manually Graded “Reflect and Submit” Codio Exercises
Codio Quick Resources
Codio Reference: Embedded quiz questions (H5P)
Codio Reference: Checking for Completion Status
Codio Reference: Manually Graded Exercises
Codio Remote Feedback Tools
Codio Reference: Ungraded exercises
Codio Reference: Autograded Exercises
Archived
Table of Contents
- All Categories
- Product Development Processes
- Course Development
- Development
- Project Management in Wrike
- Managing Task Needs/Schedule in Wrike
- Updating Task Start and Due Dates
Updating Task Start and Due Dates
Making sure the dates on Wrike projects and tasks are current is an important step in making sure all eCornell users in Wrike can stay up to date on a projects current process. For this article, we will focus on updating task dates specifically. Updating task dates within Wrike is also a good way of making sure you as an individual user has a straightforward experience when using Wrike on an everyday basis.
Start and Due Date Definitions
For the eCornell use case within Wrike, it's important to note how users should be considering both the term "Start Date" and "Due Date" for tasks within our production projects.
Start Dates are fairly straightforward, and are when it is assumed that work will be able to begin towards completing a task.
Due Dates are a less straightforward term in our use case. Due dates should be considered more as "Expected Completion Dates". Meaning, the due date of a task is not signifying specifically when a task needs to be done, but more so when it's assumed it will be completed.
Who Updates Task Dates
It is expected that anyone who is assigned a task will be the person updating a tasks dates as needed, as they are the ones with the most current and accurate information about when that task can and will be worked on.
The importance of task dates being maintained by individual assignees is especially true for the more service oriented groups of the production team (QA, Video, Motion, Graphics, etc) as they will have even more specific knowledge and context regarding a task's completion.
If assignees of tasks within a project are not updating their dates and keeping the task data current, it will then be expected for the project's overseer/manager to periodically check the project, and update the tasks dates as needed. Instructional Design team members (ID, IDA, or IDD) will be the individuals given this responsibility for projects, but it is assumed by default that this position will be filled by the project's ID, unless otherwise noted. A different role, besides ID, being given the status of overseer/manager of a particular project will be determined based off a multitude of potential variables such as, IDD team, project content, project timeline, individual's aptitude and availability, etc.
When to Update Task Dates
All tasks within course production projects will have dates attached to them by default. These dates are established by the templated dependency chain and predecessors applied to all projects and their tasks.
However, the initial dates and durations that are applied out of this mechanism are based on general assumptions about how long certain tasks will take to complete. So it is very unlikely that once production begins on a project that all of the initial dates that are applied will be 100% accurate, therefor individual task dates will need to be updated if the assumed dates are no longer realistic.
The predecessors and the dependency chain will automatically update and shift all dates within a project once one of the tasks in it is changed, either by pushing out all of the dates down chain of an adjusted task, or pulling them in (depending on if a task's timeline for completion is extended or shortened). Once these automatic changes have taken place, on the rest of the dates within the project, it is likely that some of these assumed dates will fall out of alignment with reality, and will need updating.
It is therefor recommended, when considering the above, that assignees/project overseers focus on updating the task dates that are currently being worked on, or that soon will be worked on. And allowing all of the applied dates that are generated by the dependency chain to act as a more high level predictive function, giving a general estimation of a project completion timeline.
Ways to Update Task Dates
Within Wrike, there are a number of views and ways in which a user can update the dates of a task. Here are some of the more critical methods when considering how to keep a project's tasks dates current. Which method(s) are used should be determined by user preference.
Task Details View
Within the details view of a task you will see the start and due dates, of that particular task, in the top left corner of the details screen.
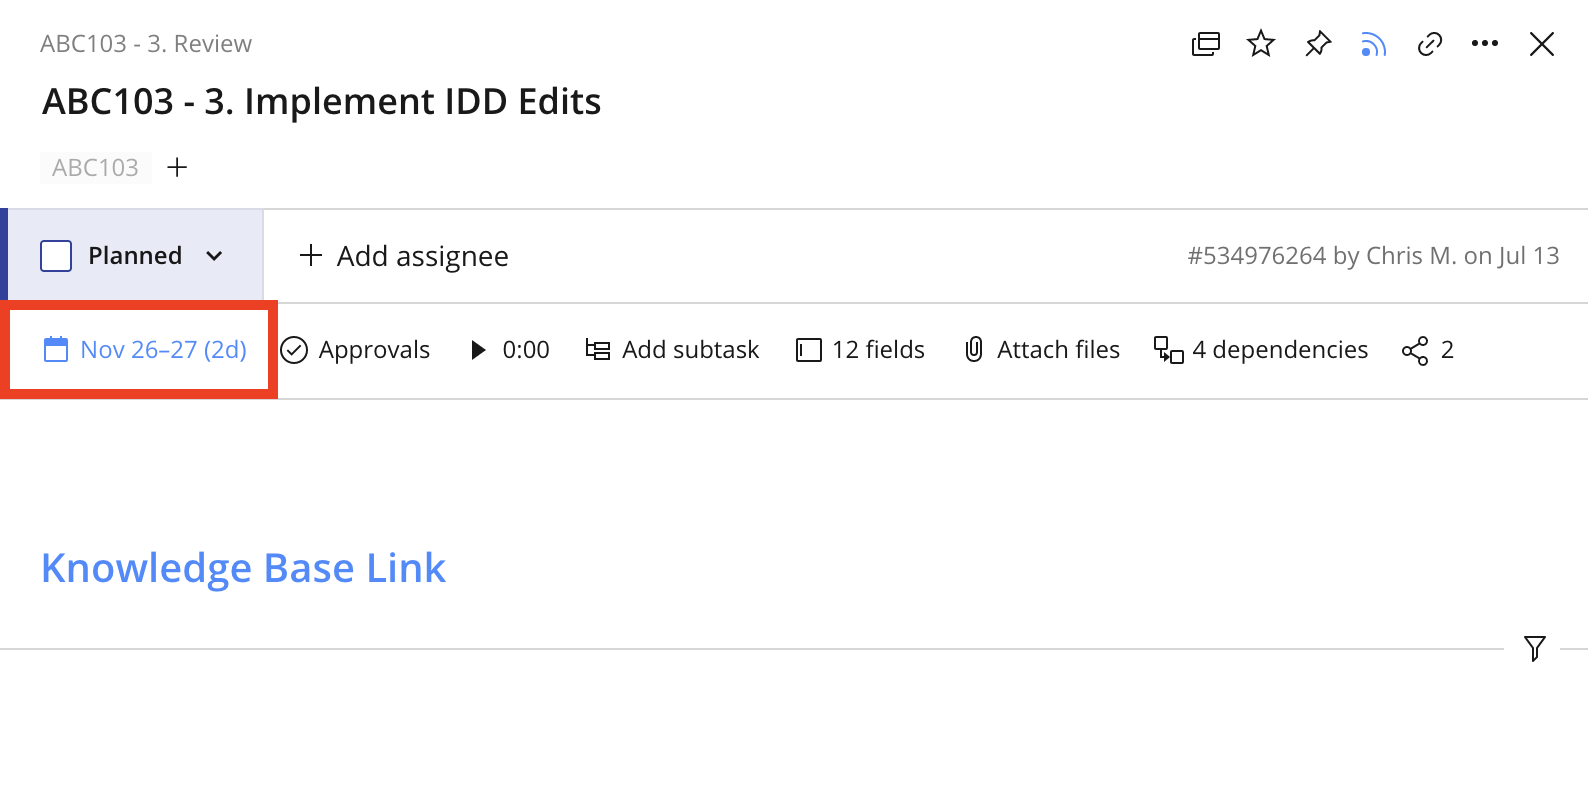
When a user clicks on either one of the dates, a dropdown will appear that allows that user to update both the start and due date. When entering this dropdown, the system defaults to having the user adjust the start date first, even if the due date was clicked on to enter the dropdown. See this gif as an example:
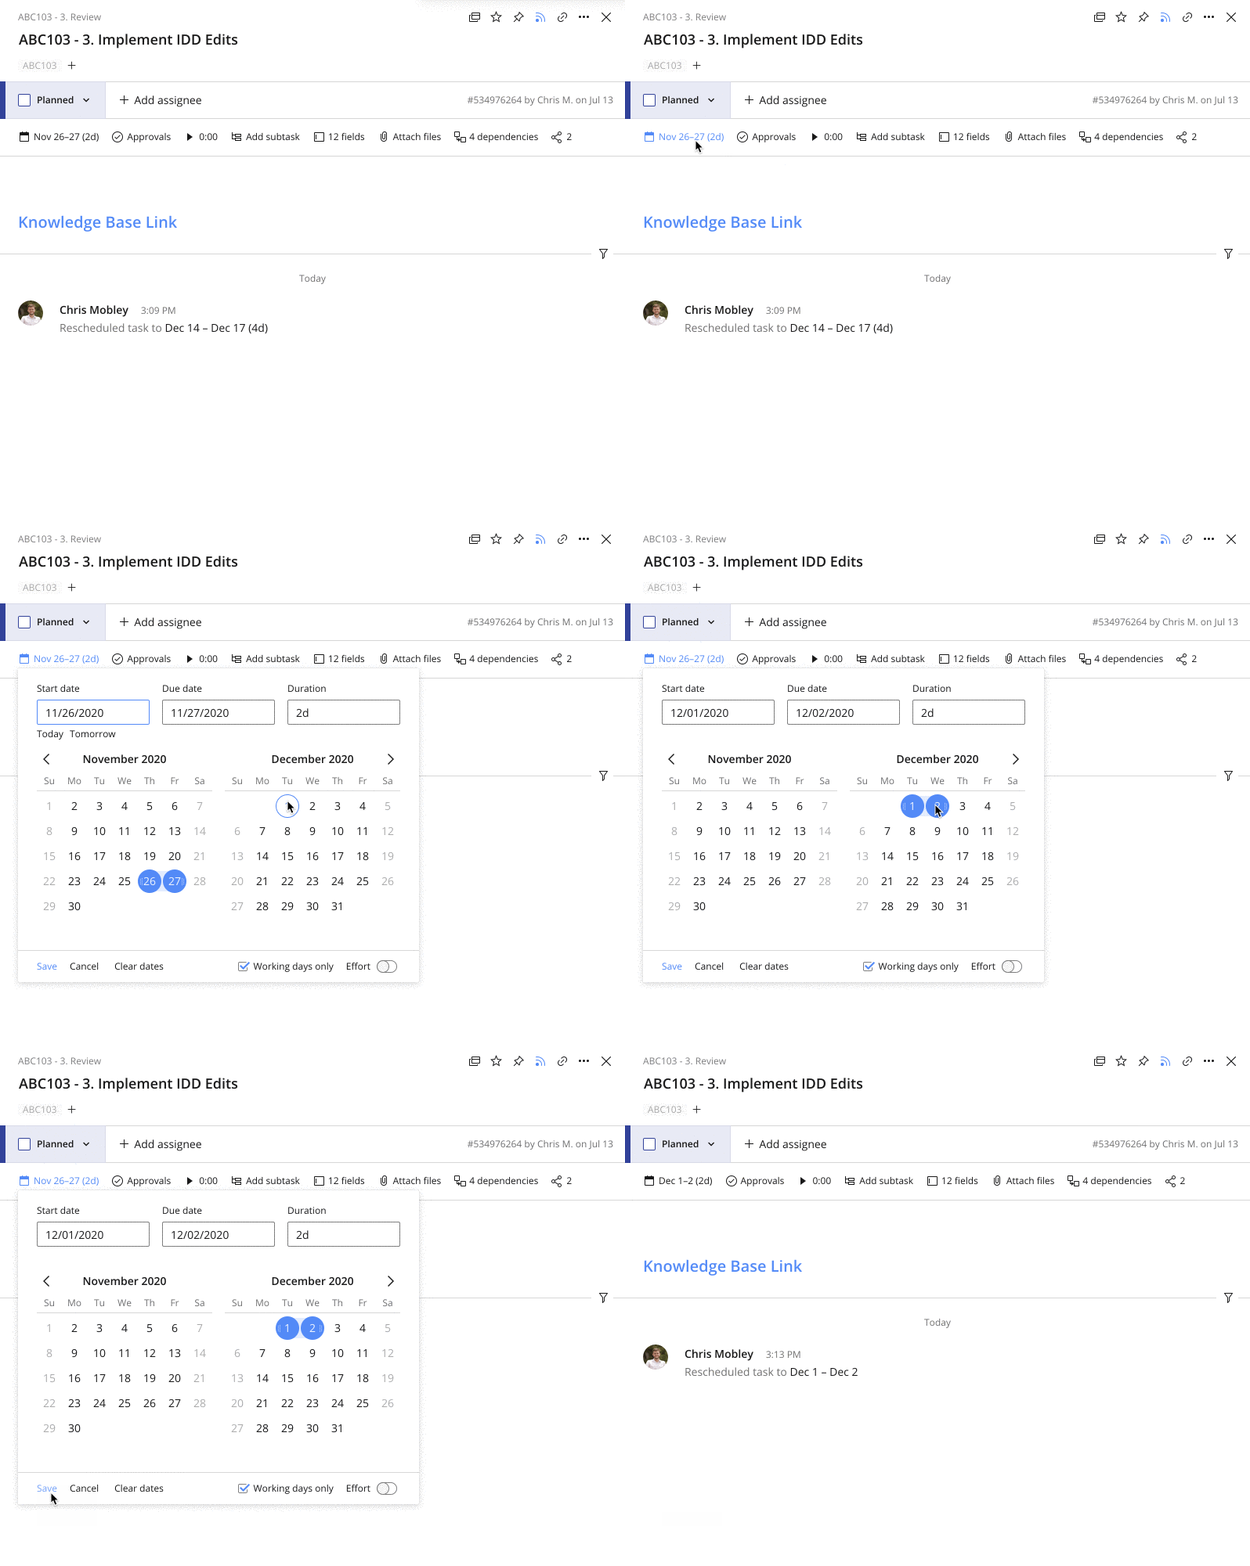
However, within this window, the user can select either the start or due date field specifically, and edit either or both as needed.
Additional pieces of functionality that users can access from within this window are:
- Adjust Duration: Allows users to specify the amount of business days it will take to complete work on this task. Adjusting the duration will by default push out or pull in the due date in accordance to the adjustment.
- Clear Dates: Allows users to completely remove both the start and due dates on the selected tasks.
- Working Days Configuration: Allows users to specify what days of the week a specific can/will be worked on. Might be appropriate especially for tasks involving faculty members, who sometimes work on tasks on weekends.
- Activate Effort: Activating effort on a task allows users to enter and track the amount of specific hours it will take/is taking to complete a task. However, this is not a variable that is currently used or tracked on by anyone within eCornell.
Gantt View
The gantt view of projects within Wrike is a practical place for updating dates, as there is a right hand pane that will visualize the dates of the tasks in a project.
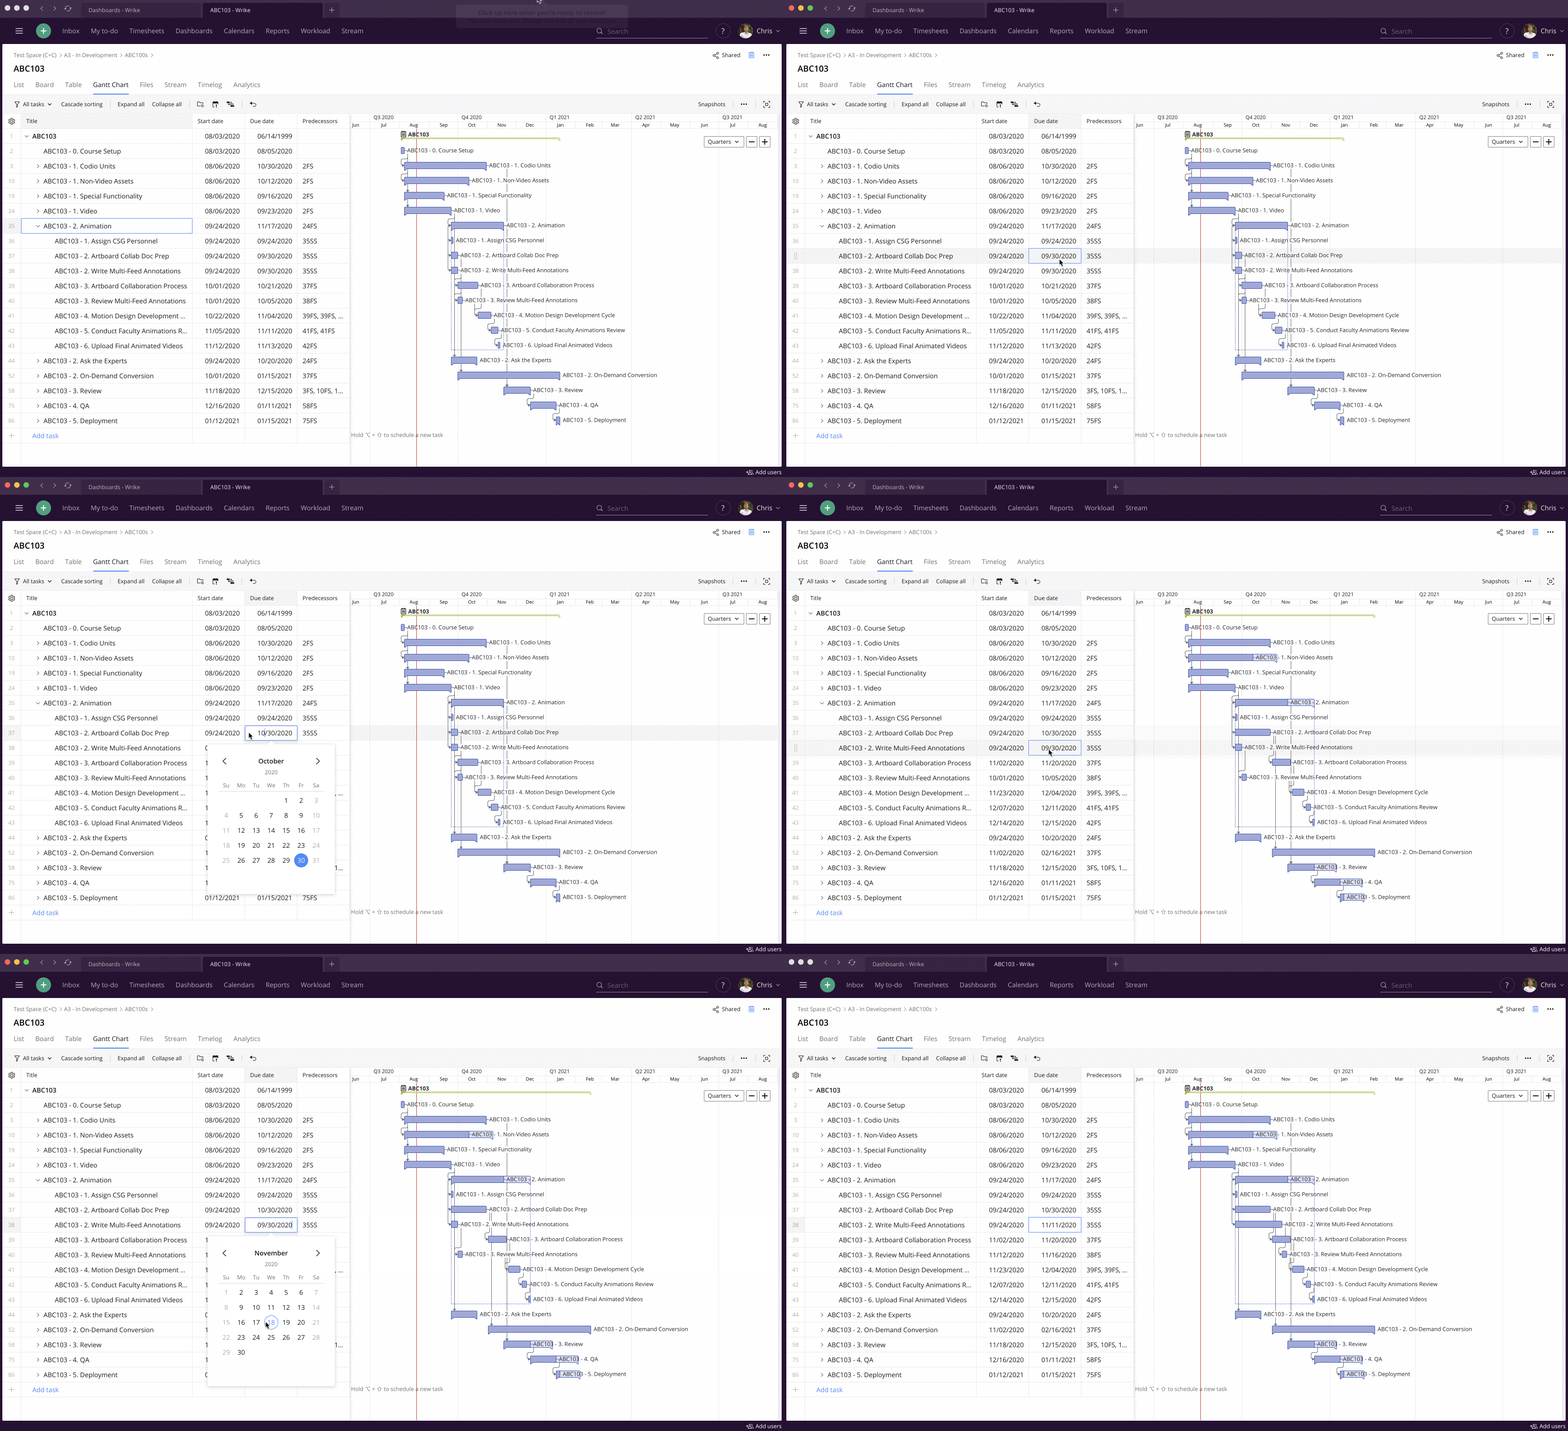
To most effectively use the gantt view for updating the start and due dates of tasks, if the start and due dates are not appearing by default, the user will want to click the gear icon in the left hand upper corner of the view. From the dropdown window the user will want to activate both the start and due dates in the left hand columned pane. It is recommended when working with dates, in the gantt view, to also activate the predecessor column. The effects of predecessors will be covered in depth in the next article in this category. However, it is important to note that predecessors can only be viewed/changed from the gantt view.
Here is a gif illustrating all of the above actions:
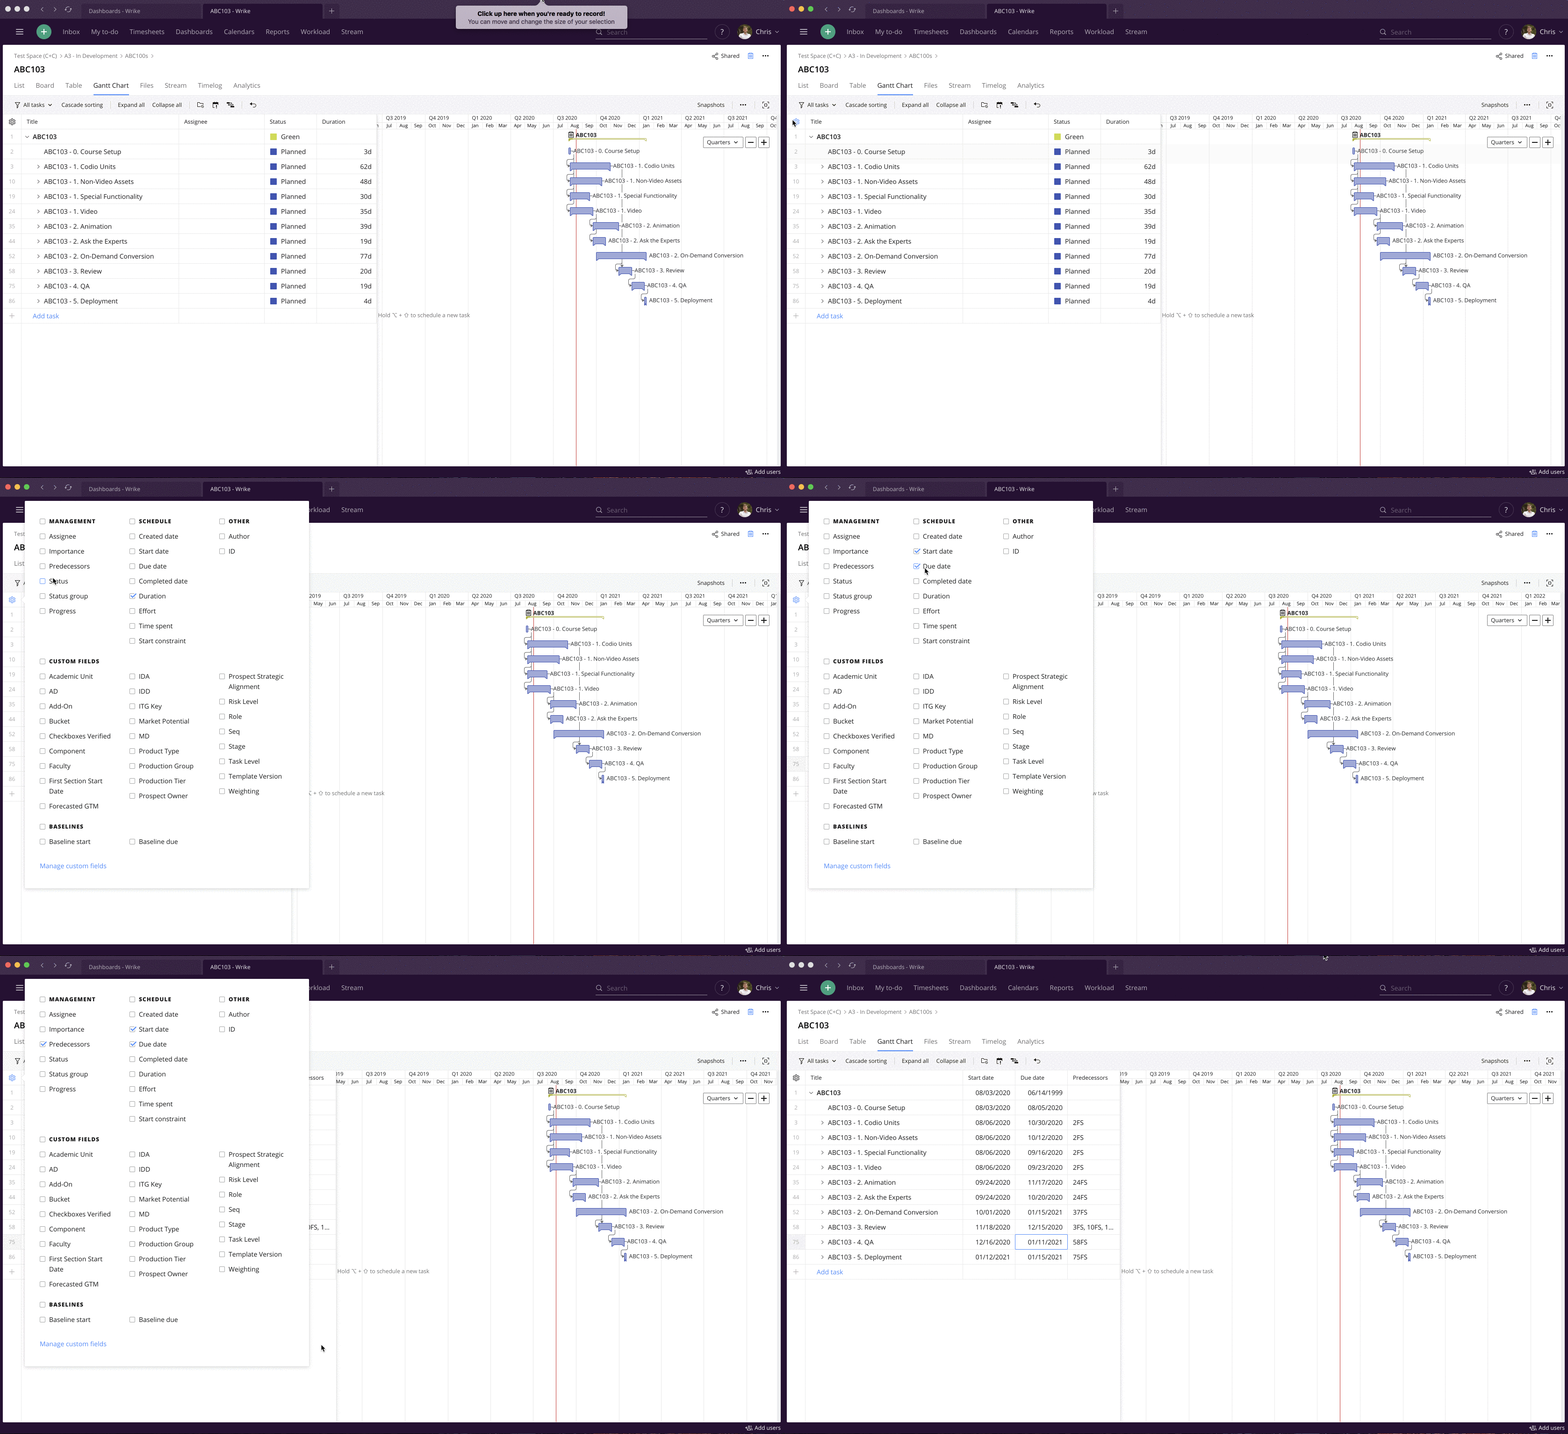
Once the view has been configured as needed, users can now change dates either from the cell/column left hand pane, or the visualized gantt chart right pane. The option comes down to user preference, so experimenting with both options is recommended.
Adjusting dates within the cells is as simple as double clicking a cell and either typing in a specific date, or using the dropdown calendar window to search for an appropriate date.
As stated above, a user can also adjust dates for tasks from the gantt chart view itself as well. To do this, find the task that needs to be adjusted, find either the start or the end of the task in the gantt view (whichever needs adjusting) and simply click and drag that end of the task either forward or backward in time on the gantt view.
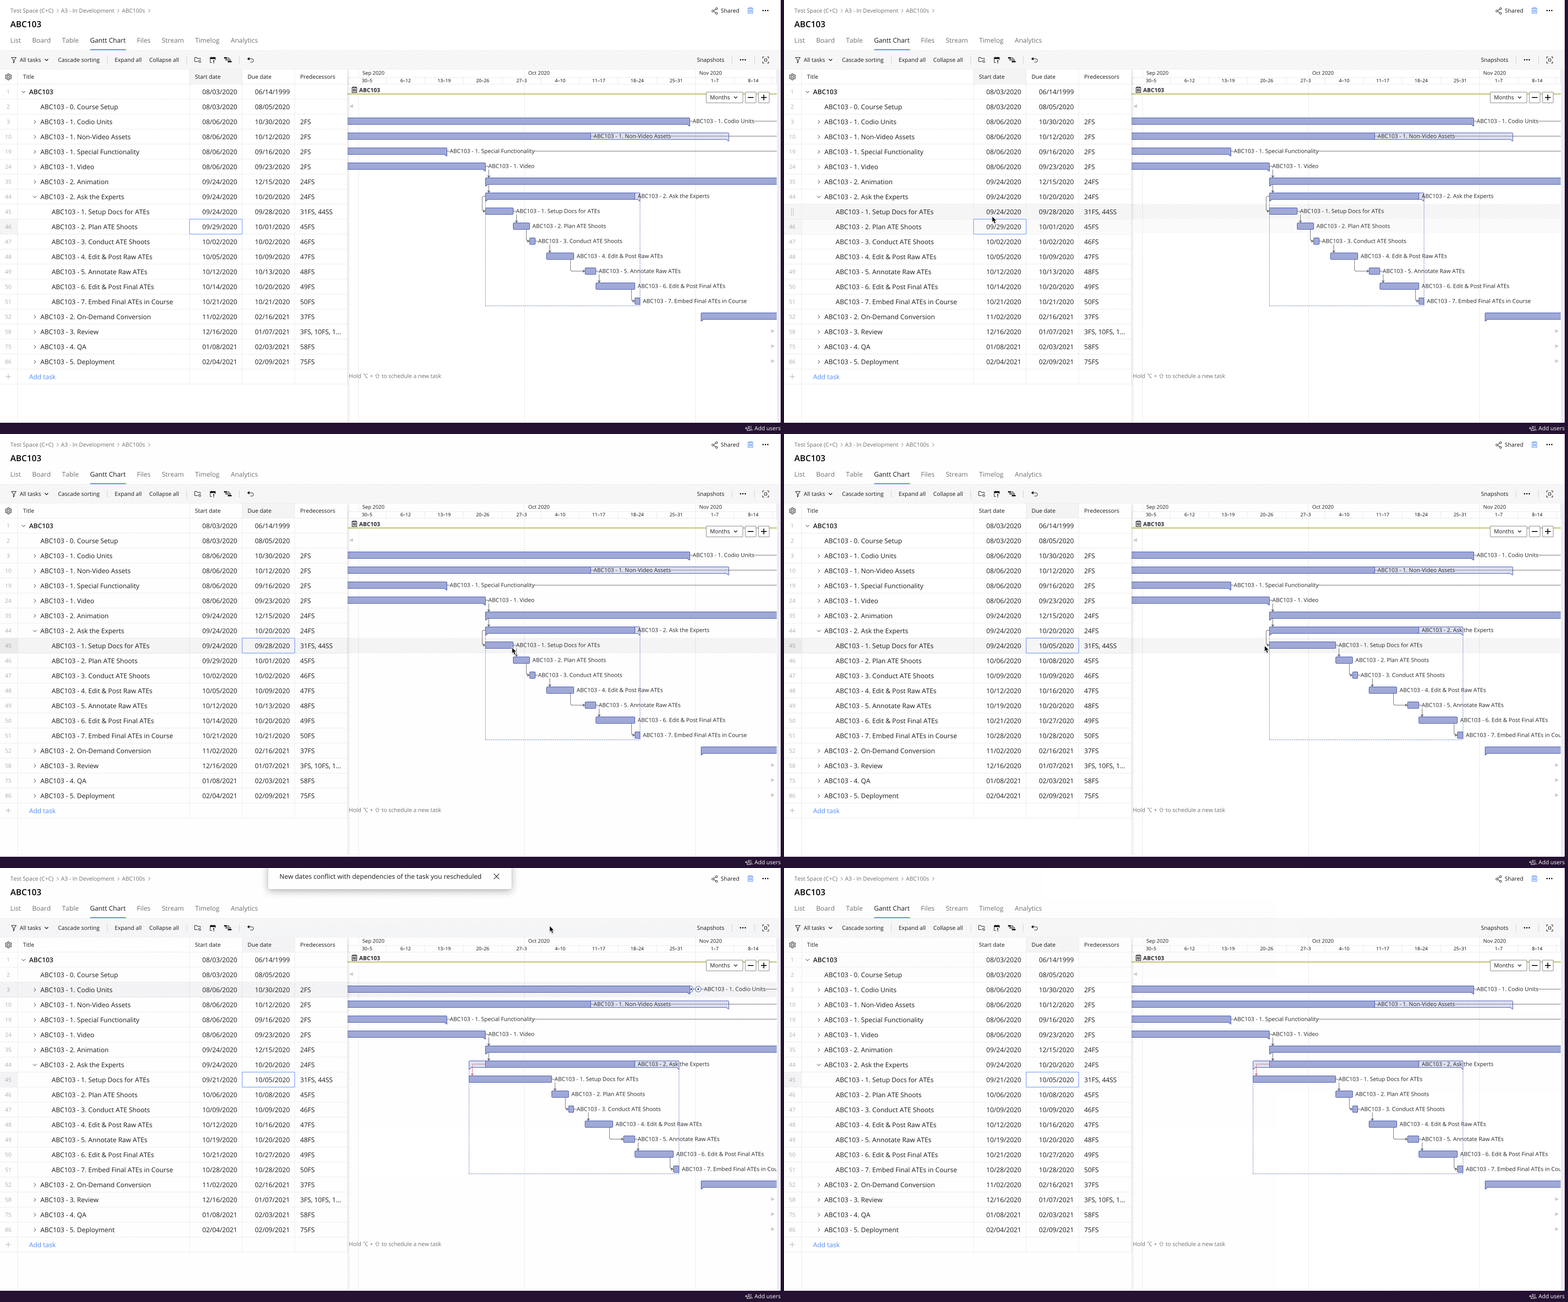
Table View
The table view is an effective way to update task dates when a large amount of tasks within one or more projects will need updates made to their dates. The table view acts a spreadsheet type of view for projects, which allows quite a few line items to be shown on the screen.
To effectively use the table view for date changes, it is recommended to remove as much unneeded information from the screen as possible. This is achieved by the same approach described above in the gantt view. Click the gear icon in the top left corner of the view, make sure the start and due date columns are activated. Then make sure any columns that will be helpful to the user, such as assignee, status, role, etc, are activated, and that any columns that are not needed by the user are unchecked and deactivated.
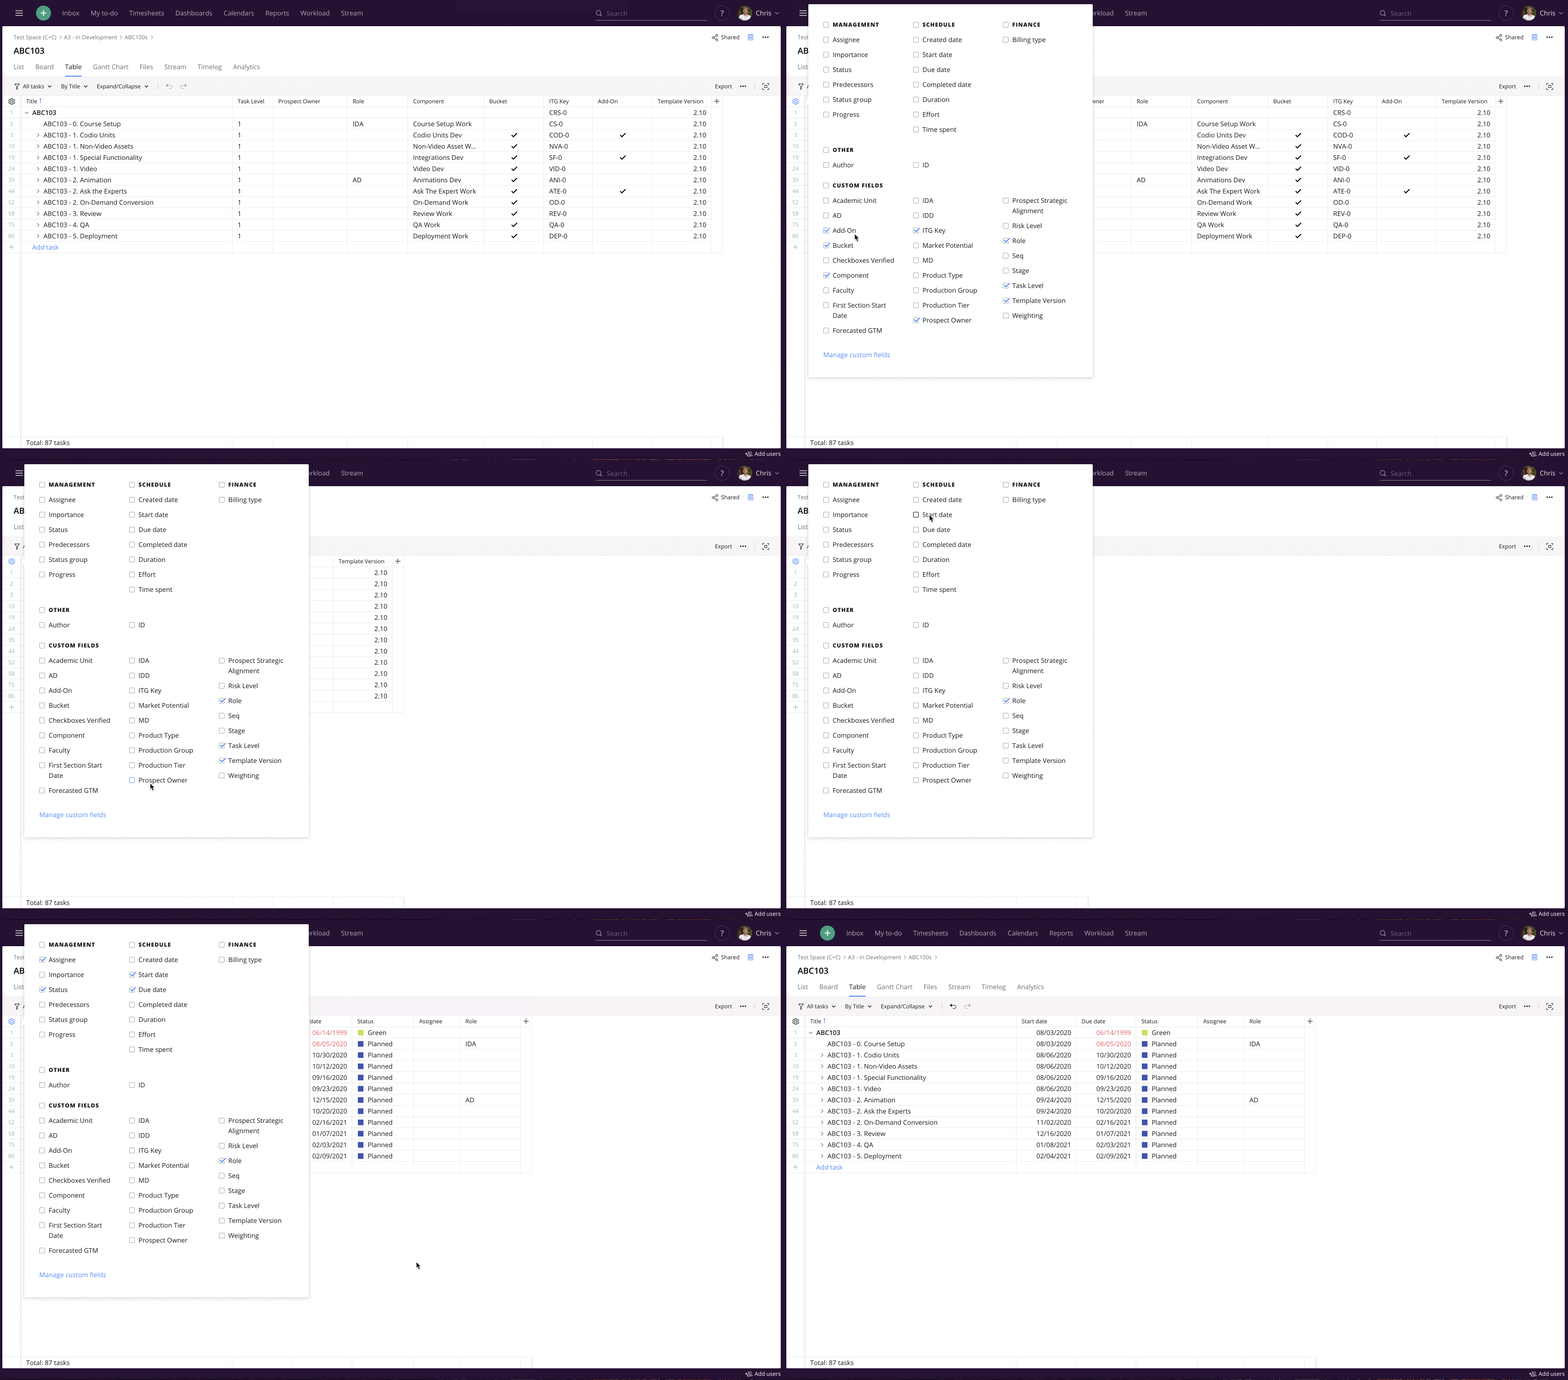
Once the view has been configured, users can double click the date field of the tasks within the project(s) to adjust the date as needed. Once again, this will open a dropdown calendar view, or give the user the ability to manually type and enter a specific date.
Dashboards
Many users within Wrike will be, or it is at least recommended for them to be, using dashboards in Wrike to manage their tasks. This might be done through the "PERSONAL: Main Task Management Dash" provided to each eCornell user, or their own custom created/configured task management dashboard. There are multiple ways to quickly adjust both the start and due dates from these dashboards when users are monitoring their tasks.
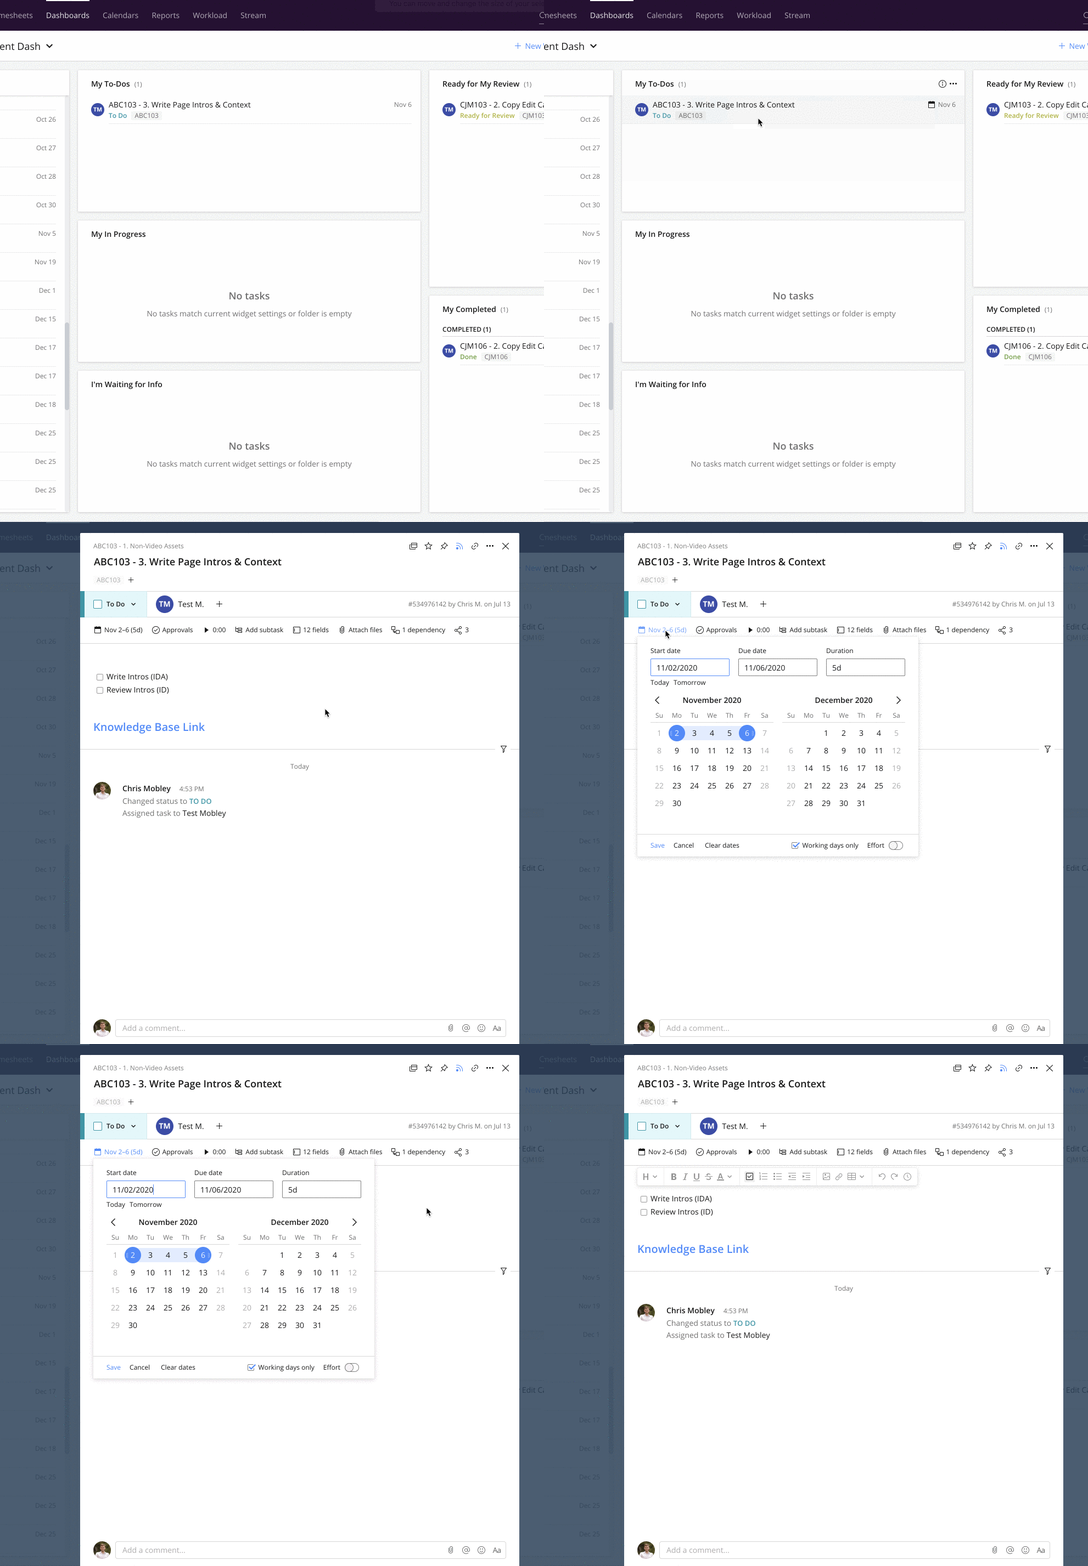
The first, and quickest, option is to find the task in the dashboard widget, find where the due date of the task is shown, and click on that date. Once a user has done so, they will see the same date adjustment window that they would see within the task details view. All of the same options that were described above in the Task Details View section are available in this window as well.
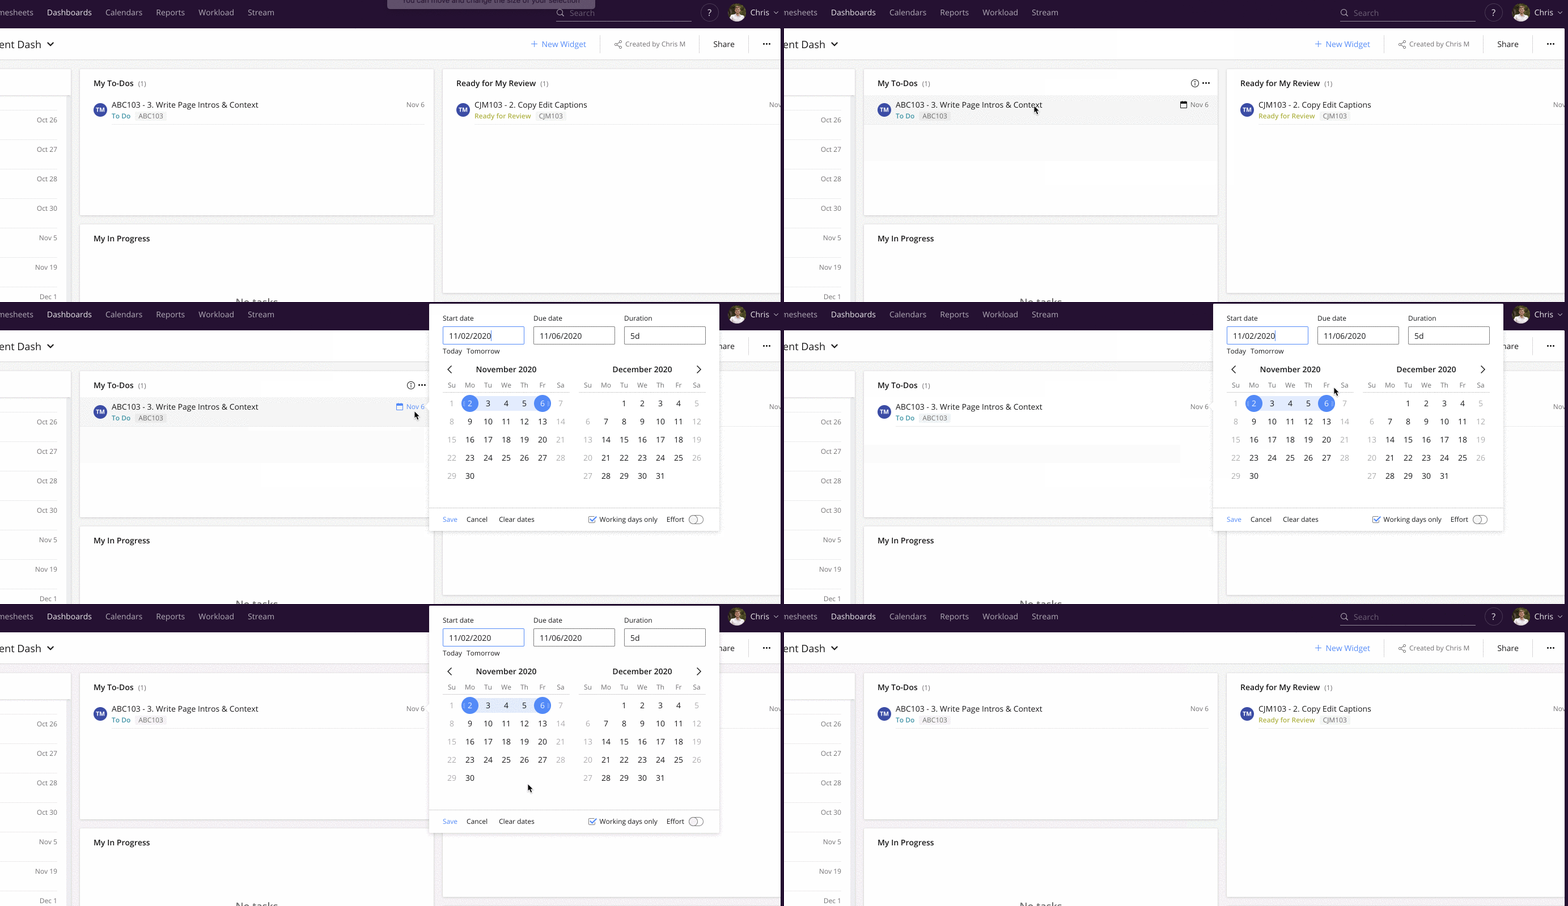
A second option is to click the task itself, which will open up the task details view. From here, dates can be adjusted as described above in the Task Details View section. Users selecting this option will then have the opportunity for other updates on this task as well, such as status or assignee changes/updates, posting comments, adding attachments, etc.
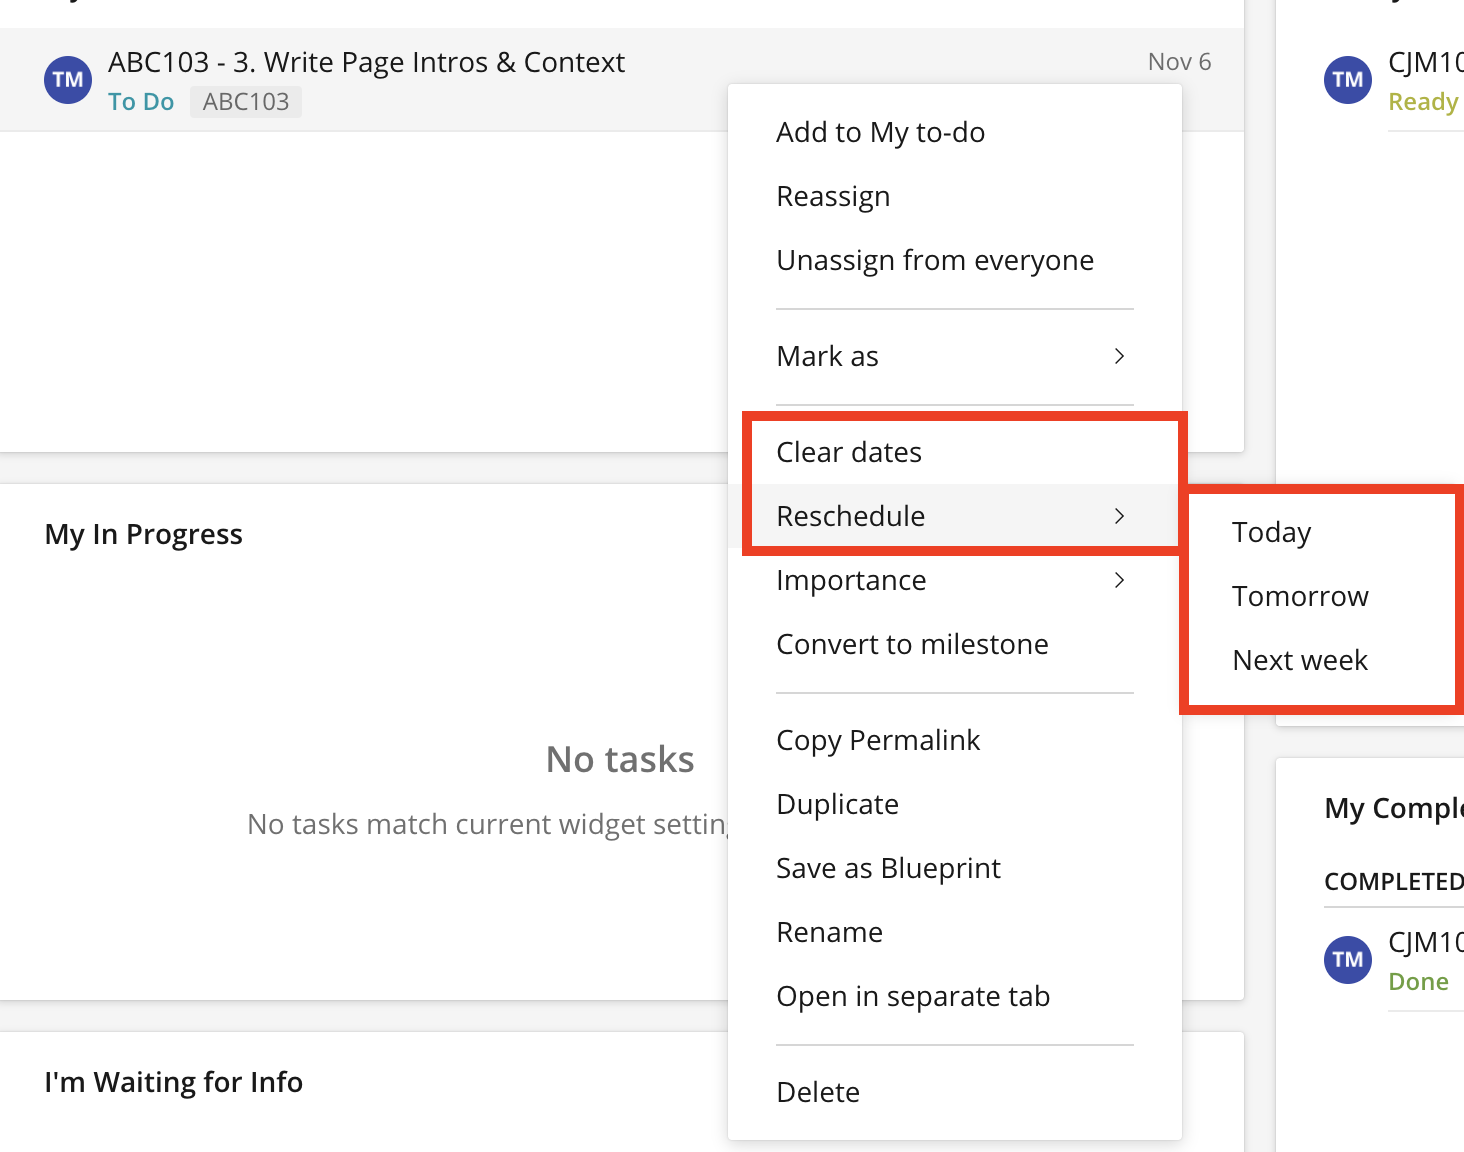
A third option is to right click the task from the dashboard, and select one of the 2, more limited, date related options. The first is "Clear Dates" this will remove any date values that are either in the start and/or due date fields. The second option is "Reschedule" which will give the user to adjust the start date of the task to either today, tomorrow, or next week. The next week option will set the start date to a Sunday, even though they are outside of our system's configured working days.
Reports
Users monitoring the dates of tasks that either they, or members of their team, are responsible for, might be inclined to use this collected view of a set of tasks to adjust the dates of these tasks.
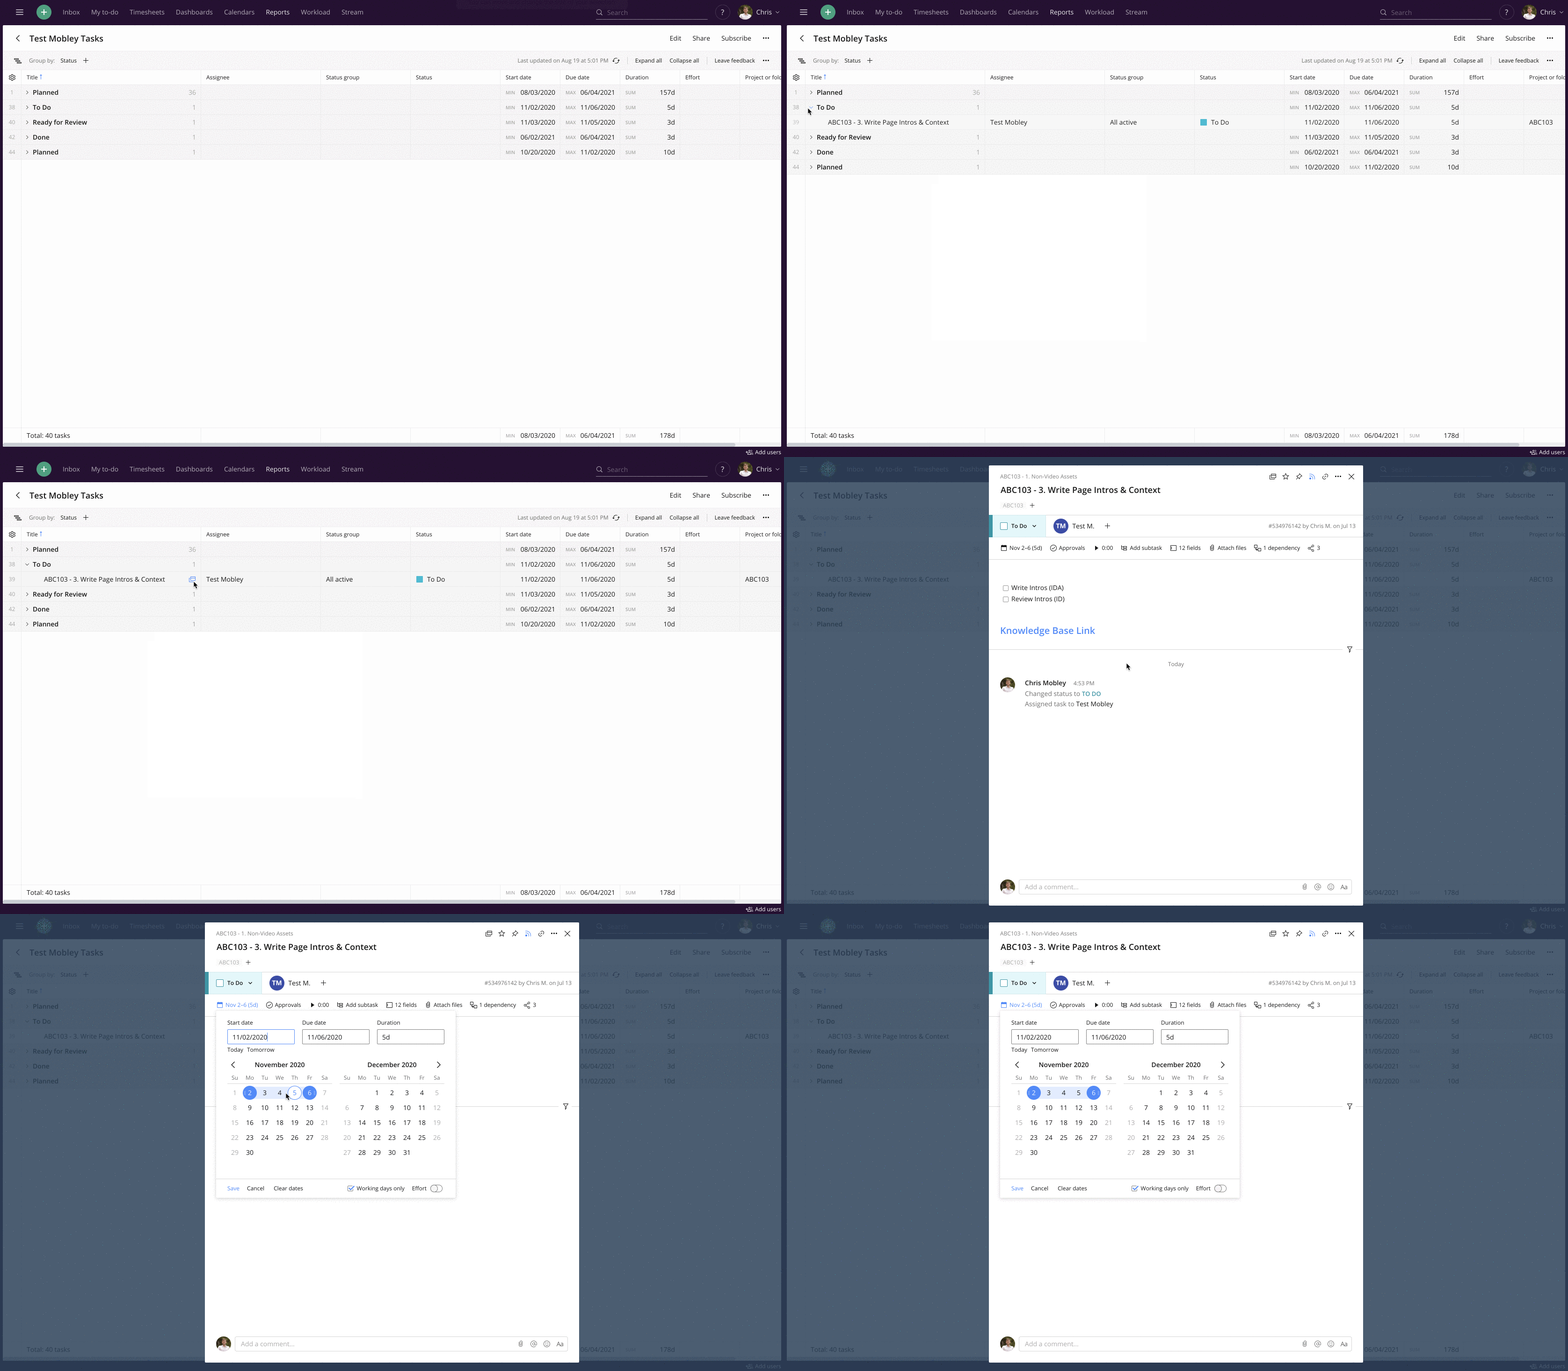
While users can not interact with tasks from within reports, they can still click on the view details button on the tasks in the report, which will bring up the task details view of the selected task. From here dates can be adjusted as described above in the Task Details View section. As well as make any other changes/updates that are needed.
