Departmental Standards
Company-Wide
eCornell Styleguide & Branding
Cornell University Branding
Writing and Editing Style Guide
Faculty and Expert Naming Conventions in Courses
Cornell School and Unit Names
Tips for Campus Engagements
LSG
Legal Policies
CSG
Updating Wrike Due Dates
Photography Style Guide
eCornell Mini Visual Style Guide
The Pocket Guide to Multimedia Design Thinking (*as It Pertains to Your Job Here)
Creative Services (CSG) Handbook
Administrative
LSG Meeting Recordings and Notes
Sending Faculty Sign-Off Forms in Adobe Sign
Weekly Faculty Status Emails
Animation/Motion Design
Instructional Design
Required Course Elements
The Pocket Guide to Instructional Design Thinking at eCornell
Adding AER to Canvas
Grading
D&D Newsletter
LSG Newsletter (LSGN) - February 2024
LSG Newsletter (LSGN) - March 2022 Edition
LSG Newsletter (LSGN) - December 2023
LSG Newsletter (LSGN) - October 2021 Edition
LSG Newsletter (LSGN) - June 2022 Edition
D&D Newsletter November 2024
LSG Newsletter (LSGN) - August 2022 Edition
LSG Newsletter (LSGN) - June 2023
LSGN Newsletter April 2023
LSG Newsletter (LSGN) - February 2022 Edition
LSG Newsletter (LSGN) - October 2022 Edition
LSGN Newsletter February 2023
LSGN Newsletter March 2023
D&D Newsletter September 2024
LSG Newsletter (LSGN) - August 2023
LSG Newsletter (LSGN) - March 2024
LSG Newsletter (LSGN) - April 2022 Edition
D&D Newsletter - August 2024
LSGN Newsletter January 2023
LSG Newsletter (LSGN) - October 2023 article
LSGN Newsletter (LSGN) - April 2024
LSG Newsletter (LSGN) - November 2021 Edition
D&D Newsletter February 2025
LSG Newsletter (LSGN) - January 2022 Edition
LSGN Newsletter December 2022
D&D Newsletter April 2025
LSG Newsletter (LSGN) - July 2022 Edition
LSG Newsletter (LSGN) - September 2022 Edition
Course Development
Image Uploads for Inline Projects
How to Install the Firefox Canvas Utilities Extension
Revising a Course/ Creating a Redux Version/ Course Updates
Creating a Perma Link With Perma.cc
Course Content Deletion Utility — Removing All Course Content
Teleprompter Slide Template
Course Names
Requesting High Resolution Video Uploads
Technical Talking Points Template
Writing Discussions: Guidelines for IDs
Online Resources in Credit-Bearing Courses
Hiring Actors for an eCornell Project
Marketing
Operations
Tech
Master Course Template Differences (8675309s)
Non-CSG File Uploads
Mentored Learning Conversion Process and Resources
Doc-Based Master Course Template and Standards (8675309-DOC)
Pedagogical Guidelines for Implementing AI-Based Interactives: AER
Coding Master Course Template and Standards (8675309-CODE)
Practice Quiz Standards
Hero Image
Platform Training
Administrative Systems
ADP
Google Drive
Downloadables Process
Embed a Document from Google Drive
Adding Google Links to Canvas
File Naming and Storage Convention Standards
Google Drive for Desktop Instructions
Storing Documents in Multiple Locations
Wrike
Wrike System Fundamentals
Field Population
1.0 to 2.0 Wrike Project Conversion
Blocking Time Off in Work Schedule (Wrike)
Wrike Custom Field Glossary
Wrike "Custom Item Type" Definitions
How to Create a Private Dashboard in Wrike
Using Timesheets in Wrike
Importing Tasks into a Wrike Project
Wrike Project Delay Causes Definitions
Setting OOO Coverage for Roles in Wrike
How to Change a Project's Item Type in Wrike
Using Search in Wrike
How to Create a Custom Report in Wrike
@ Mentioning Roles in Wrike
Automate Rules
Using Filters in Wrike
Managing Exec Ed Programs in Wrike
External Collaborators
Wrike for External Collaborators: Getting Started
Wrike for External Collaborators: Views
Wrike for External Collaborators: Tasks in Detail
Wrike Updates
New Experience Update in Wrike
Wrike Course Development Template 2.0 - What's New
Wrike - Course Development Template 3.0 Release Notes
Wrike Process Training
Course Development & Delivery Platforms
Canvas
Development
Adding Custom Links to Course Navigation
Adding Comments to PDFs from Canvas Page Links
Setting Module Prerequisites and Requirements in Canvas
Canvas Page Functionality
Create a New Course Shell From 8675309
Using LaTeX in Canvas
Search in Canvas Using API Utilities - Tutorial
Reverting a Page to a Previous Version
Student Groups
Create Different Canvas Pages
Importing Specific Parts of a Canvas Course
Canvas HTML Allowlist/Whitelist
Understanding Canvas Customizations/Stylesheets
Operations
Discussion Page Standards
How to import a CU course containing NEW quizzes
Canvas LMS: NEW Quiz compatibility
Faculty Journal
Course Content Style Guide
Click-To-Reveal Accordions in Canvas
Course Maintenance Issue Resolution Process
Meet the Experts
Codio
Codio Operations
Managing Manually Graded “Reflect and Submit” Codio Exercises
Codio Structure and Grading for Facilitators
Premade Codio Docs for Ops & Facilitators
Codio Remote Feedback Tools for Facilitators
Developers
Development Processes
Creating a New Codio Course
Creating a New Codio Unit
Integrating a Codio Course into Canvas Using LTI 1.1
Embedding a Codio Unit into Canvas
Setting Up the Class Fork
Jasmine Autograde Unit Testing
Setting Up the Class Fork (LTI 1.3)
R Studio - Exclusion List for R Code
Mocha/Selenium Autograding
Starter Packs in Codio
Configuring Partial Point Autograders in Codio
Launch a Jupyter Notebook from VM
AI Extensions
Program-Specific Developer Notes
Codio Functionality
Jupyter Notebooks
Jupyter Notebooks - nbgrader tweaks
Jupyter Notebooks Style Guide
Adding Extensions to Jupyter Notebooks
Setting up R with Jupyter Notebooks
Change Jupyter Notebook Auto Save Interval
How to Change CSS in Jupyter Notebook
RStudio in Codio
How To Centralize the .codio-menu File to One Location
Codio Fundamentals for LSG
Using the JupyterLab Starter Pack
Using Code Formatters
Using the RStudio Starter Pack
Conda Environments in Codio
Updating Codio Change Log
Codio Basics: Student Support
eC Facilitator Guide to Codio
Migrating to Updated Codio Courses
Qualtrics
Ally
Ally Institutional Report Training
Ally Features Overview Training
Using the Ally Report in a Course
Ally Vendor Documentation/Training Links
Adobe
Other Integrations
Pendo Overview
How to Add VitalSource eBooks in Canvas
Enabling Zoom/"Live Sessions" in a Course
Pendo Guide Creation
H5P
Modifying Subtitles in H5P Interactive Videos
Embedding H5P Content Into Canvas
Troubleshooting H5P Elements in Canvas
Inserting Kaltura Videos into H5P Interactive Videos
Adding Subtitles to H5P Interactive Videos
S3
BugHerd
Instructional Technologies & Tools Inventory
Canvas API Utilities
Getting started with the MOP Bot
eCornell Platform Architecture
HR & Training Systems
Product Development Processes
Accessibility
What Is Accessibility?
What Is Accessibility?
Accessibility Resources
Accessibility Considerations
Accessibility Support and Assistive Technology
Structural Accessibility
Accessibility Design and Development Best Practices
Accessible Images Using Alt Text and Long Descriptions
Accessible Excel Files
Accessibility and Semantic Headings
Accessible Hyperlinks
Accessible Tables
Creating Accessible Microsoft Files
Mathpix: Accessible STEM
Design and Development General Approach to Accessibility
Integrating Content Authored by a Third Party
Planning for Accessible Tools
Accessibility Considerations for Third Party Tools
Studio Accessibility
Designing for Accessible Canvas Courses
Accessibility: Ongoing Innovations
Course Development
Planning
Development
0. Design
1. Codio Units
1. Non-Video Assets
3. Glossary
4. Canvas Text
4. Tools
4. Tools - Wrike Task Definitions
3. Review And Revise Styled Assets
ID/A to Creative Team Handoff Steps
General Overview of Downloadables Process
Course Project: Draft and Final
Excel Tools: Draft and Final
eCornell LSG HTML Basics
1. Non-Video Assets - Wrike Task Definitions
2. Video
Multifeed Video
2. Video (Standard) - Wrike Task Definitions
Studio Tips
Tips for Remote Video Recording Sessions
Who to Tag for Video Tasks
3. Animation
3. Animation - Wrike Task Definitions
2. Artboard Collab Doc Prep
6b. Motion Design Review and Revise
Who to Tag for Animations Tasks
3. Artboard Collab Process Walkthrough
DRAFT - FrameIO Process Walkthrough
Motion Contractor Guide for IDAs / IDDs
Requesting / Using Stock Imagery (Getty Images and Shutterstock)
3. Ask the Experts
5. On-Demand Conversion
5. Review
5. Review - Wrike Task Definitions
1. Prep Course for Reviews
2. Conduct Student Experience Review
3. Implement Creative Director Edits
3. Implement IDD Edits
3. Implement Student Experience Review Edits
4. CSG - Revise Tools Export 1
5. Conduct Faculty Review
6. Implement Faculty Edits
7. Conduct Technical Review of Course (STEM-only)
Technical Student Experience (Tech SE) Review Process
2. Conduct IDD or Sr ID Review
6. Alpha
6. Alpha - Wrike Task Definitions
Alpha Review Process
Prepare a course for Alpha review
Schedule & Conduct Alpha Triage Meeting
7. QA
7. QA - Wrike Task Definitions
1. Prep Course for QA
2. Copy Edit Captions
2. Copy Edit Course & Files
4. Conduct Content QA of Course
4. Final Creative Review and Export
Adding Chat With Tech Support to Course Navigation
5. Implement QA Edits
Working With Video Captions That Contain Special Characters
Copy Edit Captions in SubPLY
Creating a Course Style and Settings Guide
Copy Editing Content in Frame.io
1. Complete Dev to QA Checklist
Copy Edit Captions in 3Play
Tag a Video for Transcription by 3Play
Course QA Checklists
8. Deployment
8. Deployment - Wrike Task Definitions
1. Finalize Master Version of Course
2. Create & Add Course Transcript (CT) to Course
Replace a Master -M With a Redux Version of the Course
3. Create -T (Training Course) and Associate With Master Blueprint
Canvas Blueprint Course Functionality
Project Management in Wrike
Managing Project Reporting in Wrike
Managing Task Needs/Schedule in Wrike
Adding Tasks
Comments and Communication
Statuses
Updating Task Start and Due Dates
Predecessors
Durations
Rollups
Calculating Project Schedule by Deadline in Wrike
Creating Course Project Plans in Wrike
Setting Custom Capacity for Resources
Customizing Effort in a New Project Plan
Marking Projects Complete in Wrike
How to Set Up Workload Charts to Track Effort in Wrike
For-Credit Considerations
1-Sheet Population
Post-Development
AI Simulations
Program Facilitation & Operational Guidelines
Data Science
Facilitator Resources
Canvas Navigation
Adding Events to the Course Calendar
Navigating Canvas and the Dashboard
How Do I View Previous Courses I Have Taken or Facilitated?
Why Am I Receiving Duplicate Canvas Emails?
How Do I Edit My Canvas Profile?
Send Students a Direct Message on Canvas
Adding Notes to Canvas Gradebook
How Do I Send Students Nudges from the Gradebook?
Overview of 2024 Changes- Course Layout and Structure
How Can I Update My Canvas Notification Preferences?
Ursus Navigation
How Do I Access My Offer in Ursus?
How Do I Edit My Ursus Profile?
How Do I Request Time Off (Blackout Dates)?
How Can I Request to Learn More Courses?
Live Sessions
Enabling Student Use of Closed Captioning in Zoom
When Should I Schedule My Live Sessions For?
Changing Live Session Date and Time After Created with Facil Tool
Help! I Need to Reschedule a Live Session
Live Session Information page
Set up Live Sessions with the Facil Tool
Combining Live Sessions with Facil Tool
Course Set-Up
Course Set Up: Getting Ready for Live Sessions
Recording and Posting a Welcome Video
Course Set Up: When can I begin to edit my course?
Course Set Up: Reviewing Due Dates
Course Set Up: Reviewing Announcements
What Do I Need to Do to Make Sure My Course is Set Up Correctly?
How Do I Customize My Course Sections?
Course Announcements and Messages Templates
Facilitator Focus
Zoom and other Technical Support
Reporting Spam/Phishing
How Do I Set Up My Zoom Account?
Support Resources for Facilitators
Live Session/Zoom Trouble Shooting Guide & Technical Readiness
How to Upload Videos to Zoom On-Demand
Student Survey FAQs
How Do I Save and Refer Back to Zoom Recordings?
How Do I Find My Personal ID Meeting link in Zoom?
Benefits as an eCornell Employee
Do I Have Access to Microsoft Office as a Cornell Employee?
Taking Courses as a Student
Professional Development Benefit
Student Success
Help! My Students Can't View a Video Within My Course
Extensions and Retakes
Policies and Navigation Resources for Students
Symposium Access Extension- Fall 2025
Students enrolled through special groups: Corporate and VA
Unique Circumstances for Student Extensions and Retakes
Communicating with Students via Canvas
Can I Provide Students with a Letter of Recommendation?
Understanding and Addressing Instances of Plagiarism
Support Resources for Students
Understanding and Addressing Use of AI
Help! My Student is Having a Hard Time Uploading a Video
Unique Student Situations
I Have a Student Requesting Accommodations- How Should I Proceed?
Canvas Mobile App
Messaging Students via the Canvas Mobile App
Setting up and Navigating the Canvas Mobile app
Setting up Push Notifications on Canvas Mobile
Canvas App Features for eCornell courses
New Facilitator Onboarding and Quick References
Facilitator Onboarding at eCornell
Why Do I Have Multiple eCornell email and Canvas Accounts?
Quick reference: Systems and Accounts we use at eCornell
Quick reference guide: Key eCornell Personnel
How do I Log Onto Canvas and Access FACT101?
How Do I Add eCornell to My Email Signature?
Training Course Review & Facilitation Authorization
What to Expect During Live Shadowing Experience
Setting up Email Forwarding
Facilitator Expectations and Grading Help
Changes in Grading Scheme: Incomplete/Complete and 75% to 85%
New (Embedded/Inline Format) How do I grade Course Projects?
Navigating the Gradebook and Accessing the Speedgrader
Quick Reference: Sort assignments in the Speedgrader
How do I Grade Quizzes?
(Old format) How Do I Grade Course Projects and Add Annotations?
Rubrics for Effective Facilitation
Is There an Answer Key for my Course?
How to Monitor and Promote Student Progress
How Do I Grade Discussions?
Adding an Attempt to a Course Project
How Quickly Do I Need to Provide Grading to Students?
Payroll and the Monthly Scheduling Process
Codio References
Manually Graded “Reflect and Submit” Codio Exercises
Codio Quick Resources
Codio Reference: Embedded quiz questions (H5P)
Codio Reference: Checking for Completion Status
Codio Reference: Manually Graded Exercises
Codio Remote Feedback Tools
Codio Reference: Ungraded exercises
Codio Reference: Autograded Exercises
Archived
Table of Contents
- All Categories
- Platform Training
- Administrative Systems
- Wrike
- Wrike Updates
- Wrike Course Development Template 2.0 - What's New
Wrike Course Development Template 2.0 - What's New
Overview
In this article we will cover the main changes within the new course development template 2.0 for Wrike. These changes were informed by feedback received from team members over the six months of using the first iteration of the template. The ultimate goal of this update is to make the template easier to understand, lighter weight to manage, and more comprehensive to project variants.
Reduced and Refined Structure
The main difference in the 2.0 dev template is the reduction of the number of tasks and task levels within the project structure. Where previously there were often 3 levels of tasks in a course project, for the majority of milestones there will now be 2 levels of templated tasks.

The goal of this change is to greatly reduce the number of singular tasks individuals will need to track and keep updated. Where individual steps of a process were previously represented as multiple tasks, you’ll now see those as a single encompassing task.
Those process steps will now be commonly represented as templated checkboxes. We will cover this area in further detail below.
Checkboxes
With the reduction in number of tasks, a new task-step structure has been added in the Description field of some tasks using Wrike's Checkbox feature. Here is an example of what you will start to see in some tasks:
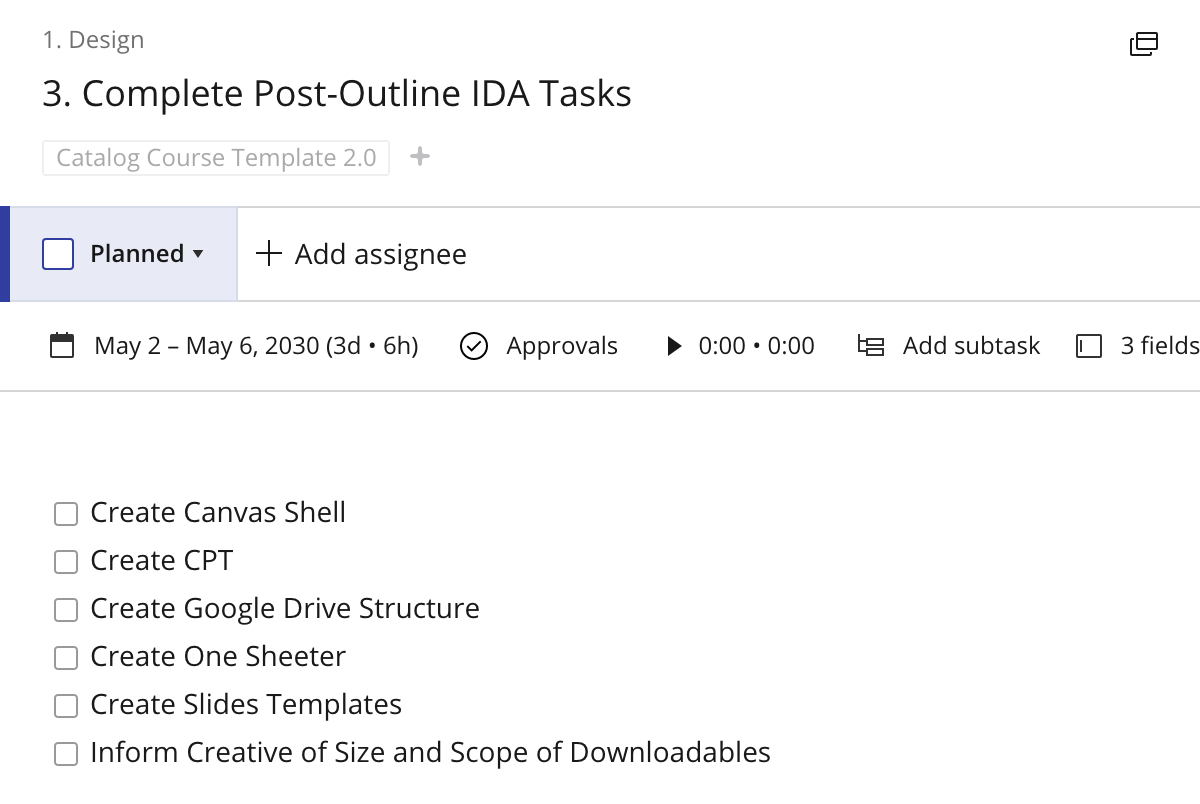
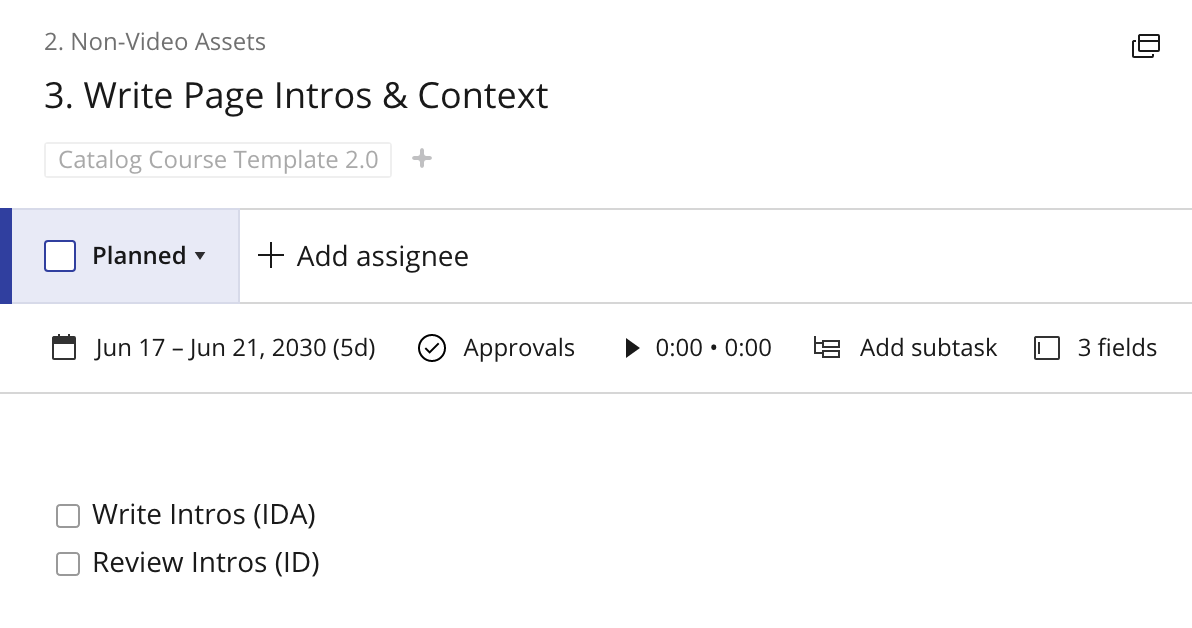
Checkboxes are meant to represent the steps that need to be taken for a task to be completed. The majority of the time all of these steps and tasks can be completed by one person who is assigned to the task. In some cases, steps of the task will need to be completed by multiple individuals. In those cases, a role will be associated with each step in the task. See an example of this here:
Another important note regarding checkboxes is the difference between them and subtasks. From the task details view, subtasks and checkboxes can look similar. However, they serve different functions in Wrike. Some of the key differences between them are:
- Subtasks can be assigned to individuals; checkboxes cannot.
- Subtasks will be visible outside of the task detail view, such as in table or gantt view; checkboxes are not.
- Subtasks are used to represent distinct pieces of work/tasks needed to complete a larger effort. A potential guideline is if a particular piece of work will need more than 4 hours of effort at least, it should be a subtask. If that piece of work is only a step in a larger process that takes under an hour to complete, it should be represented as a checkbox.
Simplified Predecessors
A feature of the 2.0 template is the reduction of the complexity of predecessors present in the templated tasks. In the previous template, it was difficult to adjust the top-level task dates, because they would be overwritten by the dates of the subtasks. Another challenge was if users added additional subtasks later in the sequence of the templated tasks of a task bucket, the predecessor configuration would not be able to recognize the dates of those lower level tasks at the milestone level. We have improvements for both these issues now.
For the issue of wanting to adjust the milestone dates directly without them being overwritten by the descendent subtask's dates, we have removed FF predecessors all together from the template, so this will not happen anymore. To replace this, we instead use SS (Start to Start) predecessors on the first task under each milestone, so there is still a relationship between the two levels but it's less brittle. Additionally, most people do not need to understand or use SS predecessors and can ignore them, and only keep track of the most standard type of predecessor - FS (Finish to Start).
For the issue of the dates of new subtasks being added not carrying up to the milestone, the feature "Item roll up" can be used to synchronize these easily. To do this, from the Gantt view simply right click on the Due Date field for a milestone task you wish to synchronize with the Due Dates of its descendants, select "Item roll up". This will synchronize the due date of the milestone with the latest due date of its subtasks, if you wish.
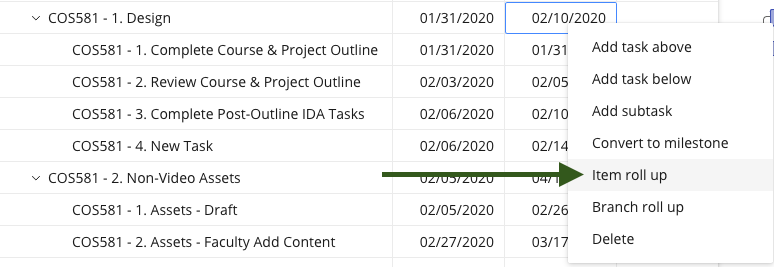
Keeping milestone task dates updated will be important communicating project progress to your managers and other stakeholders. Keeping subtask dates updated will be important for communicating with other course production team members, and help give a sense where your hands-on course work currently stands.
Custom Workflows/Statuses
Throughout the 2.0 template, there are multiple custom workflows associated with projects and certain tasks. Custom workflows allow the use of more unique and specified statuses. The areas where you will see custom workflows are:
- Certificate Project Level
- Course Project Level
- Animation Development
- Individual Video Assets in Animation Dev Cycle
- On-Demand Workflow
The custom workflows present on the certificate and course projects will supplant the more generic project statuses we were working with before.
The individual statuses for the course level are:
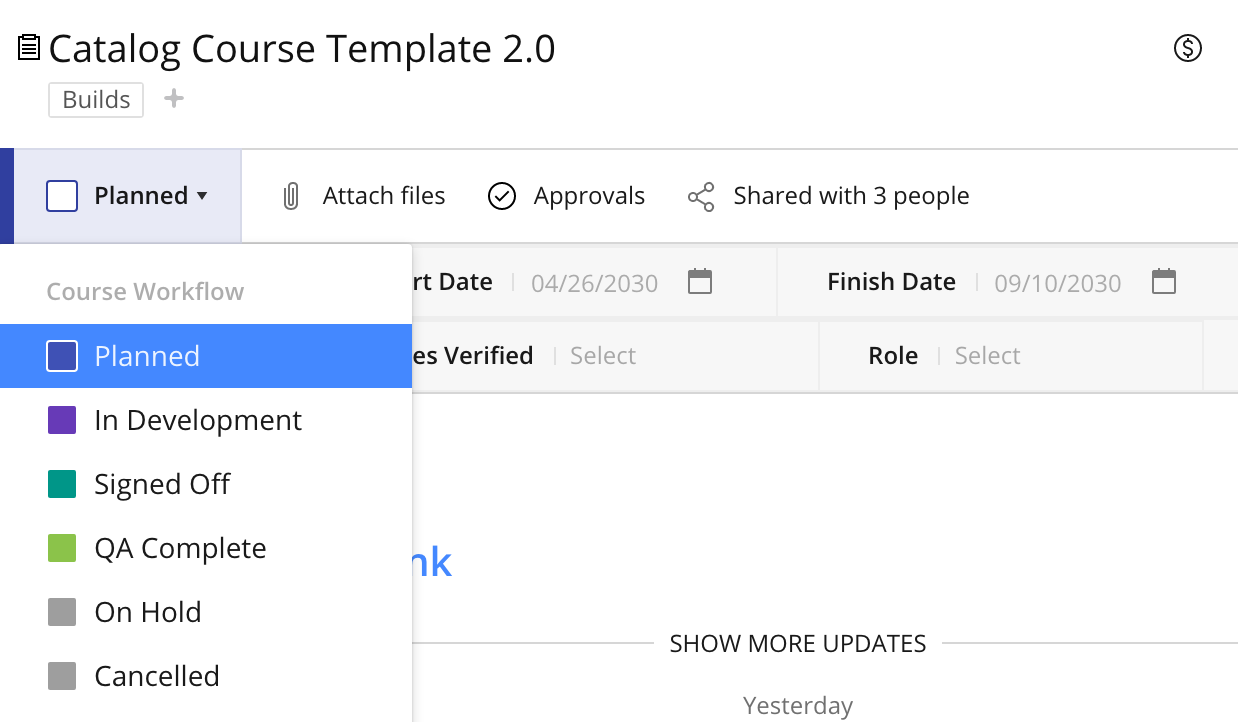
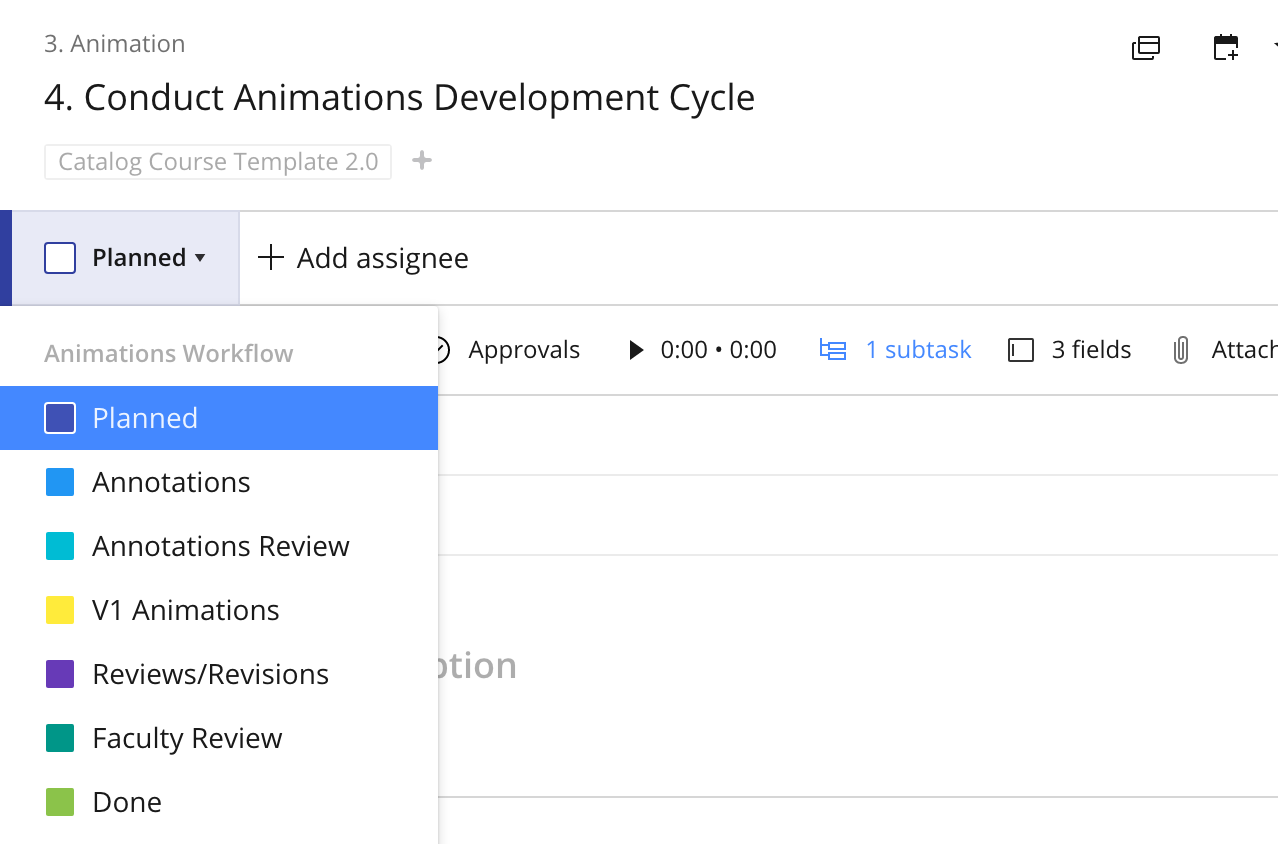
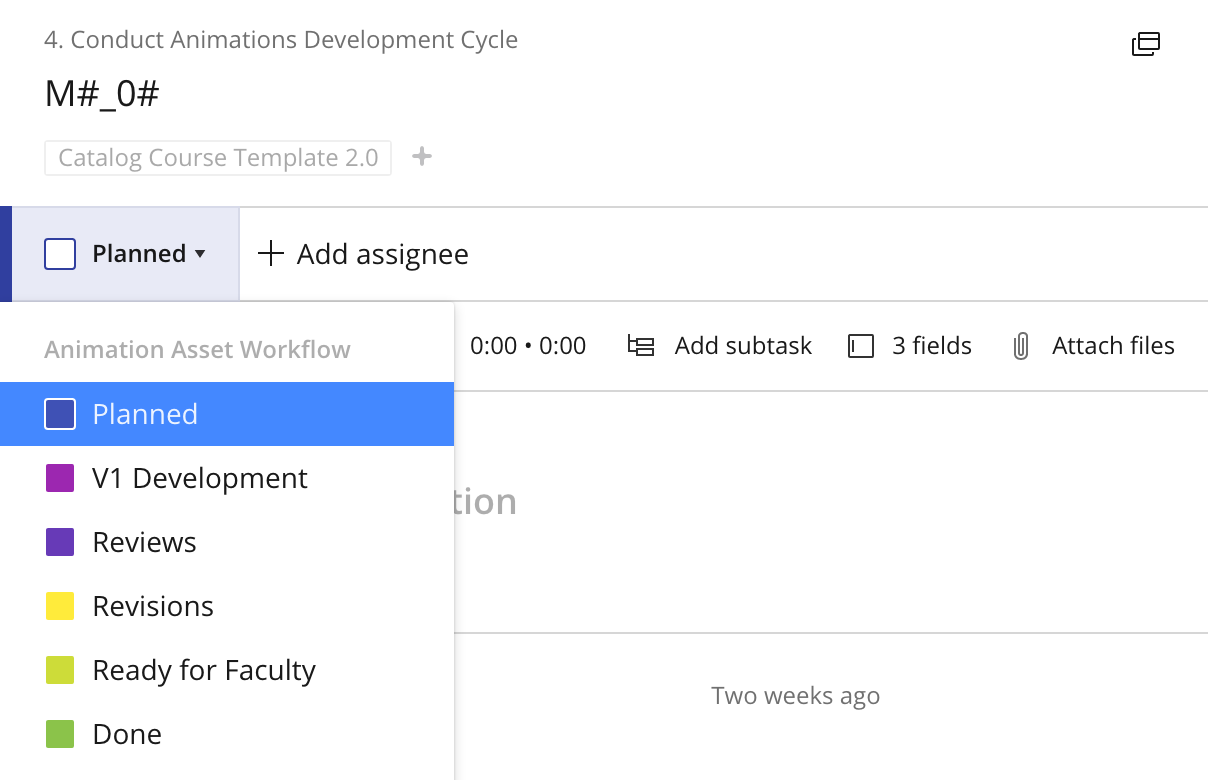
The custom workflows for the animation development cycle are used to be able to mark a task with a unique status that only applies to the development of either a course’s animations as a whole, or for the animation phase of a specific asset. Here are examples from each of the areas mentioned:
Animations Development Cycle:
Animation Asset Workflow:
Each one of these custom workflows will be described further in the individual 2.0 articles that will pertain to your role.
Modular Template
The new template is designed to package all possible task milestones into one project template, instead of having multiple project templates for different types of courses (first courses, tech courses, etc). When the project plans for a new certificate are being built, it is then decided which task milestones will apply to that project, and the unnecessary milestones/buckets will be removed from the project plan.
This new process will be carried out with an increased amount of participation between the ITG employees and the IDDs when project plans are first being built out in Wrike.
Selecting which milestones/tasks to keep and which to remove is a variable most team members will not have to consider or worry about. However, it is important that to understand the reasoning behind the inclusion of less-common and content-specific milestones & tasks in the new Wrike template.
Non-Video Asset Process
The Non-Video Asset task bucket will now be represented with a different structure than in the previous template. Before, the structure was represented by module-based tasks. In the new template, it will be structured by a phased approach.
In the 2.0 template, there are four main phases, represented by individual subtasks;
- Draft
- Faculty Add Content
- Edit/Revise
- Add to Canvas
Here is a view of the templated tasks in Wrike:

Within each subtask, checkboxes will be used to indicate the individual assets for the course. These can be entered in the first Draft subtask, and then copy-pasted in the other phase tasks for future use.
When each asset has been completed for one of the phases, the user will mark that as done using the checkbox. Here is a view of how a project might look part way through the drafting phase:
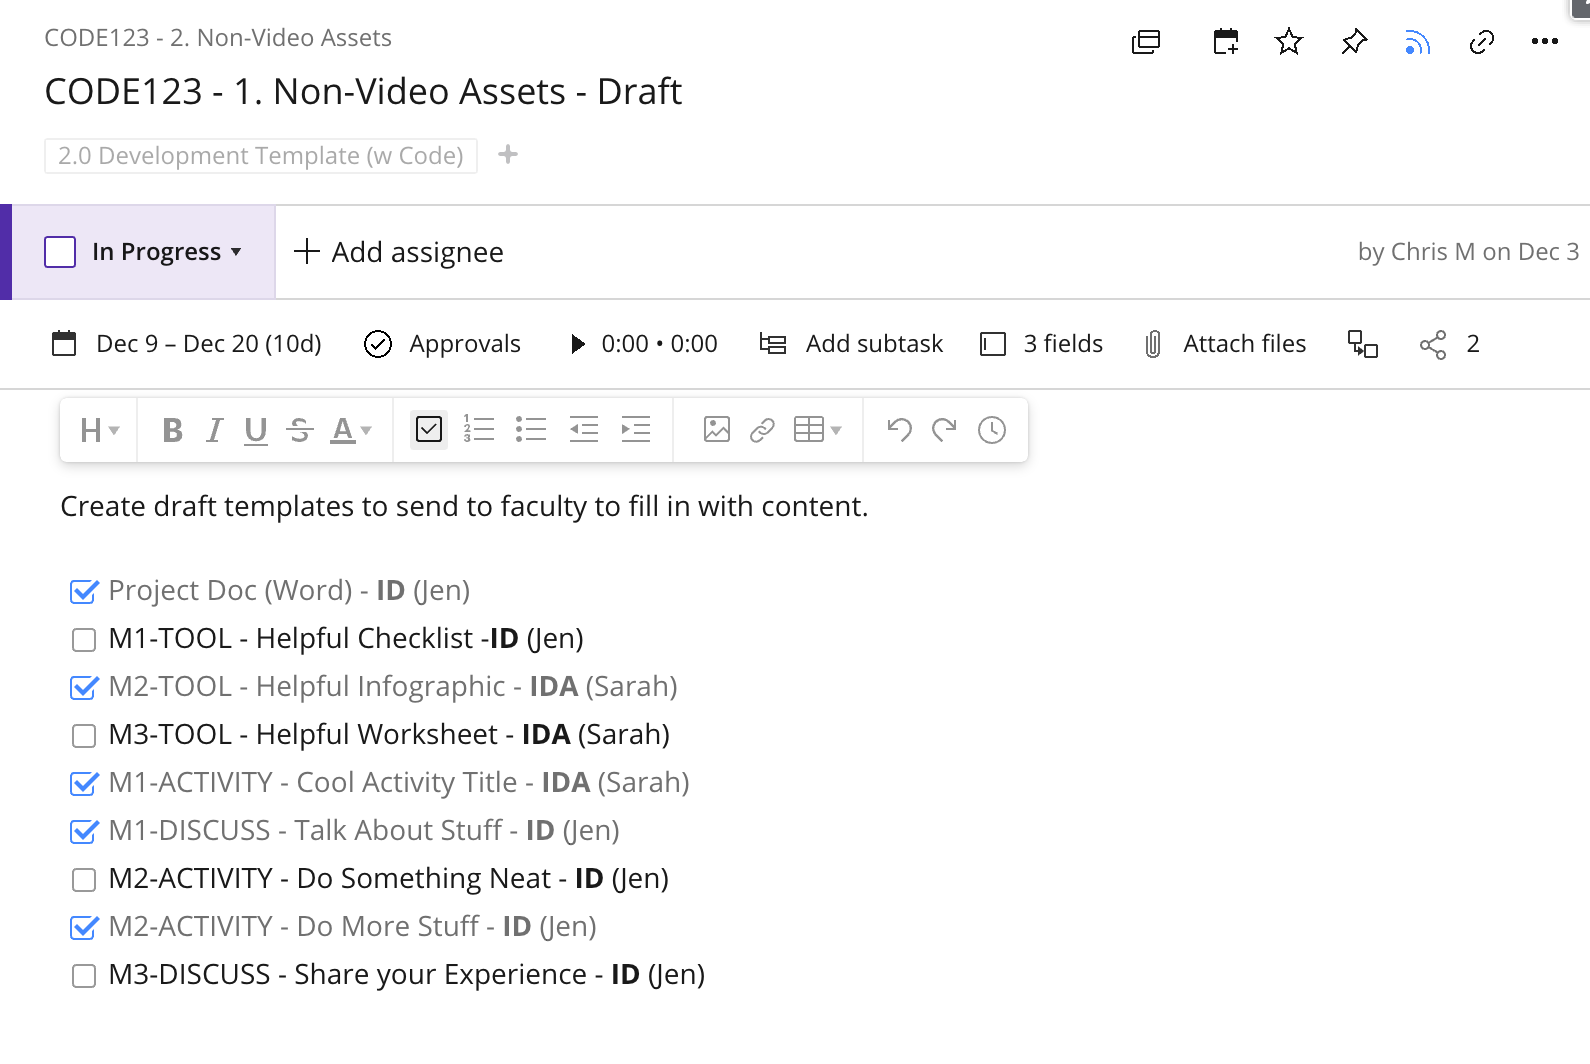
When all the assets have been completed in a phase, the task status should then be switched from In Progress to Done.
One way to structure the asset checkboxes is to clearly mark which assets will eventually go to the Creative team, and which ones won’t. Here is an example of how that might look:
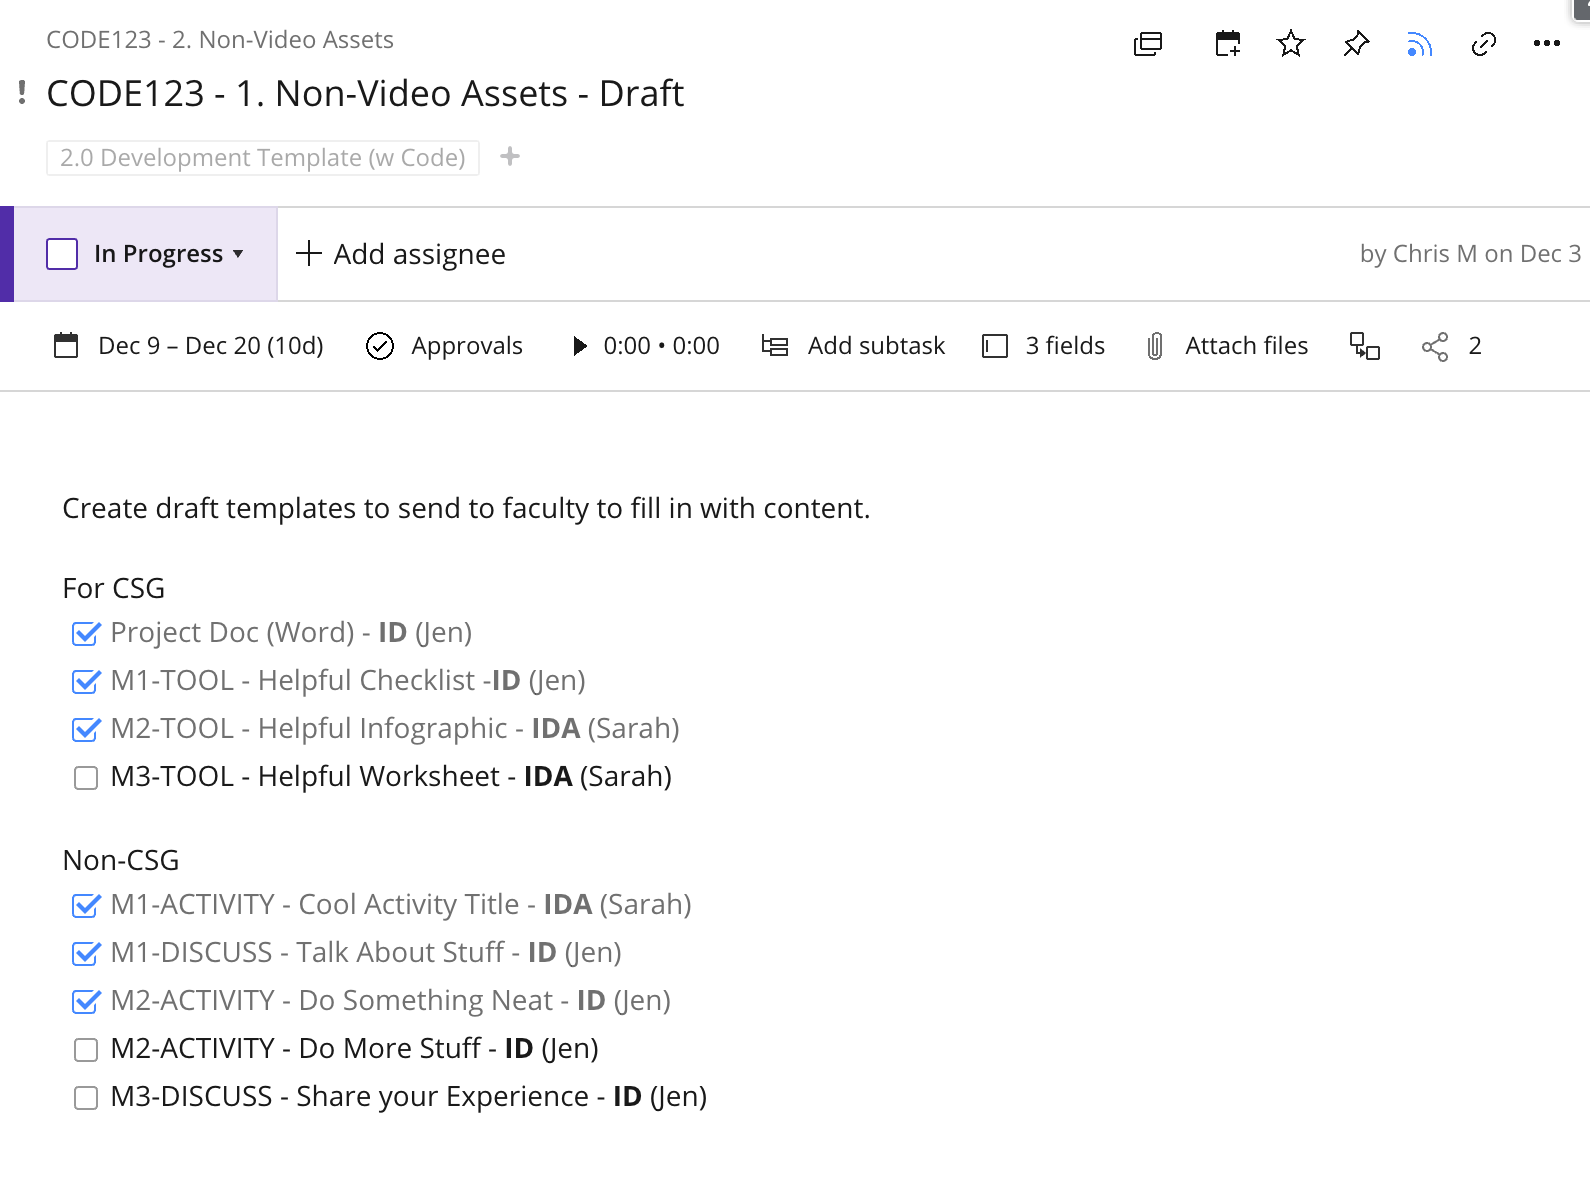
When ready to handoff the assets needing Creative team involvement, that will be done in two specific tasks that are now separated with a "CSG - " tag in the task title. These tasks will also be represented in the "phased" approach explained above.

First a task representing the request from the ID/IDA and the initial work from IGD. And then a review and finalization task, where the graphic elements will all be attached in Wrike Proof for review comments and iterations.
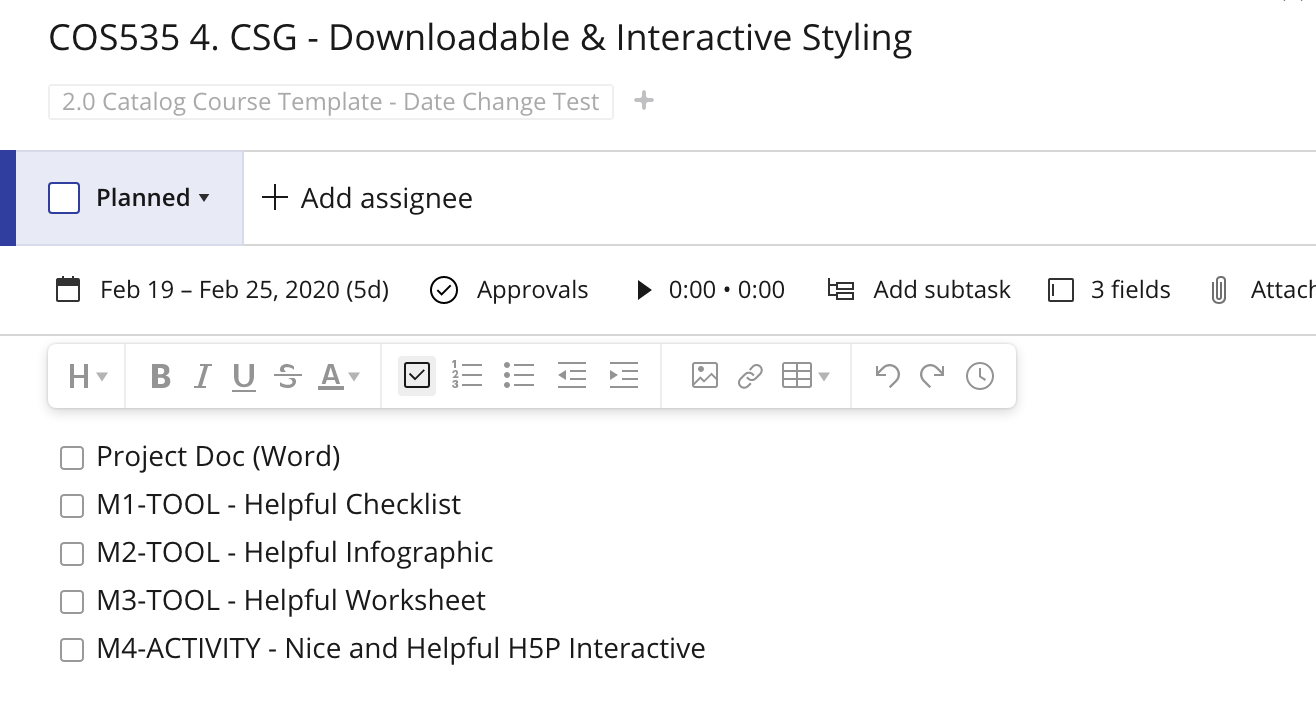
Each graphic element that needs Interactive Graphic Designer effort will be listed in checkboxes in each one of these phased tasks. Here is what a course's "CSG - Downloadable & Interactive Styling" might look like when being submitted to the Creative team:
Task Title Sequencing
Task titles will now appear a bit differently than before. Tasks will not contain a simple numbering structure in order to create a chronological order of tasks when sorting a project by “Title”.
The sequencing structure is as follows: each task milestone has been given a single-digit number to represent where in the order of the process a task milestone is supposed to be started. Task milestones that have the same number next to them should be able to be started at the same time. For example, the video and non-video asset task buckets:

Subtasks will also be given a single digit number to represent the chronological order they will be completed in. And again, if tasks share a number, it is assumed that these can be worked on simultaneously. For example, the Review bucket and its subtasks:
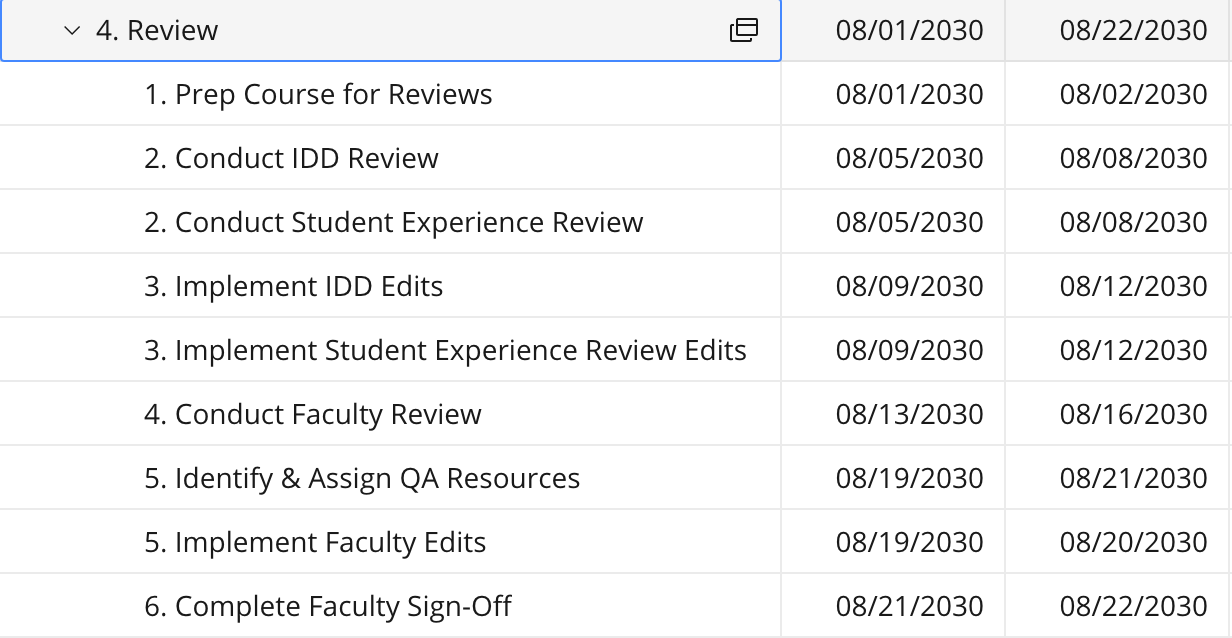
The order of the templated tasks in no way makes it impossible to start a task out of the order it has been given by the sequencing of title names. In other words, in the example above, if a course’s workflow for some reason dictates needing to specifically start the IDD review far before the Student Experience Review you can absolutely do so.
