Departmental Standards
Company-Wide
eCornell Styleguide & Branding
Cornell University Branding
Writing and Editing Style Guide
Faculty and Expert Naming Conventions in Courses
Cornell School and Unit Names
Tips for Campus Engagements
LSG
Legal Policies
CSG
Updating Wrike Due Dates
Photography Style Guide
eCornell Mini Visual Style Guide
The Pocket Guide to Multimedia Design Thinking (*as It Pertains to Your Job Here)
Creative Services (CSG) Handbook
Administrative
LSG Meeting Recordings and Notes
Sending Faculty Sign-Off Forms in Adobe Sign
Weekly Faculty Status Emails
Animation/Motion Design
Instructional Design
Required Course Elements
The Pocket Guide to Instructional Design Thinking at eCornell
Adding AER to Canvas
Grading
D&D Newsletter
LSG Newsletter (LSGN) - February 2024
LSG Newsletter (LSGN) - March 2022 Edition
LSG Newsletter (LSGN) - December 2023
LSG Newsletter (LSGN) - October 2021 Edition
LSG Newsletter (LSGN) - June 2022 Edition
D&D Newsletter November 2024
LSG Newsletter (LSGN) - August 2022 Edition
LSG Newsletter (LSGN) - June 2023
LSGN Newsletter April 2023
LSG Newsletter (LSGN) - February 2022 Edition
LSG Newsletter (LSGN) - October 2022 Edition
LSGN Newsletter February 2023
LSGN Newsletter March 2023
D&D Newsletter September 2024
LSG Newsletter (LSGN) - August 2023
LSG Newsletter (LSGN) - March 2024
LSG Newsletter (LSGN) - April 2022 Edition
D&D Newsletter - August 2024
LSGN Newsletter January 2023
LSG Newsletter (LSGN) - October 2023 article
LSGN Newsletter (LSGN) - April 2024
LSG Newsletter (LSGN) - November 2021 Edition
D&D Newsletter February 2025
LSG Newsletter (LSGN) - January 2022 Edition
LSGN Newsletter December 2022
D&D Newsletter April 2025
LSG Newsletter (LSGN) - July 2022 Edition
LSG Newsletter (LSGN) - September 2022 Edition
Course Development
Image Uploads for Inline Projects
How to Install the Firefox Canvas Utilities Extension
Revising a Course/ Creating a Redux Version/ Course Updates
Creating a Perma Link With Perma.cc
Course Content Deletion Utility — Removing All Course Content
Teleprompter Slide Template
Course Names
Requesting High Resolution Video Uploads
Technical Talking Points Template
Writing Discussions: Guidelines for IDs
Online Resources in Credit-Bearing Courses
Hiring Actors for an eCornell Project
Marketing
Operations
Tech
Master Course Template Differences (8675309s)
Non-CSG File Uploads
Mentored Learning Conversion Process and Resources
Doc-Based Master Course Template and Standards (8675309-DOC)
Pedagogical Guidelines for Implementing AI-Based Interactives: AER
Coding Master Course Template and Standards (8675309-CODE)
Practice Quiz Standards
Hero Image
Platform Training
Administrative Systems
ADP
Google Drive
Downloadables Process
Embed a Document from Google Drive
Adding Google Links to Canvas
File Naming and Storage Convention Standards
Google Drive for Desktop Instructions
Storing Documents in Multiple Locations
Wrike
Wrike System Fundamentals
Field Population
1.0 to 2.0 Wrike Project Conversion
Blocking Time Off in Work Schedule (Wrike)
Wrike Custom Field Glossary
Wrike "Custom Item Type" Definitions
How to Create a Private Dashboard in Wrike
Using Timesheets in Wrike
Importing Tasks into a Wrike Project
Wrike Project Delay Causes Definitions
Setting OOO Coverage for Roles in Wrike
How to Change a Project's Item Type in Wrike
Using Search in Wrike
How to Create a Custom Report in Wrike
@ Mentioning Roles in Wrike
Automate Rules
Using Filters in Wrike
Managing Exec Ed Programs in Wrike
External Collaborators
Wrike for External Collaborators: Getting Started
Wrike for External Collaborators: Views
Wrike for External Collaborators: Tasks in Detail
Wrike Updates
New Experience Update in Wrike
Wrike Course Development Template 2.0 - What's New
Wrike - Course Development Template 3.0 Release Notes
Wrike Process Training
Course Development & Delivery Platforms
Canvas
Development
Adding Custom Links to Course Navigation
Adding Comments to PDFs from Canvas Page Links
Setting Module Prerequisites and Requirements in Canvas
Canvas Page Functionality
Create a New Course Shell From 8675309
Using LaTeX in Canvas
Search in Canvas Using API Utilities - Tutorial
Reverting a Page to a Previous Version
Student Groups
Create Different Canvas Pages
Importing Specific Parts of a Canvas Course
Canvas HTML Allowlist/Whitelist
Understanding Canvas Customizations/Stylesheets
Operations
Discussion Page Standards
How to import a CU course containing NEW quizzes
Canvas LMS: NEW Quiz compatibility
Faculty Journal
Course Content Style Guide
Click-To-Reveal Accordions in Canvas
Course Maintenance Issue Resolution Process
Meet the Experts
Codio
Codio Operations
Managing Manually Graded “Reflect and Submit” Codio Exercises
Codio Structure and Grading for Facilitators
Premade Codio Docs for Ops & Facilitators
Codio Remote Feedback Tools for Facilitators
Developers
Development Processes
Creating a New Codio Course
Creating a New Codio Unit
Integrating a Codio Course into Canvas
Embedding a Codio Unit into Canvas
Setting Up the Class Fork
Jasmine Autograde Unit Testing
Setting Up the Class Fork (LTI 1.3)
R Studio - Exclusion List for R Code
Mocha/Selenium Autograding
Starter Packs in Codio
Configuring Partial Point Autograders in Codio
Launch a Jupyter Notebook from VM
AI Extensions
Program-Specific Developer Notes
Codio Functionality
Jupyter Notebooks
Jupyter Notebooks - nbgrader tweaks
Jupyter Notebooks Style Guide
Adding Extensions to Jupyter Notebooks
Setting up R with Jupyter Notebooks
Change Jupyter Notebook Auto Save Interval
How to Change CSS in Jupyter Notebook
RStudio in Codio
How To Centralize the .codio-menu File to One Location
Codio Fundamentals for LSG
Using the JupyterLab Starter Pack
Using Code Formatters
Using the RStudio Starter Pack
Conda Environments in Codio
Updating Codio Change Log
Codio Basics: Student Support
eC Facilitator Guide to Codio
Migrating to Updated Codio Courses
Qualtrics
Ally
Ally Institutional Report Training
Ally Features Overview Training
Using the Ally Report in a Course
Ally Vendor Documentation/Training Links
Adobe
Other Integrations
Pendo Overview
How to Add VitalSource eBooks in Canvas
Enabling Zoom/"Live Sessions" in a Course
Pendo Guide Creation
H5P
Modifying Subtitles in H5P Interactive Videos
Embedding H5P Content Into Canvas
Troubleshooting H5P Elements in Canvas
Inserting Kaltura Videos into H5P Interactive Videos
Adding Subtitles to H5P Interactive Videos
S3
BugHerd
Instructional Technologies & Tools Inventory
Canvas API Utilities
Getting started with the MOP Bot
eCornell Platform Architecture
HR & Training Systems
Product Development Processes
Accessibility
What Is Accessibility?
What Is Accessibility?
Accessibility Resources
Accessibility Considerations
Accessibility Support and Assistive Technology
Structural Accessibility
Accessibility Design and Development Best Practices
Accessible Images Using Alt Text and Long Descriptions
Accessible Excel Files
Accessibility and Semantic Headings
Accessible Hyperlinks
Accessible Tables
Creating Accessible Microsoft Files
Mathpix: Accessible STEM
Design and Development General Approach to Accessibility
Integrating Content Authored by a Third Party
Planning for Accessible Tools
Accessibility Considerations for Third Party Tools
Studio Accessibility
Designing for Accessible Canvas Courses
Accessibility: Ongoing Innovations
Course Development
Planning
Development
0. Design
1. Codio Units
1. Non-Video Assets
3. Glossary
4. Canvas Text
4. Tools
4. Tools - Wrike Task Definitions
3. Review And Revise Styled Assets
ID/A to Creative Team Handoff Steps
General Overview of Downloadables Process
Course Project: Draft and Final
Excel Tools: Draft and Final
eCornell LSG HTML Basics
1. Non-Video Assets - Wrike Task Definitions
2. Video
Multifeed Video
2. Video (Standard) - Wrike Task Definitions
Studio Tips
Tips for Remote Video Recording Sessions
Who to Tag for Video Tasks
3. Animation
3. Animation - Wrike Task Definitions
2. Artboard Collab Doc Prep
6b. Motion Design Review and Revise
Who to Tag for Animations Tasks
3. Artboard Collab Process Walkthrough
DRAFT - FrameIO Process Walkthrough
Motion Contractor Guide for IDAs / IDDs
Requesting / Using Stock Imagery (Getty Images and Shutterstock)
3. Ask the Experts
5. On-Demand Conversion
5. Review
5. Review - Wrike Task Definitions
1. Prep Course for Reviews
2. Conduct Student Experience Review
3. Implement Creative Director Edits
3. Implement IDD Edits
3. Implement Student Experience Review Edits
4. CSG - Revise Tools Export 1
5. Conduct Faculty Review
6. Implement Faculty Edits
7. Conduct Technical Review of Course (STEM-only)
Technical Student Experience (Tech SE) Review Process
2. Conduct IDD or Sr ID Review
6. Alpha
6. Alpha - Wrike Task Definitions
Alpha Review Process
Prepare a course for Alpha review
Schedule & Conduct Alpha Triage Meeting
7. QA
7. QA - Wrike Task Definitions
1. Prep Course for QA
2. Copy Edit Captions
2. Copy Edit Course & Files
4. Conduct Content QA of Course
4. Final Creative Review and Export
Adding Chat With Tech Support to Course Navigation
5. Implement QA Edits
Working With Video Captions That Contain Special Characters
Copy Edit Captions in SubPLY
Creating a Course Style and Settings Guide
Copy Editing Content in Frame.io
1. Complete Dev to QA Checklist
Copy Edit Captions in 3Play
Tag a Video for Transcription by 3Play
Course QA Checklists
8. Deployment
8. Deployment - Wrike Task Definitions
1. Finalize Master Version of Course
2. Create & Add Course Transcript (CT) to Course
Replace a Master -M With a Redux Version of the Course
3. Create -T (Training Course) and Associate With Master Blueprint
Canvas Blueprint Course Functionality
Project Management in Wrike
Managing Project Reporting in Wrike
Managing Task Needs/Schedule in Wrike
Adding Tasks
Comments and Communication
Statuses
Updating Task Start and Due Dates
Predecessors
Durations
Rollups
Calculating Project Schedule by Deadline in Wrike
Creating Course Project Plans in Wrike
Setting Custom Capacity for Resources
Customizing Effort in a New Project Plan
Marking Projects Complete in Wrike
How to Set Up Workload Charts to Track Effort in Wrike
For-Credit Considerations
1-Sheet Population
Post-Development
AI Simulations
Program Facilitation & Operational Guidelines
Data Science
Facilitator Resources
Canvas Navigation
Adding Events to the Course Calendar
Navigating Canvas and the Dashboard
How Do I View Previous Courses I Have Taken or Facilitated?
Why Am I Receiving Duplicate Canvas Emails?
How Do I Edit My Canvas Profile?
Send Students a Direct Message on Canvas
Adding Notes to Canvas Gradebook
How Do I Send Students Nudges from the Gradebook?
Overview of 2024 Changes- Course Layout and Structure
How Can I Update My Canvas Notification Preferences?
Ursus Navigation
How Do I Access My Offer in Ursus?
How Do I Edit My Ursus Profile?
How Do I Request Time Off (Blackout Dates)?
How Can I Request to Learn More Courses?
Live Sessions
Enabling Student Use of Closed Captioning in Zoom
When Should I Schedule My Live Sessions For?
Changing Live Session Date and Time After Created with Facil Tool
Help! I Need to Reschedule a Live Session
Live Session Information page
Set up Live Sessions with the Facil Tool
Combining Live Sessions with Facil Tool
Course Set-Up
Course Set Up: Getting Ready for Live Sessions
Recording and Posting a Welcome Video
Course Set Up: When can I begin to edit my course?
Course Set Up: Reviewing Due Dates
Course Set Up: Reviewing Announcements
What Do I Need to Do to Make Sure My Course is Set Up Correctly?
How Do I Customize My Course Sections?
Course Announcements and Messages Templates
Facilitator Focus
Zoom and other Technical Support
Reporting Spam/Phishing
How Do I Set Up My Zoom Account?
Support Resources for Facilitators
Live Session/Zoom Trouble Shooting Guide & Technical Readiness
How to Upload Videos to Zoom On-Demand
Student Survey FAQs
How Do I Save and Refer Back to Zoom Recordings?
How Do I Find My Personal ID Meeting link in Zoom?
Benefits as an eCornell Employee
Do I Have Access to Microsoft Office as a Cornell Employee?
Taking Courses as a Student
Professional Development Benefit
Student Success
Help! My Students Can't View a Video Within My Course
Extensions and Retakes
Policies and Navigation Resources for Students
Symposium Access Extension- Fall 2025
Students enrolled through special groups: Corporate and VA
Unique Circumstances for Student Extensions and Retakes
Communicating with Students via Canvas
Can I Provide Students with a Letter of Recommendation?
Understanding and Addressing Instances of Plagiarism
Support Resources for Students
Understanding and Addressing Use of AI
Help! My Student is Having a Hard Time Uploading a Video
Unique Student Situations
I Have a Student Requesting Accommodations- How Should I Proceed?
Canvas Mobile App
Messaging Students via the Canvas Mobile App
Setting up and Navigating the Canvas Mobile app
Setting up Push Notifications on Canvas Mobile
Canvas App Features for eCornell courses
New Facilitator Onboarding and Quick References
Facilitator Onboarding at eCornell
Why Do I Have Multiple eCornell email and Canvas Accounts?
Quick reference: Systems and Accounts we use at eCornell
Quick reference guide: Key eCornell Personnel
How do I Log Onto Canvas and Access FACT101?
How Do I Add eCornell to My Email Signature?
Training Course Review & Facilitation Authorization
What to Expect During Live Shadowing Experience
Setting up Email Forwarding
Facilitator Expectations and Grading Help
Changes in Grading Scheme: Incomplete/Complete and 75% to 85%
New (Embedded/Inline Format) How do I grade Course Projects?
Navigating the Gradebook and Accessing the Speedgrader
Quick Reference: Sort assignments in the Speedgrader
How do I Grade Quizzes?
(Old format) How Do I Grade Course Projects and Add Annotations?
Rubrics for Effective Facilitation
Is There an Answer Key for my Course?
How to Monitor and Promote Student Progress
How Do I Grade Discussions?
Adding an Attempt to a Course Project
How Quickly Do I Need to Provide Grading to Students?
Payroll and the Monthly Scheduling Process
Codio References
Manually Graded “Reflect and Submit” Codio Exercises
Codio Quick Resources
Codio Reference: Embedded quiz questions (H5P)
Codio Reference: Checking for Completion Status
Codio Reference: Manually Graded Exercises
Codio Remote Feedback Tools
Codio Reference: Ungraded exercises
Codio Reference: Autograded Exercises
Archived
Table of Contents
- All Categories
- Platform Training
- Course Development & Delivery Platforms
- Codio
- Developers
- Development Processes
- Starter Packs in Codio
Starter Packs in Codio
Updated
by Nick
What is a Starter Pack?
A starter pack is a fully-functional Codio unit and a quick starting point for course development. Each starter pack can be slightly or greatly different from the others. However, each starter pack usually shares certain things in common, like:
- Pre-defined CSS rules under
.guides/styles.css- Note: We can use @import lines of CSS code inside of styles.css that can pull in stylesheets from Amazon S3. The @import lines can be used for common used CSS rules used across multiple Codio unit.
- A pre-defined layout. The layout consists of various panels (zero-indexed) that consist of the Codio Guide in one panel and may consist of other panels that can included coding files, static/dynamically preview-able HTML files, a Bash terminal or third-party applications.
Codio can have up to four panels and has the ability to show or hide the file tree as well as place the Codio Guide either to the left or the right. For most cases, we have the Codio Guide to the left. For Codio units using a third-party application like Jupyter Notebook, R Studio or OmniDB, we usually have the guide to the right, but also collapsed (to be toggled in the Settings area).
- A pre-defined Codio top menu. We can choose to hide/show any of the options in the top Codio Menu by modifying the .codio-menu file under the /workspace directory.
- Pre-defined settings. In the Codio backend, under Settings, there are a number of radio buttons to toggle certain feature on or off. In this same area, we can automatically run javascript files upon startup.
- Fully set up filetree. All files published into the Starter Pack will be automatically accessible upon the creation of a new Codio Unit.
- Guide Pages. There may be one or more Codio Guide Pages that appear upon the creation of a new Codio unit using a Starter Pack with example copy present.
- Third party applications. Not all units will have third party applications by default, but Starter Packs allow us to have them present upon the creation of a new unit to expedite the development process.
- Code Assessments. Not all units will have code assessments by default, but Starter Packs allow us to have them present upon the creation of a new unit to show, as an example, how the tests function and run.
RStudio Starter Pack
Codio units created with the RStudio Starter Pack open an RStudio window using an open tab of "Preview" type with the RStudio Server URL https://{{domain8787}} in the Guide Layout configuration. When a student opens one of these Codio units, they should see an RStudio window with four panels, as described by the Using RStudio collapsed guide page (which students can expand by clicking the right sidebar). This description of the basic RStudio interface is configured in the Guide Settings using the .guides/load.js file shown in the Workspace Files section; specific configurations for Guide Layout and Guide Settings are shown in the Guide Configuration section. For information on how to make updates to the stack pertaining to the RStudio Starter Pack, see the Stack Updates for RStudio section below.
Workspace Files
This section explains how the Codio workspace files are set up. These are files located in the /home/codo/workspace (or simply ~/workspace) directory of Codio.
.codio
{
    // Preview button configuration
    "preview": {
        "RStudio": "https://{{domain8787}}"
    }
}
.codio-menu
{
    "Logo": false,
    "Codio": false,
    "Project": {
        "Restart Box...": true,
        "Resync File Tree": false,
        "Export as Zip": false,
        "Settings...": false,
        "Stack": false,
        "Permissions...": false,
        "Box Info": false,
        "Reset Box...": false,
        "Create Copy...": false,
        "Share...": false,
        "QR Code for Preview URL": false,
        "Delete...": false,
        "Exit": false
    },
    "File": false,
    "Edit": false,
    "Find": false,
    "View": false,
    "Tools": false,
    "Education": {
        "Mark as Completed": true,
        "Code Comments": false,
        "Earsketch": false,
        "Jupyter Lab": false
    },
    "Help": false,
    "Run": false,
    "Debugger": false,
    "Status": false,
    "Preview": false,
    "Toggle sections list": false,
    "Online": false
}
.guides/load.js
.guides/load.js must be in the Scripts text area under the Codio settings for the following line to be called.$("#guide").load("https://ecornell.s3.amazonaws.com/Codio/Reuseables/RStudio/guideText.txt");.guides/style.css
@import "https://s3.amazonaws.com/ecornell/Codio/CSS/styles.css";
Guide Configuration
This section describes how the Codio guide is set up.
Guide Editor
<img src="https://ecornell.s3.amazonaws.com/Codio/Reuseables/RStudio/quadrants.png" />

<div id="guide">

</div>
Guide Settings
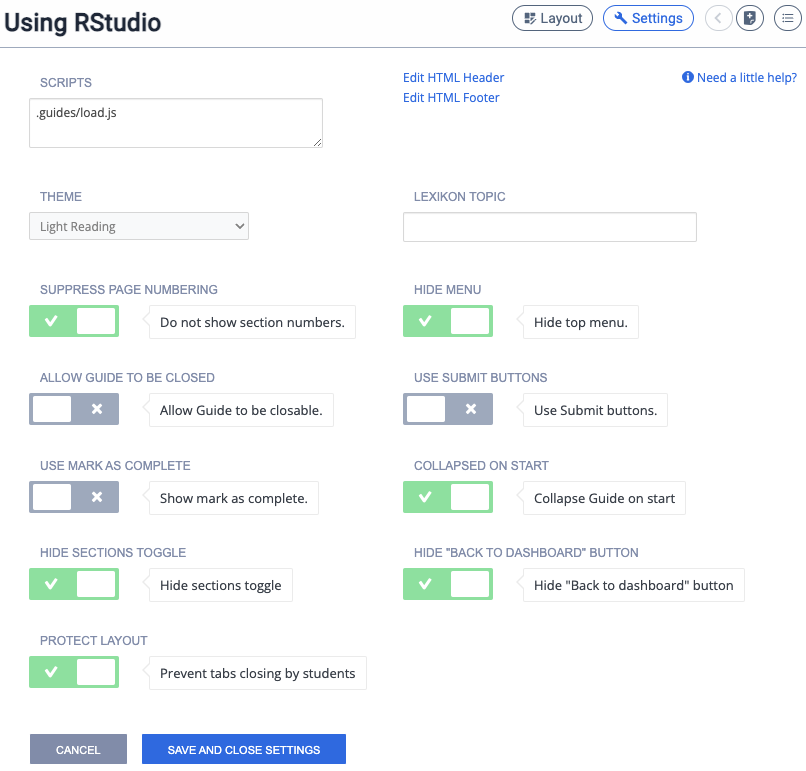
For an ungraded RStudio Codio unit, make sure USE MARK AS COMPLETE is toggled off and HIDE MENU is toggled on:
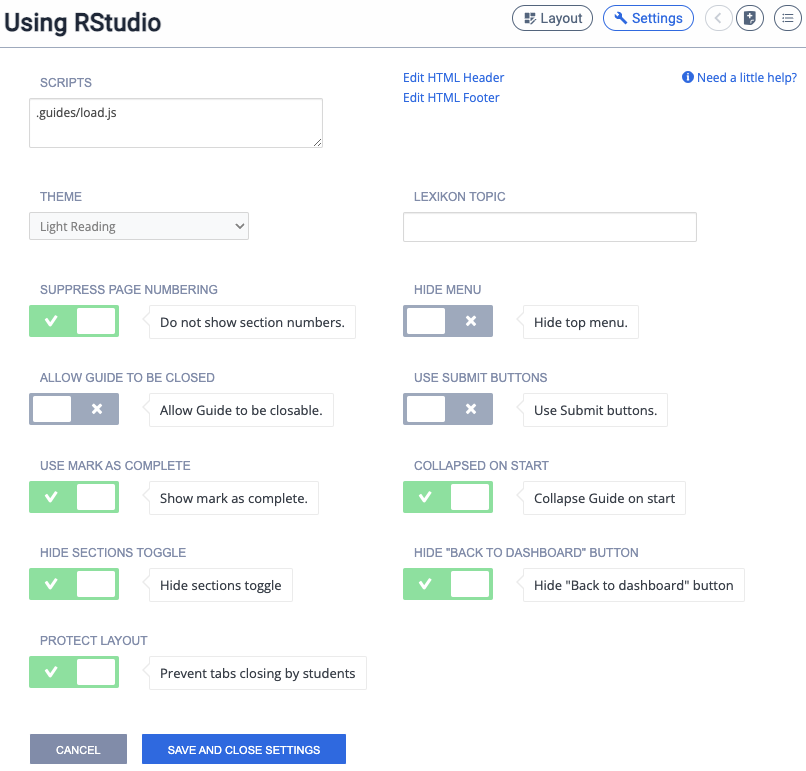
For a graded RStudio Codio unit, make sure USE MARK AS COMPLETE is toggled on and HIDE MENU is toggled off (this is the default with the starter pack):
Guide Layout
For the Open Tabs, you will want to use the same URL to serve RStudio Server:
https://{{domain8787}}/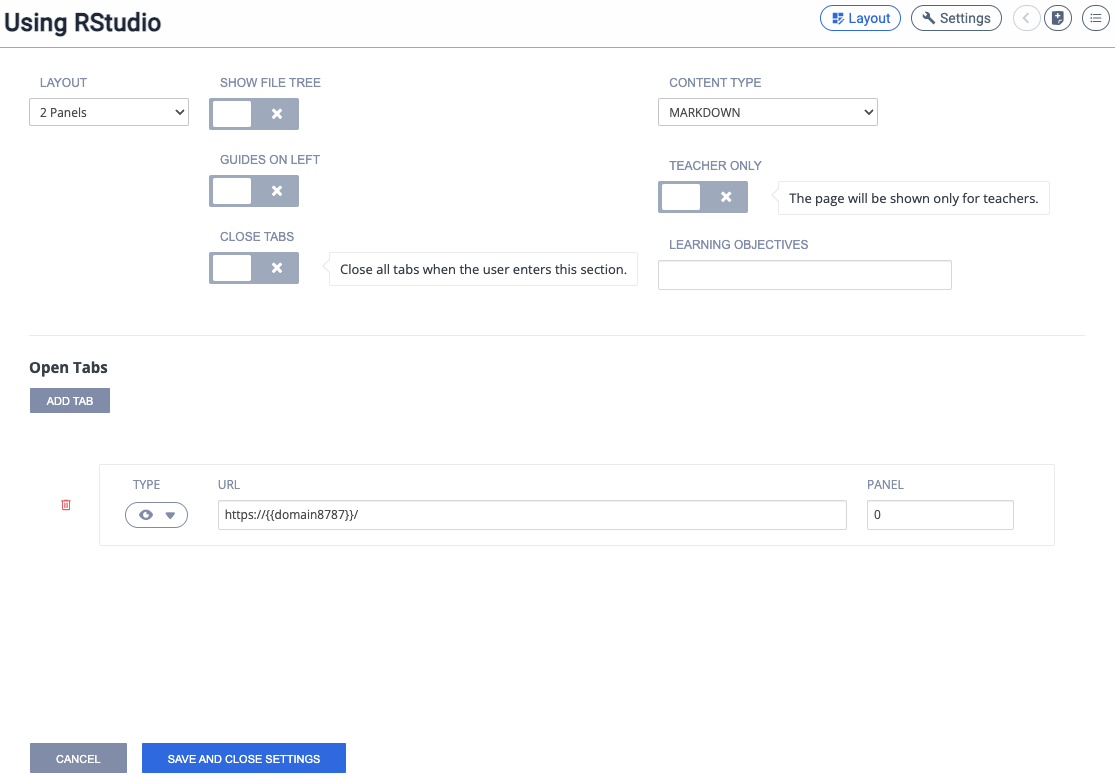
Stack Updates for RStudio
The version of R is tied to the version of Ubuntu operating system, so upgrading the R version amounts to upgrading the Ubuntu version if there is a new long-term support (LTS) version of Ubuntu available. Upgrading the version of Ubuntu may or may not upgrade the version of R, depending on whether the the new version of Ubuntu comes with a new version of R.
To update the Ubuntu operating system:
sudo apt update && sudo apt dist-upgrade
rstudio-server-codio.service is properly enabled and rstudio-server.service is disabled. Failing to do this may cause unexpected behavior, such as the RStudio Server login screen being presented to users when they load a Codio unit.If R gets updated when you update Ubuntu, you may need to update or reinstall R packages using R commands in an R terminal. To start an R terminal, enter R at the ~/workspace$ prompt.
To update all R packages, run the following R command (this will take several minutes):
update.packages(ask = F, Ncpus = 4)
To maintain R compatibility with JupyterLab, make sure that the R packages IRkernel, languageserver, and repr are up-to-date by running the R command:
install.packages(c("IRkernel", "languageserver", "repr"))After updating IRKernel, reinstall the R kernel in JupyterLab with the R command:
IRkernel::installspec()
JupyterLab Starter Pack
The JupyterLab Starter Pack uses the same stack as the RStudio Starter Pack, but its workspace files are configured for JupyterLab rather than RStudio. Since the stack has Julia, Python, and R installed, the JupyterLab Starter Pack can be used for projects in all three languages.
Workspace Files
This section explains how the Codio workspace files are set up. These are files located in the /home/codo/workspace (or simply ~/workspace) directory of Codio.
.codio
{
    // Preview button configuration
    "preview": {
        "JupyterLab": "https://{{domain3000}}/lab"
    }
}
.codio-menu
{
    "Logo": false,
    "Codio": false,
    "Project": {
        "Restart Box...": true,
        "Resync File Tree": false,
        "Export as Zip": false,
        "Settings...": false,
        "Stack": false,
        "Permissions...": false,
        "Box Info": false,
        "Reset Box...": false,
        "Create Copy...": false,
        "Share...": false,
        "QR Code for Preview URL": false,
        "Delete...": false,
        "Exit": false
    },
    "File": false,
    "Edit": false,
    "Find": false,
    "View": false,
    "Tools": false,
    "Education": {
        "Mark as Completed": true,
        "Code Comments": false,
        "Earsketch": false,
        "Jupyter Lab": false
    },
    "Help": false,
    "Run": false,
    "Debugger": false,
    "Status": false,
    "Preview": false,
    "Toggle sections list": false,
    "Online": false
}
.codio-jupyter
Add a .codio-jupyter file to ~/workspace when you want Codio to use nbgrader for assessment grading. It is possible to configure nbgrader using the .codio-jupyter file, but the configuration settings are limited. Instead, leave .codio-jupyter empty and add an nbgrader_config.py file to ~/workspace with fine-tuned configuration settings. For example, you can define custom pre-processors to control what students see on Codio's feedback form after an assignment is Marked as Completed.
nbgrader_config.py
Add an nbgrader_config.py file to ~/workspace to adjust the configuration settings for nbgrader. Here is one example of an nbgrader_config.py file with a custom pre-processor named ClearTracebacks that gives you the ability to hide or replace traceback messages in Codio's feedback form:
from nbgrader.preprocessors import NbGraderPreprocessor
class ClearTracebacks(NbGraderPreprocessor):
    '''
    Custom preprocessor that removes traceback messages
    (i.e., `output['traceback'] = []`)
    or replaces traceback messages with another message
    (i.e., `output['traceback'] = ['replacement_message']`).
    '''
    def preprocess_cell(self, cell, resources, cell_index):
        # Remove or replace traceback messages in graded cells
        if 'nbgrader' in cell.metadata and cell.metadata.nbgrader.grade == True:
            for output in cell.outputs:
                if 'traceback' in output:
                    output['traceback'] = ['Traceback messages have been hidden.']
        # Remove or replace traceback messages in solution cells
        if 'nbgrader' in cell.metadata and cell.metadata.nbgrader.solution == True:
            for output in cell.outputs:
                if 'traceback' in output:
                    output['traceback'] = ['Traceback messages have been hidden.']
        return cell, resources

# Initialize configuration
c = get_config()

# Configuration settings
c.ClearHiddenTests.begin_test_delimeter = "BEGIN HIDDEN TESTS"
c.ClearHiddenTests.end_test_delimeter = "END HIDDEN TESTS"
c.LockCells.lock_all_cells = False
c.LockCells.lock_grade_cells = True
c.LockCells.lock_readonly_cells = True
c.LockCells.lock_solution_cells = True
c.ExecutePreprocessor.interrupt_on_timeout = True
c.ExecutePreprocessor.timeout = 90
c.ClearSolutions.code_stub = {
    "julia": "# YOUR CODE HERE\nerror(\"Your code is missing.\")\n# END OF YOUR CODE",
    "python": "# YOUR CODE HERE\nraise NotImplementedError(\"Your code is missing.\")\n# END OF YOUR CODE",
    "R": "# YOUR CODE HERE\nstop(\"Your code is missing.\")\n# END OF YOUR CODE",
}

# Clear hidden tests and tracebacks from Codio's student feedback report;
# controls what students see after their assignments are Marked as Completed.
c.GenerateFeedback.preprocessors = [
    'nbgrader.preprocessors.GetGrades',
    'nbconvert.preprocessors.CSSHTMLHeaderPreprocessor',
    'nbgrader.preprocessors.ClearHiddenTests',
    ClearTracebacks,
]
.guides/load.js
.guides/load.js must be in the Scripts text area under the Codio settings for the following line to be called.$("#guide").load("https://ecornell.s3.amazonaws.com/Codio/Reuseables/JupyterLab/JupyterLab_Guide.txt");.guides/style.css
@import "https://s3.amazonaws.com/ecornell/Codio/CSS/styles.css";
Guide Configuration
This section describes how the Codio guide is set up.
Guide Editor
In the Guide Editor, put the following HTML code:
<div id="guide">

</div>
Guide Settings
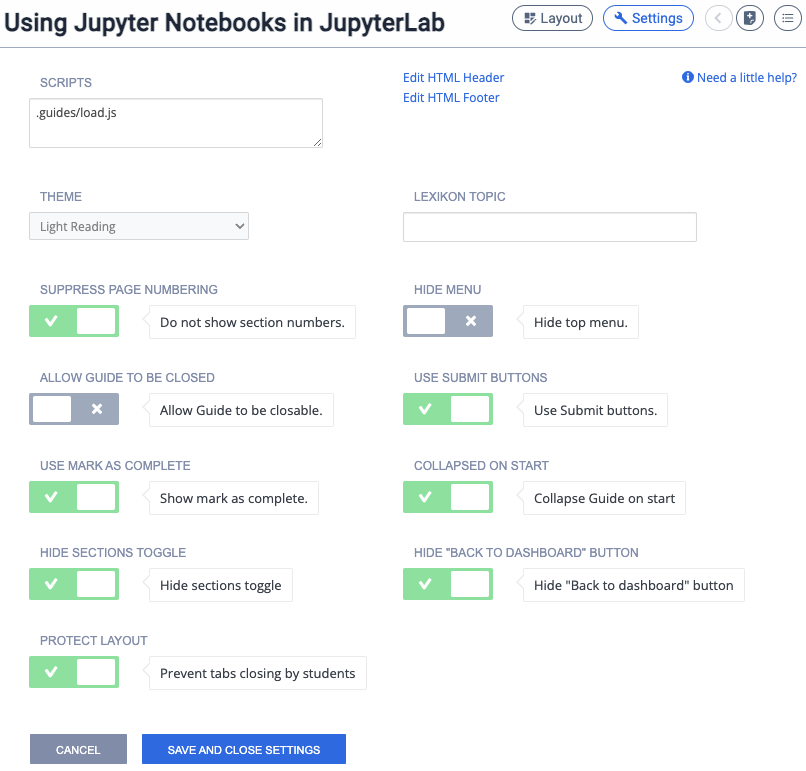
For an ungraded JupyterLab Codio unit, make sure USE MARK AS COMPLETE is toggled off and HIDE MENU is toggled on:
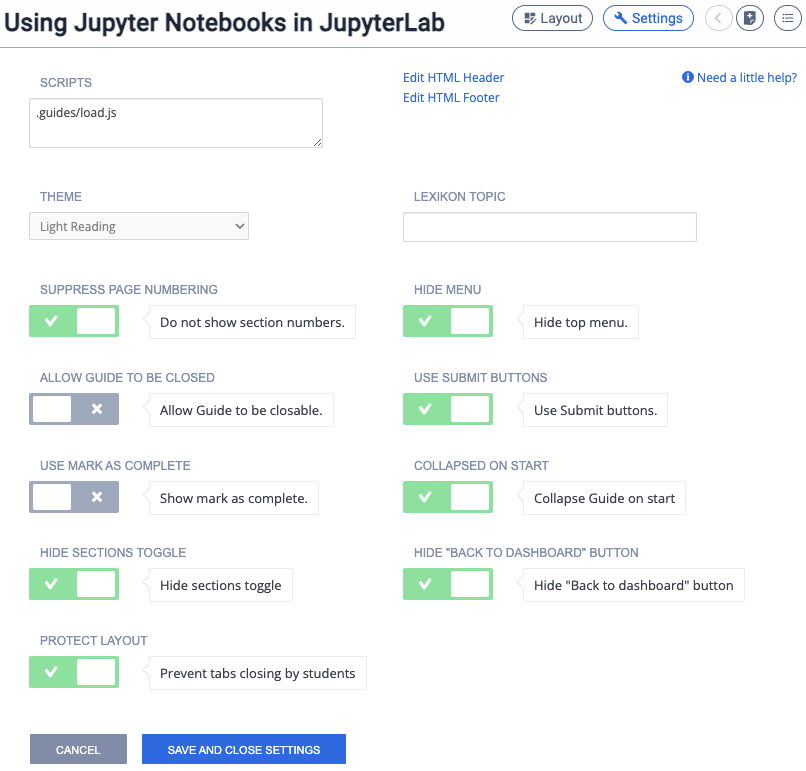
For a graded JupyterLab Codio unit, make sure USE MARK AS COMPLETE is toggled on and HIDE MENU is toggled off (this is the default with the starter pack):
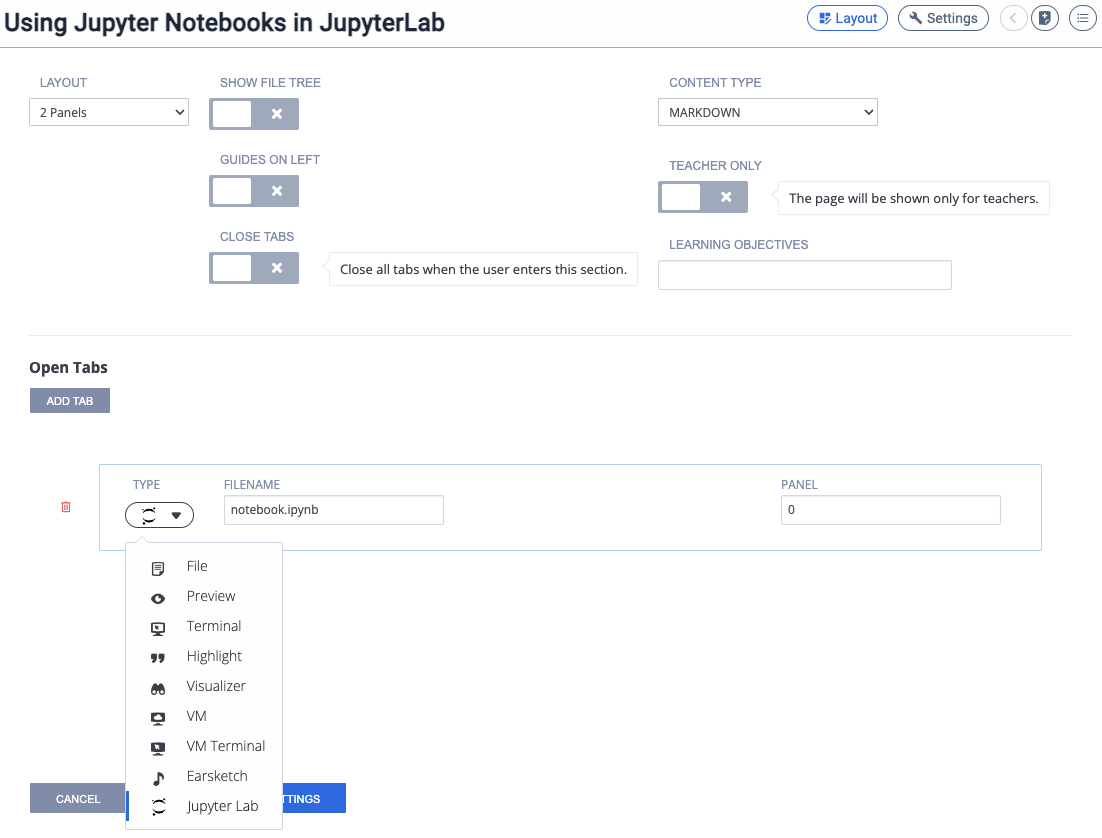
Guide Layout
Two-panel layout with notebook.ipynb as an open tab of Jupyter Lab type (panel 0):
Stack Updates for JupyterLab
In contrast to the RStudio starter pack, updating stack components for the JupyterLab starter pack do not require upgrading the Ubuntu operating system, although you may want to upgrade Ubuntu to the latest long-term support (LTS) version for potential performance enhancements.
First upgrade the Python package manager pip to the latest version:
pip install --upgrade pip
To update jupyterlab, update the JupyterLab extensions jupyter-lsp, jupyterlab-lsp, and nbgrader at the same time:
pip install --upgrade jupyterlab jupyter-lsp jupyterlab-lsp nbgrader
To upgrade other JupyterLab extensions, first get information about them using
jupyter labextension list
If there are outdated JupyterLab extensions in the list, try updating them with
pip install --upgrade extension1 extension2 ...
To install/uninstall JupyterLab extensions:
pip install extension1 extension2 ...
pip uninstall extension1 extension2 ...
To enable/disable JupyterLab extensions:
jupyter labextension enable extension1 extension2 ...
jupyter labextension disable extension1 extension2 ...
eCornell Python Starter Pack
This starter pack is a basic starting point for Python development using Python 3.6.7. Is has a 3 panel layout with the guides left, a code file in the upper-right and a terminal in the lower right. PyTest is the framework used for automated testing.
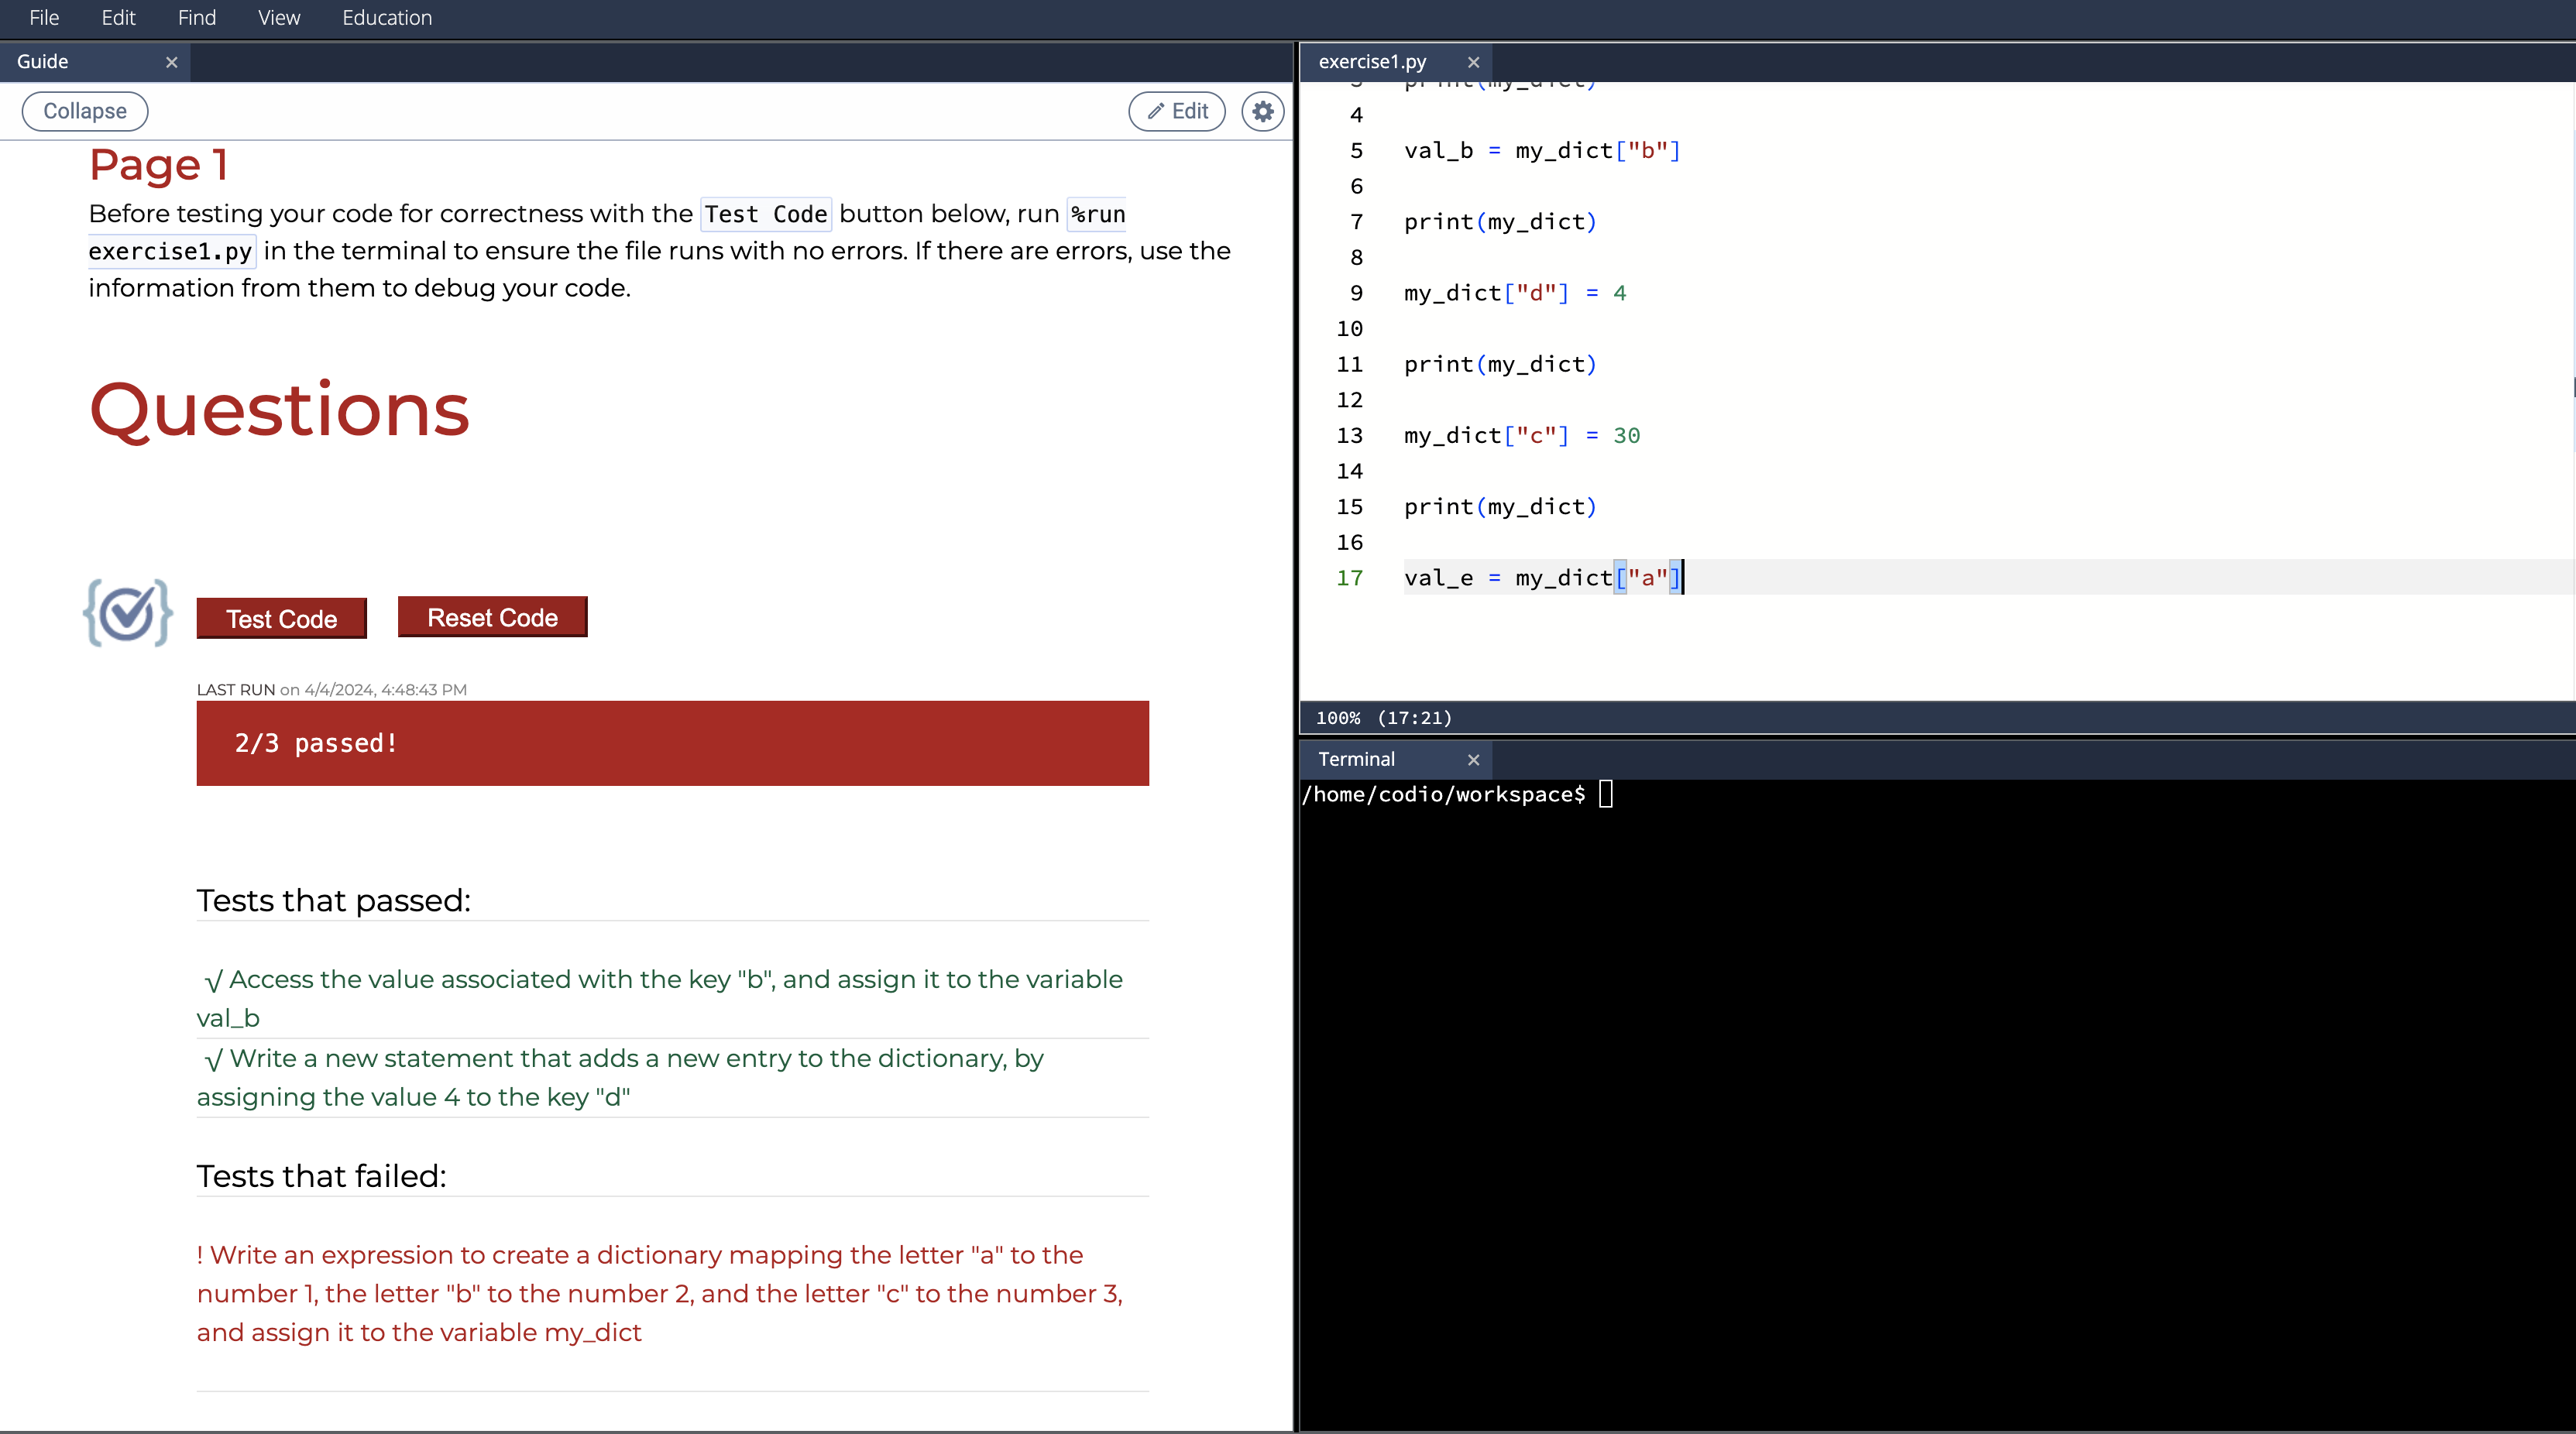
- Testing Framework: PyTest
- The auto grader first runs .guides/test/runner1.sh. This file first ensure the student's code compiles. If it doesn't, an error is returned and the auto graded does not run. If the code does compile, the PyTest unit tests will run under the .guides/test/test1.py file.
- Layout: A 3 panel layout with the guides left, a code file in the upper-right and a terminal in the lower right.
- Stack Software: (To include):
- Python 3.6.7
- PyTest 5.2.1
- geopandas 0.7.0
- ipython 6.2.1
- matplotlib 3.2.1
- nbgrader 0.5.5
- notebook 5.7.8
- numpy 1.16.3
- pandas 1.0.3
- scikit-learn 0.22.2.post1
- scipy 1.2.1
- seaborn 0.10.0
- tornado 6.0.2
Mocha/Selenium JS Auto Grading
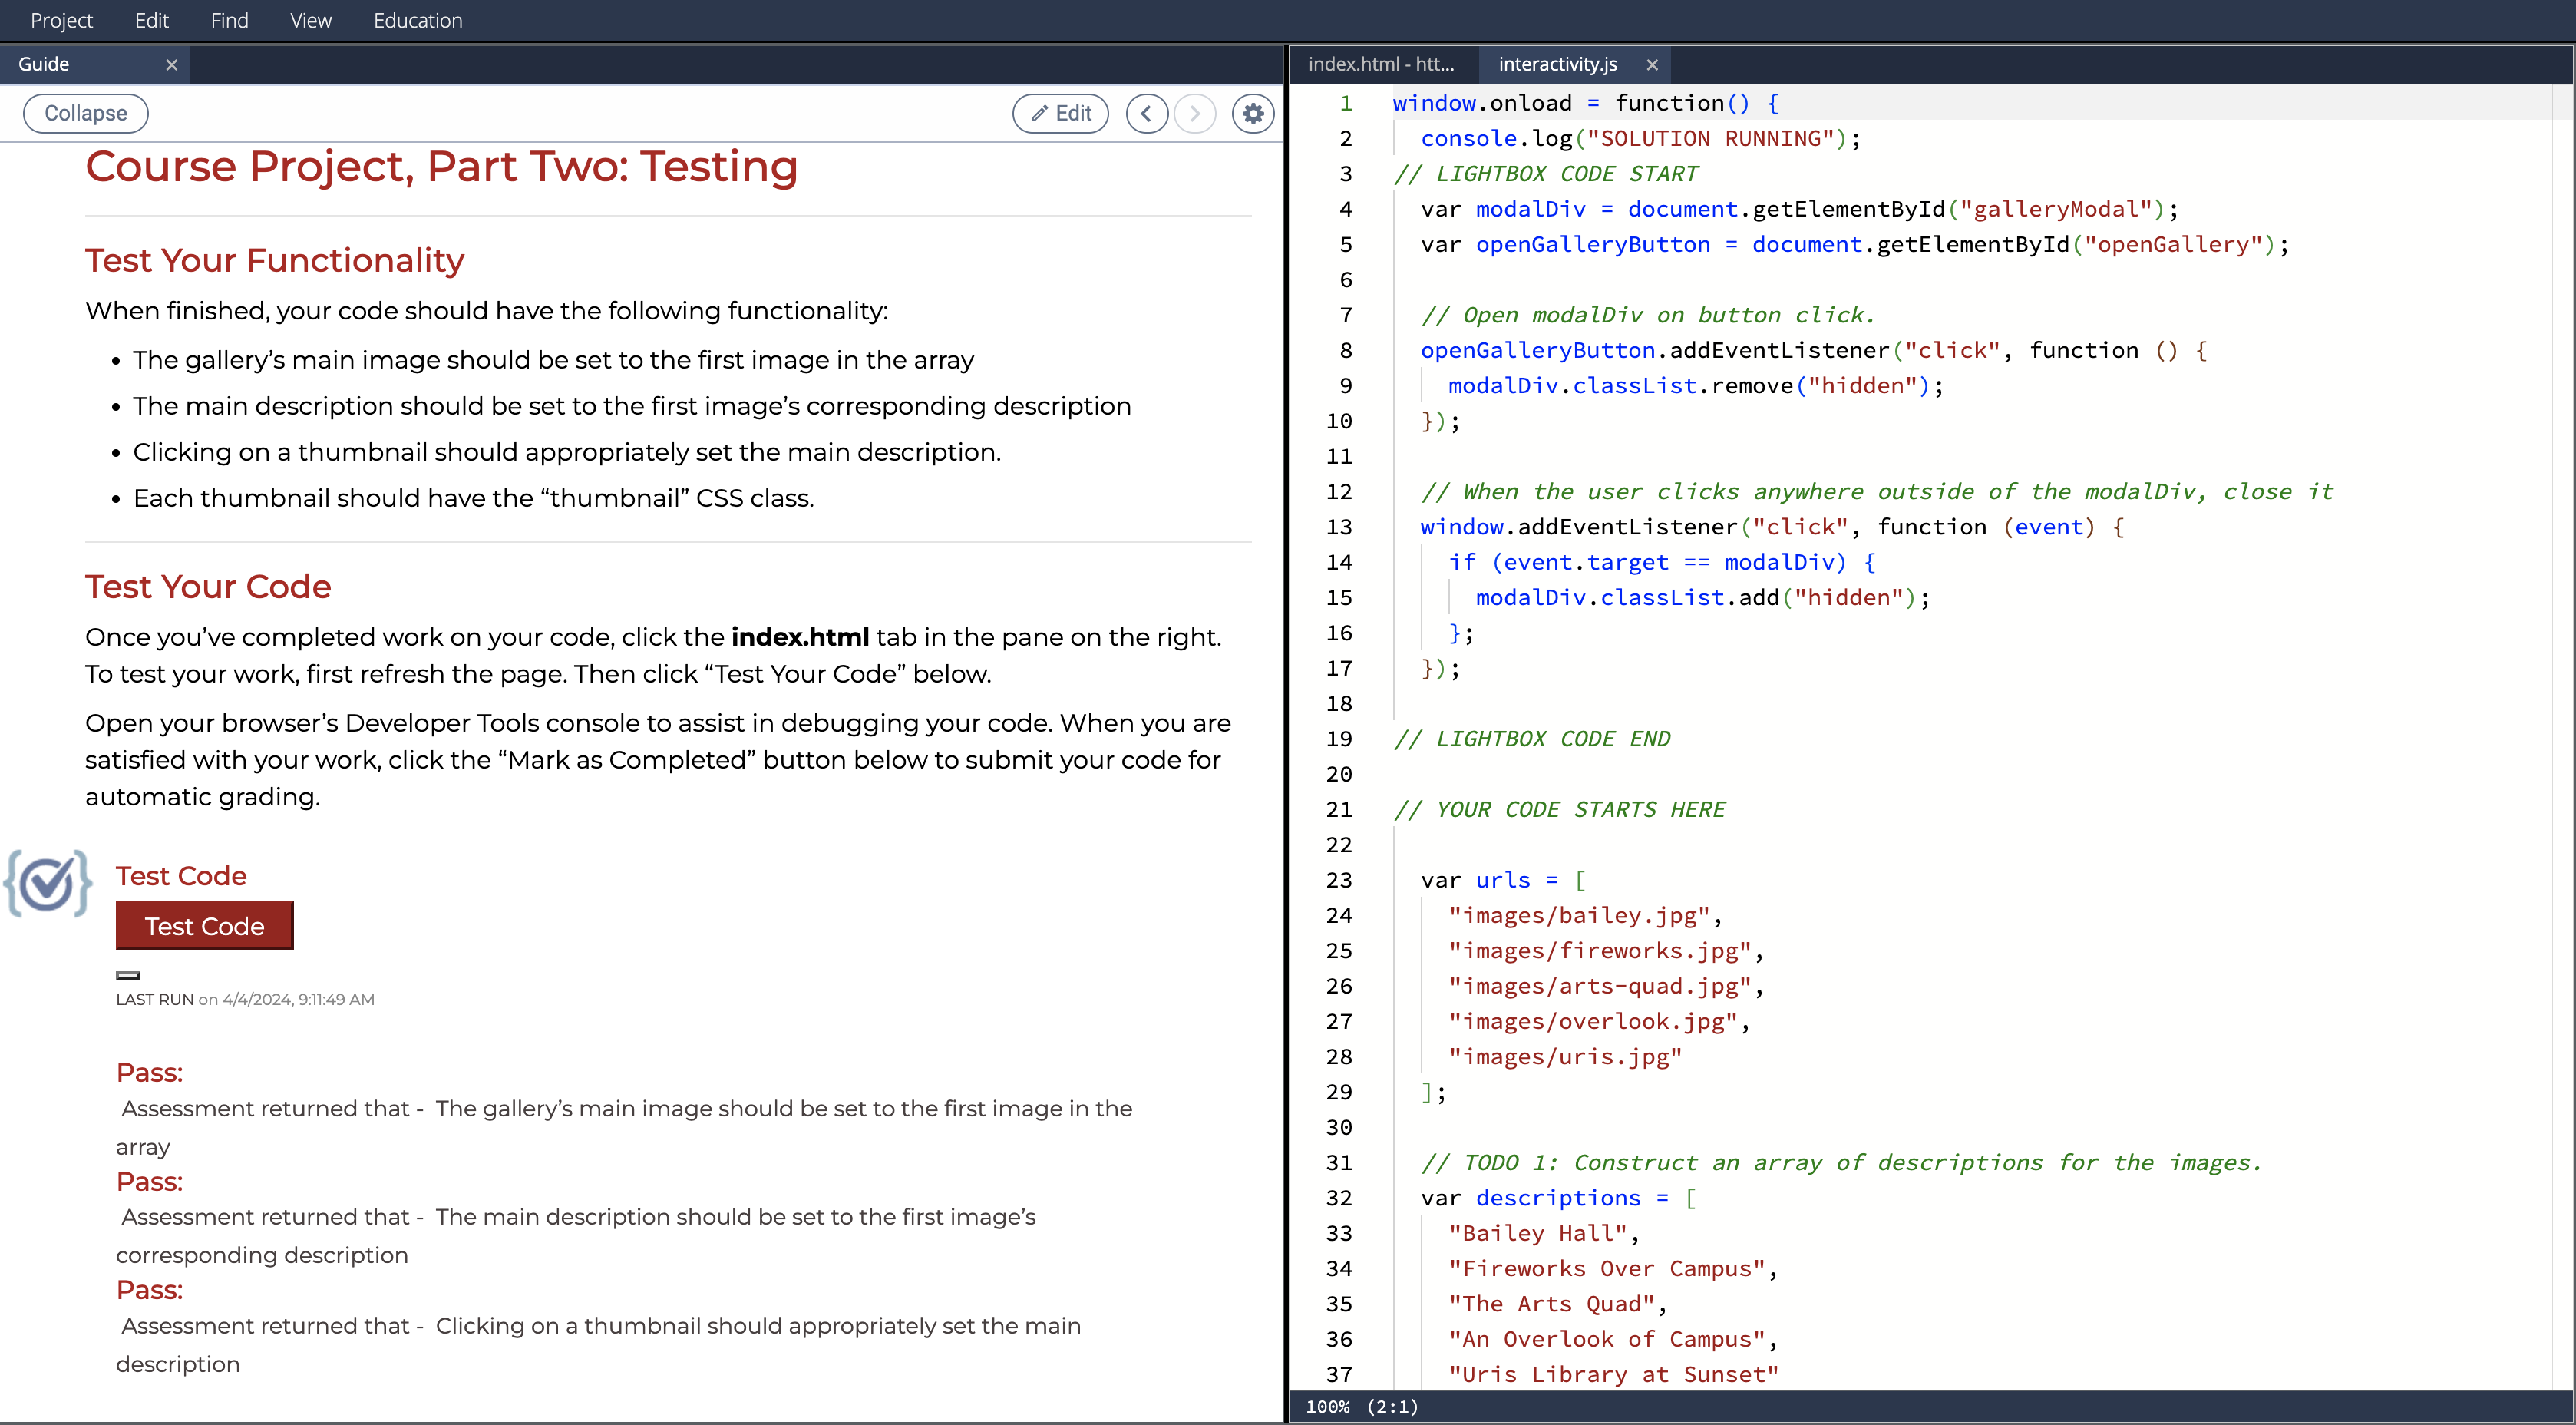
This starter pack involved using Mocha, Selenium and NodeJs for front-end web development. It has a two-panel layout with the guides left with a code file and preview file to the right. A more in-depth article on this can be found here.
Ubuntu22 WebDev
This starter pack is a very generic starter pack using Ubuntu 22.04.2 LTS. This essentially is a bare-bones starting point for Codio units that need this version of Ubuntu.
- Testing Framework: None
- Layout: A 2 panel layout with the Codio guides left and an editable HTML file to the right
- Stack: Ubuntu22 webdev
- Stack Software: (To include):
- Node v18.17.0
- Ubuntu 22.04.2 LTS
- Python 3.11.2
- Flask 2.1.3
- ipython 8.13.2
- matplotlib 3.7.1
- notebook 6.5.4
- numpy 1.24.2
- pandas 2.0.1
- pytest 7.3.1
- requests 2.30.0
- scikit-learn 1.2.2
- scipy 1.10.1
- seaborn 0.12.2
- tornado 6.3.2
