Departmental Standards
Company-Wide
eCornell Styleguide & Branding
Cornell University Branding
Writing and Editing Style Guide
Faculty and Expert Naming Conventions in Courses
Cornell School and Unit Names
Tips for Campus Engagements
LSG
Legal Policies
CSG
Updating Wrike Due Dates
Photography Style Guide
eCornell Mini Visual Style Guide
The Pocket Guide to Multimedia Design Thinking (*as It Pertains to Your Job Here)
Creative Services (CSG) Handbook
Administrative
LSG Meeting Recordings and Notes
Sending Faculty Sign-Off Forms in Adobe Sign
Weekly Faculty Status Emails
Animation/Motion Design
Instructional Design
Required Course Elements
The Pocket Guide to Instructional Design Thinking at eCornell
Adding AER to Canvas
Grading
D&D Newsletter
LSG Newsletter (LSGN) - February 2024
LSG Newsletter (LSGN) - March 2022 Edition
LSG Newsletter (LSGN) - December 2023
LSG Newsletter (LSGN) - October 2021 Edition
LSG Newsletter (LSGN) - June 2022 Edition
D&D Newsletter November 2024
LSG Newsletter (LSGN) - August 2022 Edition
LSG Newsletter (LSGN) - June 2023
LSGN Newsletter April 2023
LSG Newsletter (LSGN) - February 2022 Edition
LSG Newsletter (LSGN) - October 2022 Edition
LSGN Newsletter February 2023
LSGN Newsletter March 2023
D&D Newsletter September 2024
LSG Newsletter (LSGN) - August 2023
LSG Newsletter (LSGN) - March 2024
LSG Newsletter (LSGN) - April 2022 Edition
D&D Newsletter - August 2024
LSGN Newsletter January 2023
LSG Newsletter (LSGN) - October 2023 article
LSGN Newsletter (LSGN) - April 2024
LSG Newsletter (LSGN) - November 2021 Edition
D&D Newsletter February 2025
LSG Newsletter (LSGN) - January 2022 Edition
LSGN Newsletter December 2022
D&D Newsletter April 2025
LSG Newsletter (LSGN) - July 2022 Edition
LSG Newsletter (LSGN) - September 2022 Edition
Course Development
Image Uploads for Inline Projects
How to Install the Firefox Canvas Utilities Extension
Revising a Course/ Creating a Redux Version/ Course Updates
Creating a Perma Link With Perma.cc
Course Content Deletion Utility — Removing All Course Content
Teleprompter Slide Template
Course Names
Requesting High Resolution Video Uploads
Technical Talking Points Template
Writing Discussions: Guidelines for IDs
Online Resources in Credit-Bearing Courses
Hiring Actors for an eCornell Project
Marketing
Operations
Tech
Master Course Template Differences (8675309s)
Non-CSG File Uploads
Mentored Learning Conversion Process and Resources
Doc-Based Master Course Template and Standards (8675309-DOC)
Pedagogical Guidelines for Implementing AI-Based Interactives: AER
Coding Master Course Template and Standards (8675309-CODE)
Practice Quiz Standards
Hero Image
Platform Training
Administrative Systems
ADP
Google Drive
Downloadables Process
Embed a Document from Google Drive
Adding Google Links to Canvas
File Naming and Storage Convention Standards
Google Drive for Desktop Instructions
Storing Documents in Multiple Locations
Wrike
Wrike System Fundamentals
Field Population
1.0 to 2.0 Wrike Project Conversion
Blocking Time Off in Work Schedule (Wrike)
Wrike Custom Field Glossary
Wrike "Custom Item Type" Definitions
How to Create a Private Dashboard in Wrike
Using Timesheets in Wrike
Importing Tasks into a Wrike Project
Wrike Project Delay Causes Definitions
Setting OOO Coverage for Roles in Wrike
How to Change a Project's Item Type in Wrike
Using Search in Wrike
How to Create a Custom Report in Wrike
@ Mentioning Roles in Wrike
Automate Rules
Using Filters in Wrike
Managing Exec Ed Programs in Wrike
External Collaborators
Wrike for External Collaborators: Getting Started
Wrike for External Collaborators: Views
Wrike for External Collaborators: Tasks in Detail
Wrike Updates
New Experience Update in Wrike
Wrike Course Development Template 2.0 - What's New
Wrike - Course Development Template 3.0 Release Notes
Wrike Process Training
Course Development & Delivery Platforms
Canvas
Development
Adding Custom Links to Course Navigation
Adding Comments to PDFs from Canvas Page Links
Setting Module Prerequisites and Requirements in Canvas
Canvas Page Functionality
Create a New Course Shell From 8675309
Using LaTeX in Canvas
Search in Canvas Using API Utilities - Tutorial
Reverting a Page to a Previous Version
Student Groups
Create Different Canvas Pages
Importing Specific Parts of a Canvas Course
Canvas HTML Allowlist/Whitelist
Understanding Canvas Customizations/Stylesheets
Operations
Discussion Page Standards
How to import a CU course containing NEW quizzes
Canvas LMS: NEW Quiz compatibility
Faculty Journal
Course Content Style Guide
Click-To-Reveal Accordions in Canvas
Course Maintenance Issue Resolution Process
Meet the Experts
Codio
Codio Operations
Managing Manually Graded “Reflect and Submit” Codio Exercises
Codio Structure and Grading for Facilitators
Premade Codio Docs for Ops & Facilitators
Codio Remote Feedback Tools for Facilitators
Developers
Development Processes
Creating a New Codio Course
Creating a New Codio Unit
Integrating a Codio Course into Canvas
Embedding a Codio Unit into Canvas
Setting Up the Class Fork
Jasmine Autograde Unit Testing
Setting Up the Class Fork (LTI 1.3)
R Studio - Exclusion List for R Code
Mocha/Selenium Autograding
Starter Packs in Codio
Configuring Partial Point Autograders in Codio
Launch a Jupyter Notebook from VM
AI Extensions
Program-Specific Developer Notes
Codio Functionality
Jupyter Notebooks
Jupyter Notebooks - nbgrader tweaks
Jupyter Notebooks Style Guide
Adding Extensions to Jupyter Notebooks
Setting up R with Jupyter Notebooks
Change Jupyter Notebook Auto Save Interval
How to Change CSS in Jupyter Notebook
RStudio in Codio
How To Centralize the .codio-menu File to One Location
Codio Fundamentals for LSG
Using the JupyterLab Starter Pack
Using Code Formatters
Using the RStudio Starter Pack
Conda Environments in Codio
Updating Codio Change Log
Codio Basics: Student Support
eC Facilitator Guide to Codio
Migrating to Updated Codio Courses
Qualtrics
Ally
Ally Institutional Report Training
Ally Features Overview Training
Using the Ally Report in a Course
Ally Vendor Documentation/Training Links
Adobe
Other Integrations
Pendo Overview
How to Add VitalSource eBooks in Canvas
Enabling Zoom/"Live Sessions" in a Course
Pendo Guide Creation
H5P
Modifying Subtitles in H5P Interactive Videos
Embedding H5P Content Into Canvas
Troubleshooting H5P Elements in Canvas
Inserting Kaltura Videos into H5P Interactive Videos
Adding Subtitles to H5P Interactive Videos
S3
BugHerd
Instructional Technologies & Tools Inventory
Canvas API Utilities
Getting started with the MOP Bot
eCornell Platform Architecture
HR & Training Systems
Product Development Processes
Accessibility
What Is Accessibility?
What Is Accessibility?
Accessibility Resources
Accessibility Considerations
Accessibility Support and Assistive Technology
Structural Accessibility
Accessibility Design and Development Best Practices
Accessible Images Using Alt Text and Long Descriptions
Accessible Excel Files
Accessibility and Semantic Headings
Accessible Hyperlinks
Accessible Tables
Creating Accessible Microsoft Files
Mathpix: Accessible STEM
Design and Development General Approach to Accessibility
Integrating Content Authored by a Third Party
Planning for Accessible Tools
Accessibility Considerations for Third Party Tools
Studio Accessibility
Designing for Accessible Canvas Courses
Accessibility: Ongoing Innovations
Course Development
Planning
Development
0. Design
1. Codio Units
1. Non-Video Assets
3. Glossary
4. Canvas Text
4. Tools
4. Tools - Wrike Task Definitions
3. Review And Revise Styled Assets
ID/A to Creative Team Handoff Steps
General Overview of Downloadables Process
Course Project: Draft and Final
Excel Tools: Draft and Final
eCornell LSG HTML Basics
1. Non-Video Assets - Wrike Task Definitions
2. Video
Multifeed Video
2. Video (Standard) - Wrike Task Definitions
Studio Tips
Tips for Remote Video Recording Sessions
Who to Tag for Video Tasks
3. Animation
3. Animation - Wrike Task Definitions
2. Artboard Collab Doc Prep
6b. Motion Design Review and Revise
Who to Tag for Animations Tasks
3. Artboard Collab Process Walkthrough
DRAFT - FrameIO Process Walkthrough
Motion Contractor Guide for IDAs / IDDs
Requesting / Using Stock Imagery (Getty Images and Shutterstock)
3. Ask the Experts
5. On-Demand Conversion
5. Review
5. Review - Wrike Task Definitions
1. Prep Course for Reviews
2. Conduct Student Experience Review
3. Implement Creative Director Edits
3. Implement IDD Edits
3. Implement Student Experience Review Edits
4. CSG - Revise Tools Export 1
5. Conduct Faculty Review
6. Implement Faculty Edits
7. Conduct Technical Review of Course (STEM-only)
Technical Student Experience (Tech SE) Review Process
2. Conduct IDD or Sr ID Review
6. Alpha
6. Alpha - Wrike Task Definitions
Alpha Review Process
Prepare a course for Alpha review
Schedule & Conduct Alpha Triage Meeting
7. QA
7. QA - Wrike Task Definitions
1. Prep Course for QA
2. Copy Edit Captions
2. Copy Edit Course & Files
4. Conduct Content QA of Course
4. Final Creative Review and Export
Adding Chat With Tech Support to Course Navigation
5. Implement QA Edits
Working With Video Captions That Contain Special Characters
Copy Edit Captions in SubPLY
Creating a Course Style and Settings Guide
Copy Editing Content in Frame.io
1. Complete Dev to QA Checklist
Copy Edit Captions in 3Play
Tag a Video for Transcription by 3Play
Course QA Checklists
8. Deployment
8. Deployment - Wrike Task Definitions
1. Finalize Master Version of Course
2. Create & Add Course Transcript (CT) to Course
Replace a Master -M With a Redux Version of the Course
3. Create -T (Training Course) and Associate With Master Blueprint
Canvas Blueprint Course Functionality
Project Management in Wrike
Managing Project Reporting in Wrike
Managing Task Needs/Schedule in Wrike
Adding Tasks
Comments and Communication
Statuses
Updating Task Start and Due Dates
Predecessors
Durations
Rollups
Calculating Project Schedule by Deadline in Wrike
Creating Course Project Plans in Wrike
Setting Custom Capacity for Resources
Customizing Effort in a New Project Plan
Marking Projects Complete in Wrike
How to Set Up Workload Charts to Track Effort in Wrike
For-Credit Considerations
1-Sheet Population
Post-Development
AI Simulations
Program Facilitation & Operational Guidelines
Data Science
Facilitator Resources
Canvas Navigation
Adding Events to the Course Calendar
Navigating Canvas and the Dashboard
How Do I View Previous Courses I Have Taken or Facilitated?
Why Am I Receiving Duplicate Canvas Emails?
How Do I Edit My Canvas Profile?
Send Students a Direct Message on Canvas
Adding Notes to Canvas Gradebook
How Do I Send Students Nudges from the Gradebook?
Overview of 2024 Changes- Course Layout and Structure
How Can I Update My Canvas Notification Preferences?
Ursus Navigation
How Do I Access My Offer in Ursus?
How Do I Edit My Ursus Profile?
How Do I Request Time Off (Blackout Dates)?
How Can I Request to Learn More Courses?
Live Sessions
Enabling Student Use of Closed Captioning in Zoom
When Should I Schedule My Live Sessions For?
Changing Live Session Date and Time After Created with Facil Tool
Help! I Need to Reschedule a Live Session
Live Session Information page
Set up Live Sessions with the Facil Tool
Combining Live Sessions with Facil Tool
Course Set-Up
Course Set Up: Getting Ready for Live Sessions
Recording and Posting a Welcome Video
Course Set Up: When can I begin to edit my course?
Course Set Up: Reviewing Due Dates
Course Set Up: Reviewing Announcements
What Do I Need to Do to Make Sure My Course is Set Up Correctly?
How Do I Customize My Course Sections?
Course Announcements and Messages Templates
Facilitator Focus
Zoom and other Technical Support
Reporting Spam/Phishing
How Do I Set Up My Zoom Account?
Support Resources for Facilitators
Live Session/Zoom Trouble Shooting Guide & Technical Readiness
How to Upload Videos to Zoom On-Demand
Student Survey FAQs
How Do I Save and Refer Back to Zoom Recordings?
How Do I Find My Personal ID Meeting link in Zoom?
Benefits as an eCornell Employee
Do I Have Access to Microsoft Office as a Cornell Employee?
Taking Courses as a Student
Professional Development Benefit
Student Success
Help! My Students Can't View a Video Within My Course
Extensions and Retakes
Policies and Navigation Resources for Students
Symposium Access Extension- Fall 2025
Students enrolled through special groups: Corporate and VA
Unique Circumstances for Student Extensions and Retakes
Communicating with Students via Canvas
Can I Provide Students with a Letter of Recommendation?
Understanding and Addressing Instances of Plagiarism
Support Resources for Students
Understanding and Addressing Use of AI
Help! My Student is Having a Hard Time Uploading a Video
Unique Student Situations
I Have a Student Requesting Accommodations- How Should I Proceed?
Canvas Mobile App
Messaging Students via the Canvas Mobile App
Setting up and Navigating the Canvas Mobile app
Setting up Push Notifications on Canvas Mobile
Canvas App Features for eCornell courses
New Facilitator Onboarding and Quick References
Facilitator Onboarding at eCornell
Why Do I Have Multiple eCornell email and Canvas Accounts?
Quick reference: Systems and Accounts we use at eCornell
Quick reference guide: Key eCornell Personnel
How do I Log Onto Canvas and Access FACT101?
How Do I Add eCornell to My Email Signature?
Training Course Review & Facilitation Authorization
What to Expect During Live Shadowing Experience
Setting up Email Forwarding
Facilitator Expectations and Grading Help
Changes in Grading Scheme: Incomplete/Complete and 75% to 85%
New (Embedded/Inline Format) How do I grade Course Projects?
Navigating the Gradebook and Accessing the Speedgrader
Quick Reference: Sort assignments in the Speedgrader
How do I Grade Quizzes?
(Old format) How Do I Grade Course Projects and Add Annotations?
Rubrics for Effective Facilitation
Is There an Answer Key for my Course?
How to Monitor and Promote Student Progress
How Do I Grade Discussions?
Adding an Attempt to a Course Project
How Quickly Do I Need to Provide Grading to Students?
Payroll and the Monthly Scheduling Process
Codio References
Manually Graded “Reflect and Submit” Codio Exercises
Codio Quick Resources
Codio Reference: Embedded quiz questions (H5P)
Codio Reference: Checking for Completion Status
Codio Reference: Manually Graded Exercises
Codio Remote Feedback Tools
Codio Reference: Ungraded exercises
Codio Reference: Autograded Exercises
Archived
Table of Contents
- All Categories
- Product Development Processes
- Accessibility
- Accessibility Design and Development Best Practices
- Mathpix: Accessible STEM
Mathpix: Accessible STEM
Updated
by Brock Schmutzler
Overview
Mathpix uses artificial intelligence (AI) and optical character recognition (OCR) to capture math images and generate MathML code, which is the key to creating math that is accessible to people using assistive technology. Mathpix also generates LaTeX, PNG, and SVG code that is useful in producing STEM content.
Here are some helpful links to Mathpix documentation:
Snip Desktop and Snip Web are the two Mathpix apps you will use most often. When building STEM materials with accessible math, these two apps complement each other but also have distinct functionality which suit different workflows:
- Snip Desktop - Take screenshots of math then copy/paste the "MathML (MS Word)" code from Mathpix into a Microsoft Word document. (Mathpix also has its own documentation on using Mathpix Snip Desktop with Word.)
- Snip Web - Create content in a Mathpix Note (written in Mathpix Markdown) then export to a Microsoft Word document (or HTML file) with built-in MathML code.
This article will explain how to use the "snipping tool" to take screenshots of math with the Snip Desktop app then move on to discuss the Snip Web app.
Mathpix Snip Desktop
With the Mathpix Snip Desktop app, you can build accessible math in essentially two steps:
- Use the snipping tool to capture a math image on your computer screen.
- Copy and paste the MathML code into Microsoft Word (or any other MathML-aware editor).
The details are given in the subsections below.
Snip Math Image
The snipping tool can be used to capture any static math image on your computer screen (e.g., PDF, website, paused video) using Mathpix OCR technology.
- Download Mathpix Desktop (mathpix.com > Downloads > Desktop) and install it (you will need to contact it-help@ecornell.com for installation if you do not have administrator privileges).

- Click the Mathpix icon in the menu bar (upper-right corner of your screen):

- Click the snipping tool (monitor icon) in the upper-left corner of the Mathpix window (keyboard shortcut:
CTRL+CMD+M) and use your cursor to draw a box around the math image. To draw the box, left-click near the upper-left corner of the math image and, while holding the mouse button down, drag your cursor to the lower-right corner of the math image to create the box, then release your mouse button to "snip" what is in the box: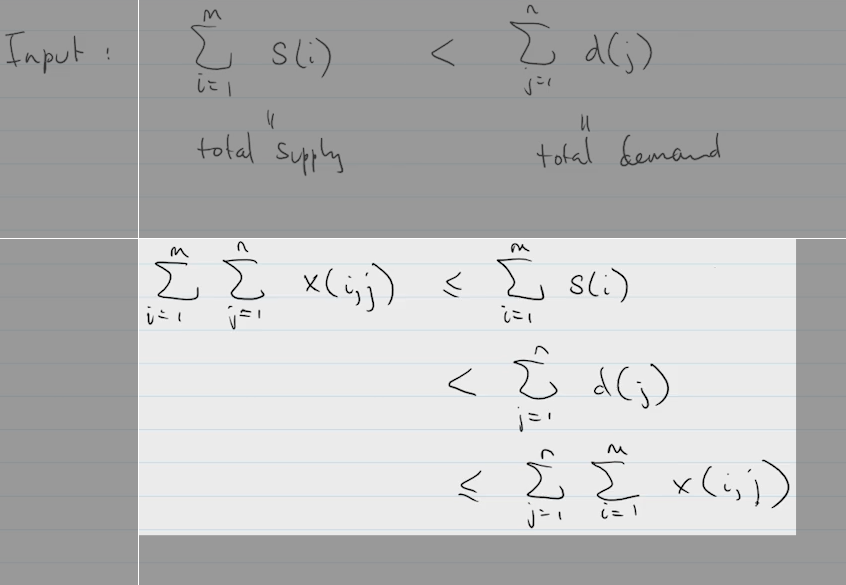
- When you release your mouse button, Mathpix OCRs the math inside the box and converts it to code in the Snip Desktop app, where you can copy and/or edit the LaTeX code that Mathpix has generated for the math image. In the example below, the first image shows the original image along with the LaTeX code and output, which is not quite correct. Clicking the Edit button in the first image allows us to make the corrections shown in the second image. After clicking the Save button shown in the second image, we are shown the new LaTeX output in the third image.
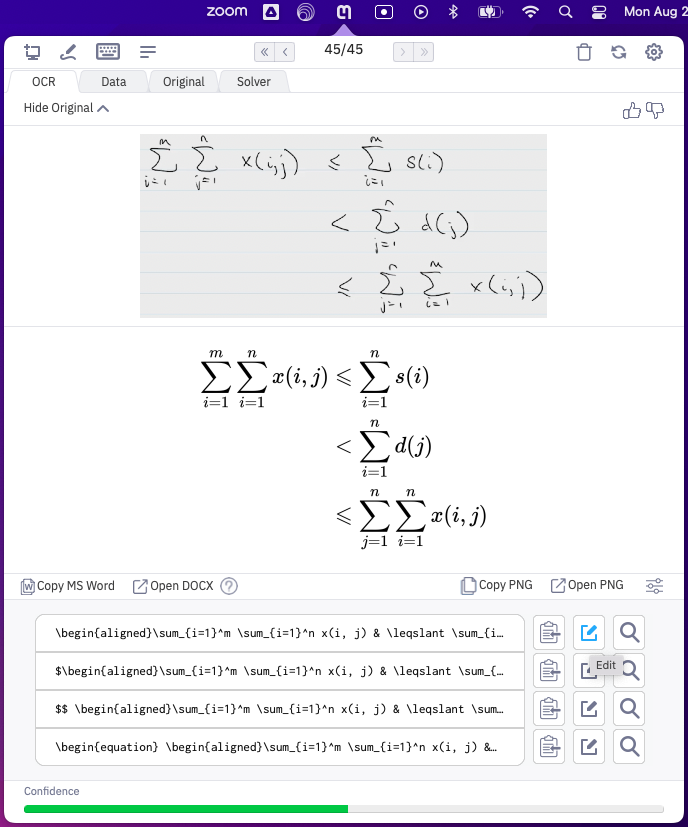
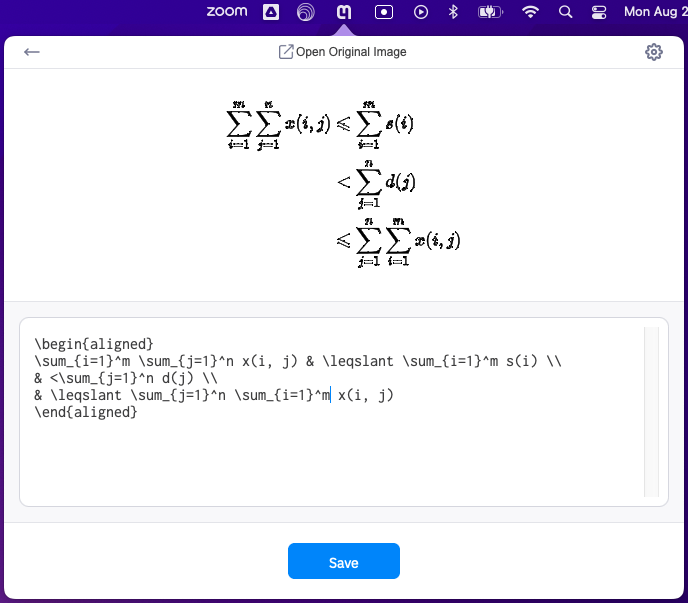
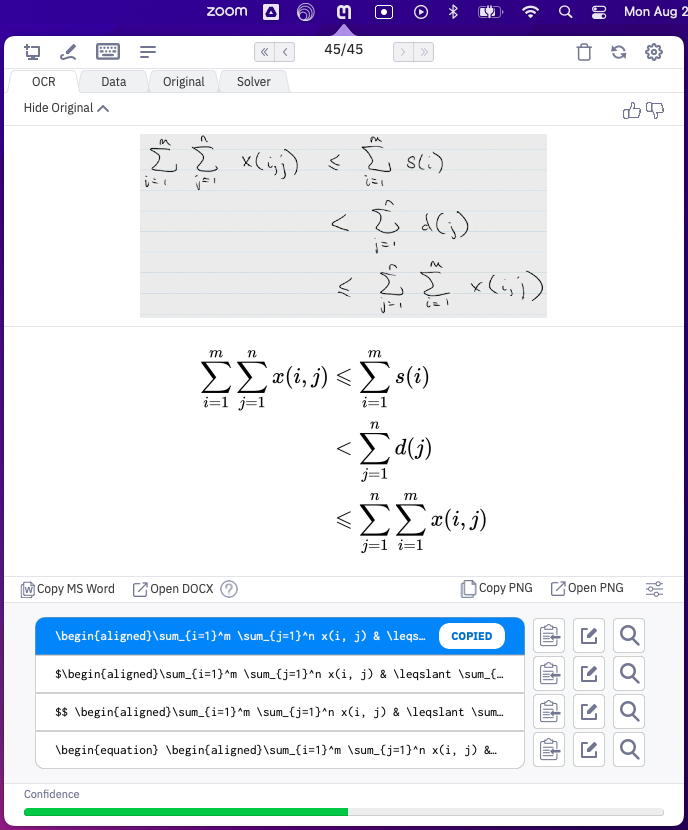
At this stage, the correct LaTeX code for this math image has been copied to your clipboard. The default "OCR" tab (above) will show you the LaTeX code for the math image. The "Data" tab will give you access to other code formats for your math image (e.g., MathML). This is discussed in the next two subsections.
Snip Desktop to Word
If you are creating accessible STEM content in a Microsoft (MS) Word document, follow these steps to copy and paste the MathML code from the Snip Desktop app into Word.
- Click the Copy MS Word button to copy MathML code optimized for Word documents:
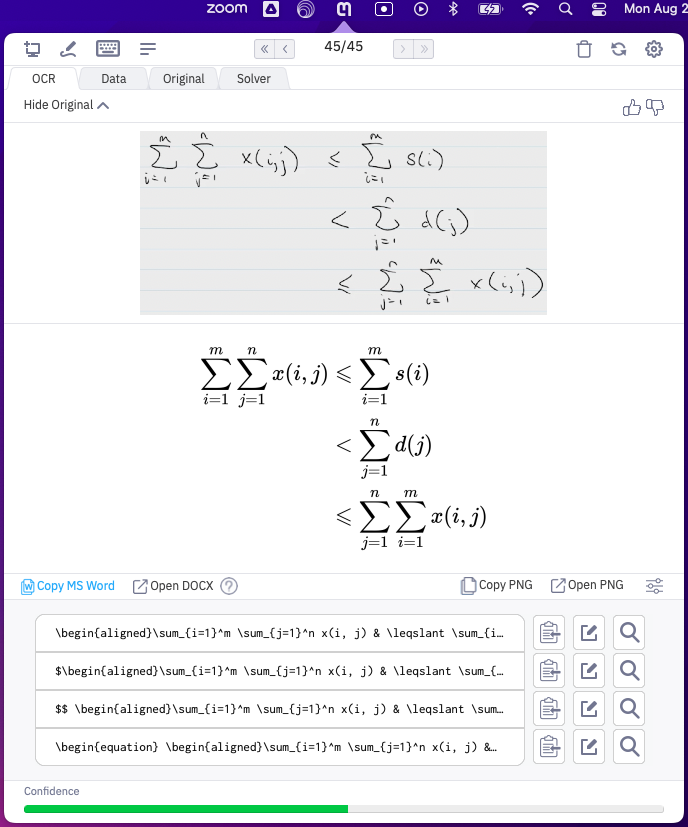
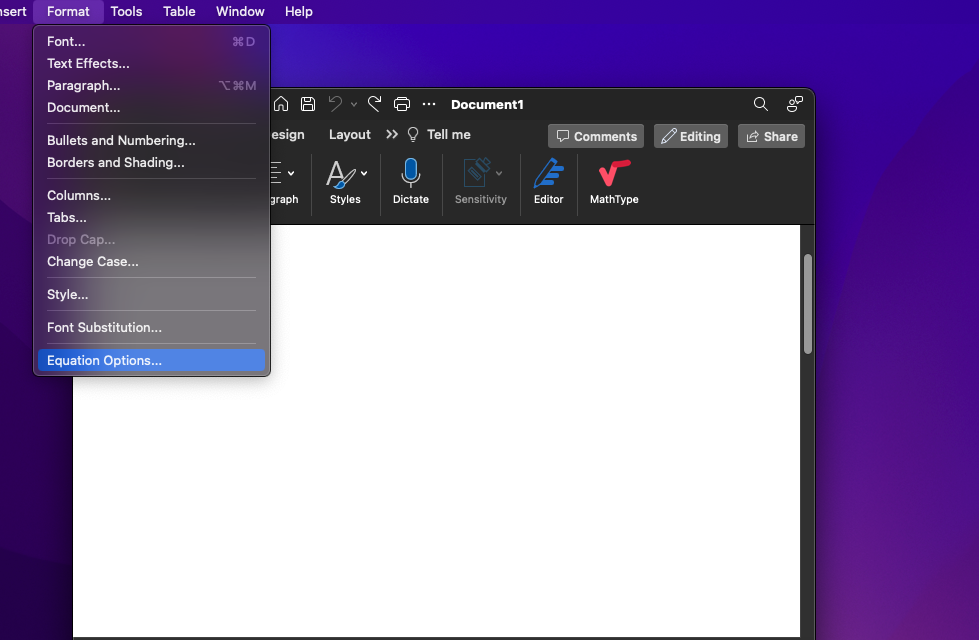
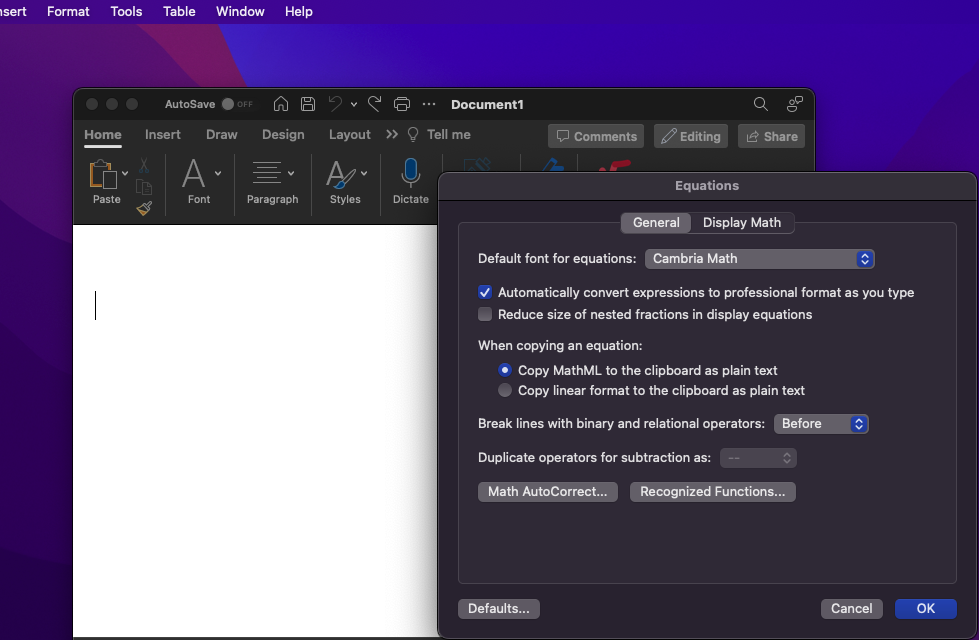
- Paste — as unformatted text — the "MathML (MS Word)" code into the appropriate place in the Word document. Word should automatically render the MathML code in a manner which is similar (but not exactly the same) as the rendering in a LaTeX editor or PDF (see second screenshot below).
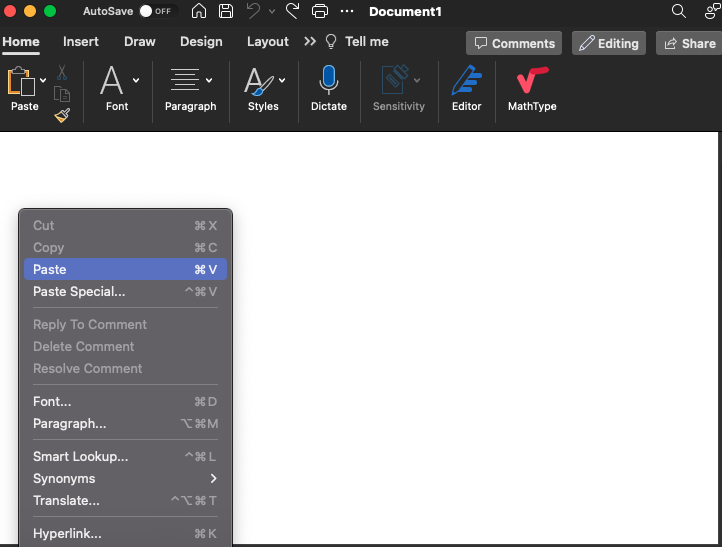
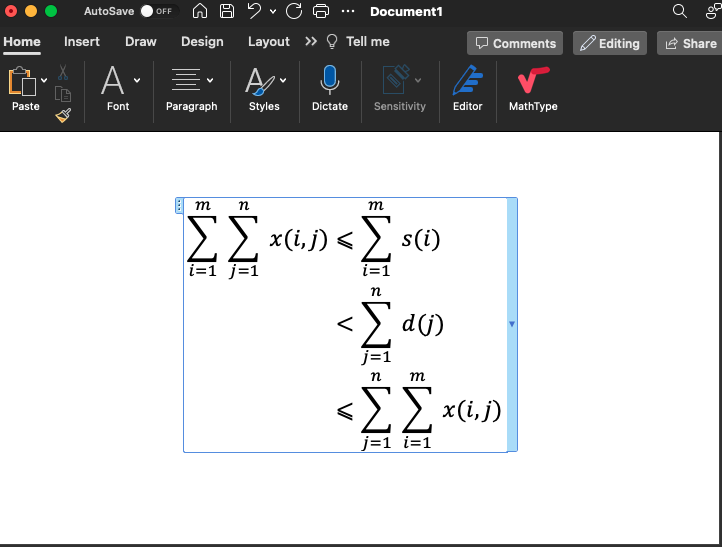
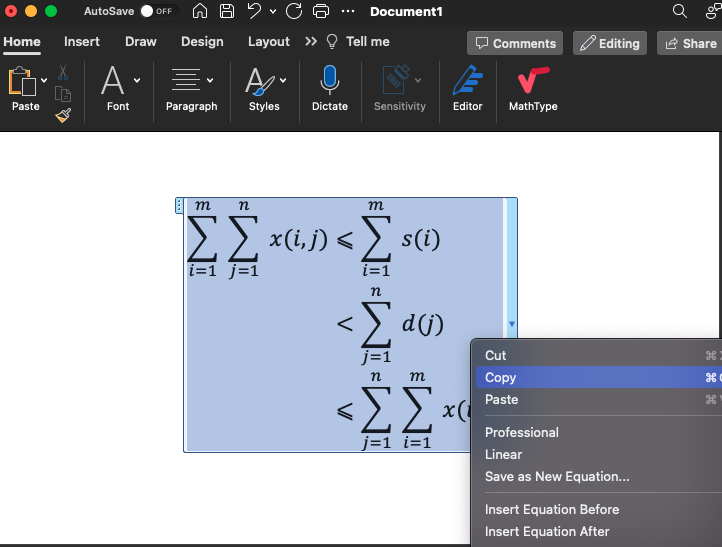
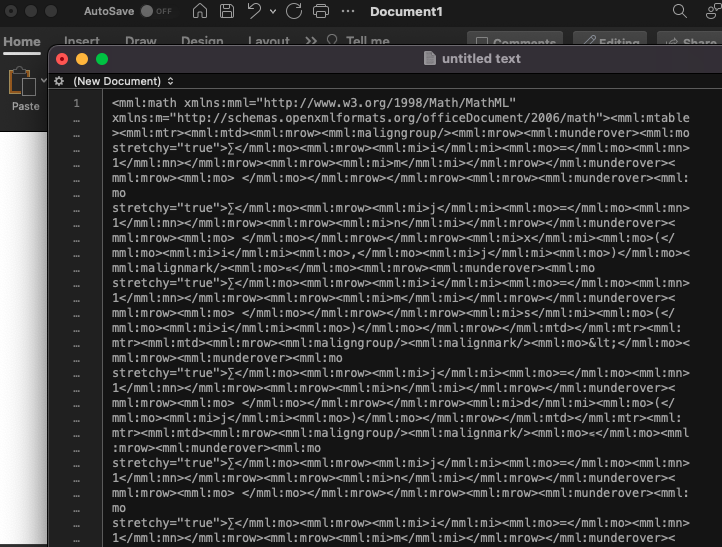
- The image you see in your Word document should now be embedded with MathML code, which assistive technologies can use, for example, to create speech. One way to verify that the MathML code is in the Word document is to highlight the image, copy it, and paste it into a text editor:
Useful Output Formats
After using the Mathpix snipping tool to capture a math image, you have access to the math image in different output formats in the Snip Desktop app. We mention three of those formats here:
- MathML code that has been optimized for producing high-quality accessible math in Microsoft Word documents
- MathML code (i.e., standard MathML) used for building high-quality accessible math outside of Word documents
- PNG format which generates high-resolution images that can be inserted into videos and other creative products
Depending on the context and need, each of these formats can be handed off to the Creative team or Product team.
MathML (Math Markup Language)
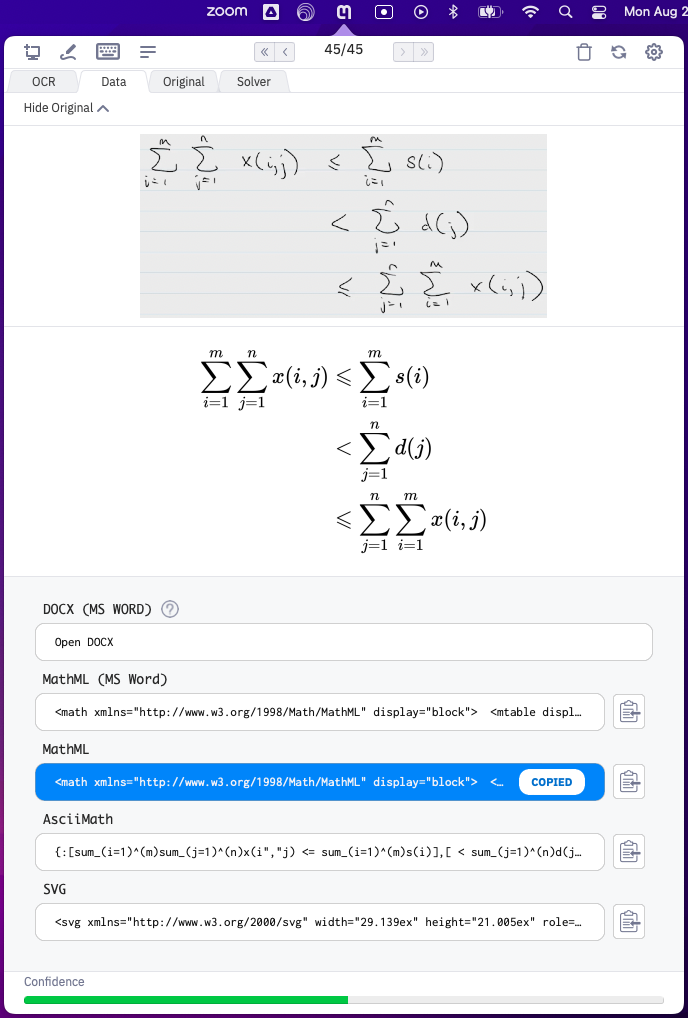
Mathpix generates two versions of MathML code that will make math accessible to people using assistive technology. MathML (MS Word) is a version of MathML code that has been optimized for use in accessible Word documents, whereas MathML is the "standard" version of MathML code that should be used anywhere other than Word documents.
Both types of MathML are available in the "Data" tab of the Snip Desktop app after you have used the snipping tool:
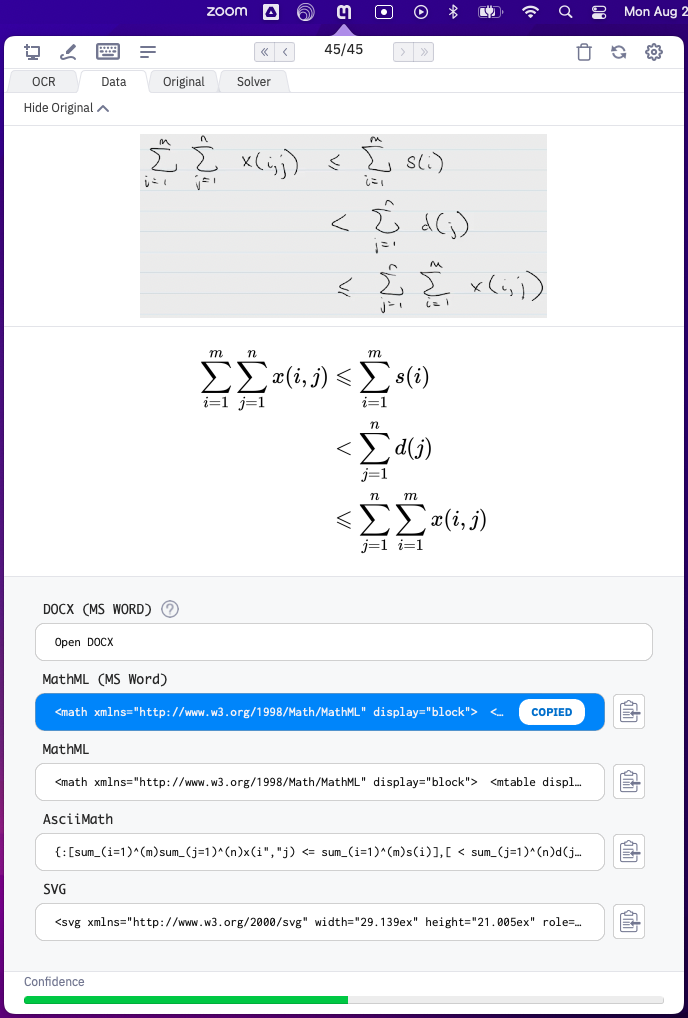
The difference between the two types of MathML is subtle (and not worth trying to describe in detail). If you need MathML code for a software platform other than Microsoft Word, copy the the standard MathML:
PNG (Portable Network Graphics)
If you need the math image encoded in PNG format, click the Open PNG button located in the "OCR" tab:
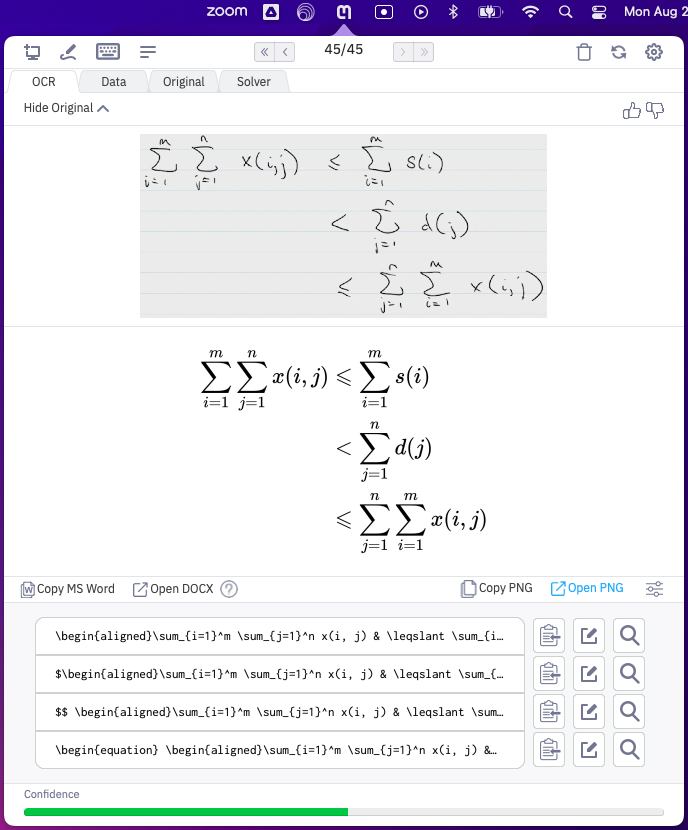
This will automatically create a high-resolution PNG file and open it in a separate window. Once open, you can save the PNG file with an appropriate name in a designated folder. You can then insert the PNG file wherever it is needed:

Mathpix Snip Web
The Mathpix Snip Web app has an HTML editor that understands LaTeX and Markdown code. Whether you are using Snip Web or Snip Desktop, Mathpix automatically equips the math with accessibility code (i.e., MathML). Moreover, the Snip Web app is synchronized with the Snip Desktop app so you can insert your snips into Mathpix Notes, where math and text can be edited and formatted simultaneously. You can also export Notes to several file formats, including Word and HTML.
To build accessible STEM content with the Mathpix Snip Web app, there are two basic options:
- If you have PDF content you want to make accessible, upload your PDF to Snip Web and convert the PDF to a Mathpix Note. (The "nicer" the PDF, the better the conversion.)
- Use the snipping tool in the Mathpix Snip Desktop app to capture a math image then go to Snip Web to insert the math into a Mathpix Note.
Snip Web Settings
To open the Mathpix Snip Web app for the first time, you can click this Mathpix Snip Web link or you can go to mathpix.com and select Downloads > Web:

In either case, click the Launch Snip Web button:

The first time you sign in to Snip Web, you will see a screen that looks something like this:
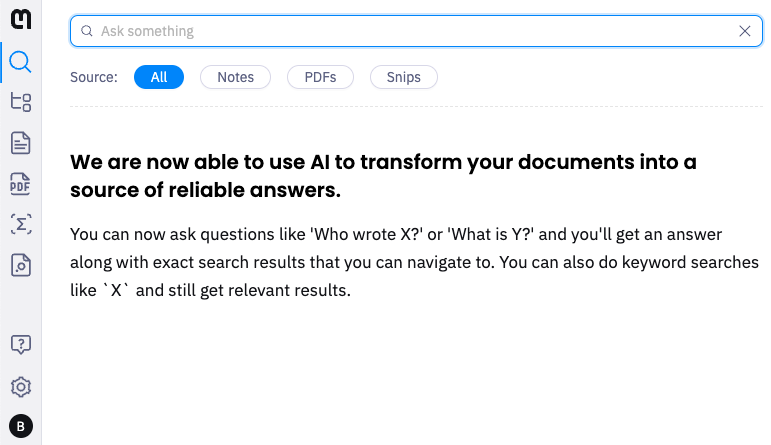
- Click the Account button (icon with the first initial of your name) in the left sidebar menu:

- Select the Account option:

- Go to Personal Settings > Account and deselect the "Mathpix can use my images..." button:

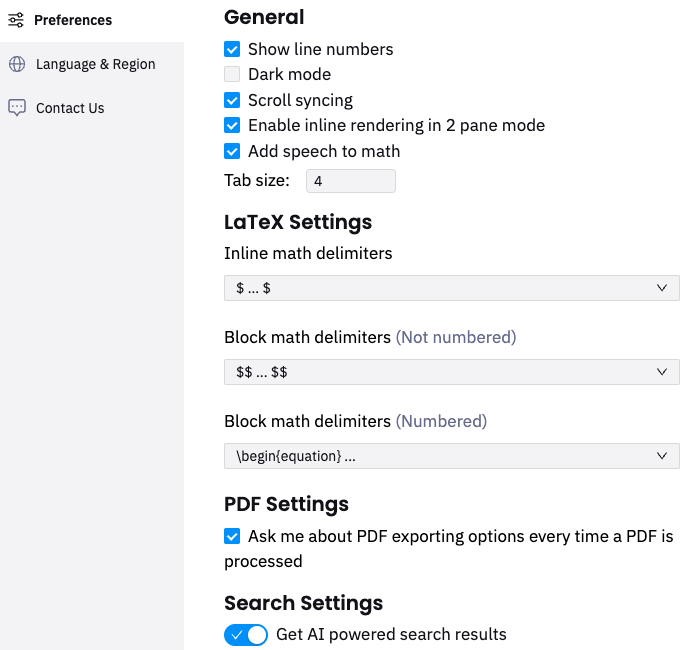
- Go back to Step 1, click the Account button, and this time select the Preferences option:

- Select the following options in Preferences:
Mathpix Notes
With Snip Web, it is easy to build accessible STEM content in a Mathpix Note because all the math has embedded MathML code behind it. You can either convert a PDF to a Note (as discussed in the PDF to Note to Word section) or you can follow the steps below to create a blank note and build from there.
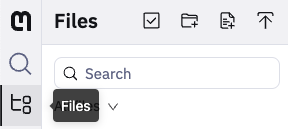
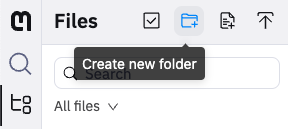
- Create a new folder in your Snip Web file tree to store the note.
- Go to the Files tab on the left sidebar menu:
- Click the Create new folder button:
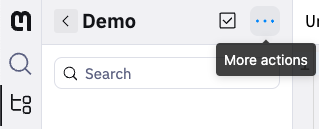
- Go to the Files tab on the left sidebar menu:
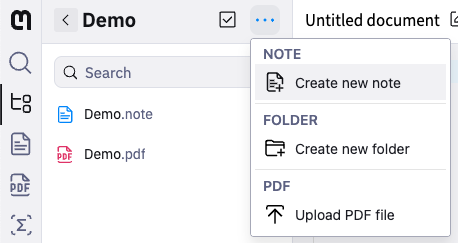
- Click the horizontal three-dot menu for More actions:
- Select the Create new note option:
Snip Web + Snip Desktop
Snip Web synchronizes with Snip Desktop so you have access to the snips you create with the snipping tool in the Snip Desktop app (as described in the Snip Math Image section above).
- In the Snip Desktop app, use the snipping tool to OCR a math image (as described above). Then click the Snips button in the left sidebar menu of Snip Web:
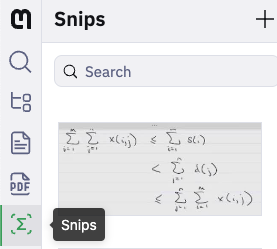
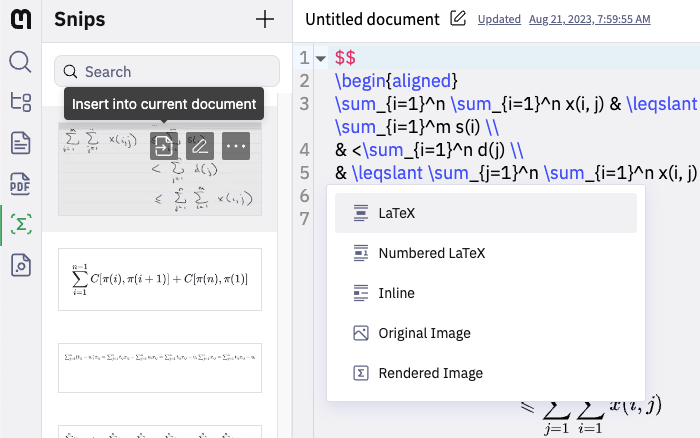
- From your list of snips, hover over the one you want to insert, click the Insert into current document button, and select the desired option (e.g., "LaTeX" or "Inline"):
PDF to Note to Word
One of the main advantages of the Snip Web app is its ability to convert PDFs to Notes then export Notes to other file formats, such as Microsoft Word documents. The general process is as follows:
- Upload the PDF and convert it to a Note.
- Edit the Note.
- Review the Note.
- Export the Note to Word (or HTML if needed).
Details about each step in this process can be found in the subsections below.
PDF Upload and Conversion
Mathpix makes it easy to upload a PDF file and convert it to a Mathpix Note. The steps below will walk you through the process. The Mathpix website has more information about the PDF conversion process.
- Create a new folder in your Snip Web file tree to store the PDF and Note.
- Go to the Files tab on the left sidebar menu:

- Click the Create new folder button:

- Go to the Files tab on the left sidebar menu:
- Upload your PDF to the new folder you created.
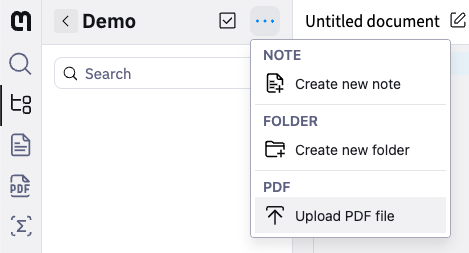
- Click the horizontal three-dot menu for More actions:

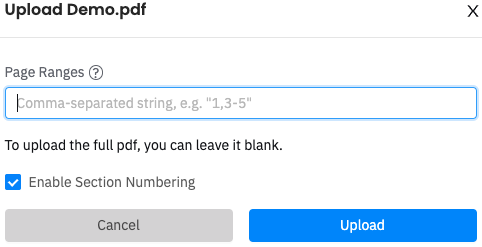
- Select the Upload PDF file option:
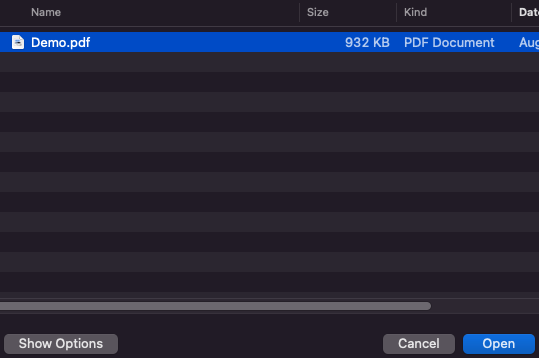
- Select the PDF file you want to upload:
- Click the Upload button:
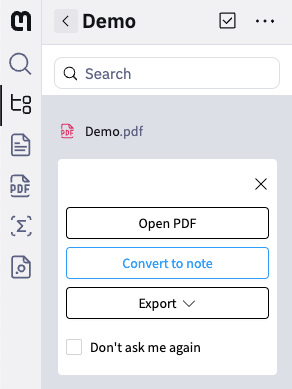
- Click the horizontal three-dot menu for More actions:
- Convert the PDF to a Mathpix Note by clicking the Convert to note button:
Edit the Note
Once the PDF has been uploaded and converted to a Mathpix Note, you will need to do a bit of editing to fix any conversion errors and make sure the headers, figures, and tables/arrays are formatted correctly. A few pointers are listed below. For more comprehensive coverage, please see the Mathpix Guide at the end of this article.
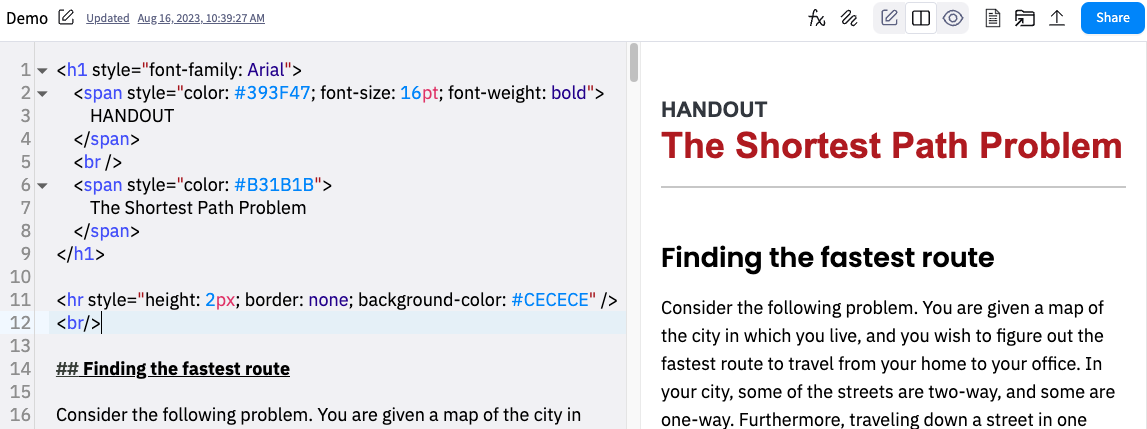
- Use the following HTML code for your title header (level 1 header):
<h1 style="font-family: Arial">
    <span style="color: #393F47; font-size: 16pt; font-weight: bold">
        TYPE OF DOCUMENT (e.g., TOOL, CHEAT SHEET)
    </span>
    <span style="color: #B31B1B">
        Name of Document
    </span>
</h1>

<hr style="height: 2px; border: none; background-color: #CECECE" />
<br />
- Here's an example of what a title header looks like in Mathpix Snip Web:
- Use hashtag Markdown syntax for all lower-level headers (level 2, 3, 4):
## Header 2### Header 3#### Header 4
- Use the Markdown syntax
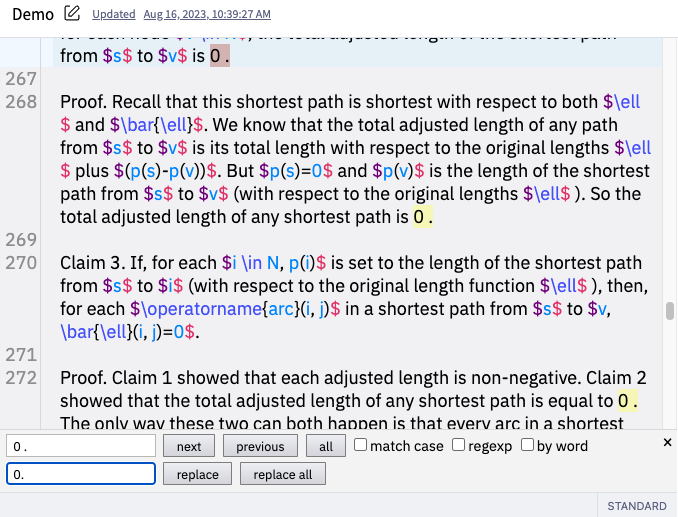
**text**for bold text and*text*for italicized text. - Remove extra spaces that Mathpix may have erroneously inserted during the PDF conversion. Errant extra spaces tend to occur most often between numbers and punctuation, as well as between LaTeX math delimiters (e.g.,
$...$and\(...\)) and punctuation. In cases when there is a repetitive edit you want to make, try using the "find and replace" functionality by pressingCMD+F(keystroke: command and F) while you are in the Editor mode pane:
- Use the code
—to render an em-dash (as opposed to a regular dash-) - Break up inline math separated by commas that would be easier to understand if read aloud separately; e.g., the single math object
$x(i,j), i=1,\ldots,m, j=1,\ldots,n$could be separated into three pieces of math:$x(i,j)$,$i=1,\ldots,m$,$j=1,\ldots,n$. Or, perhaps even better:$x(i,j)$, where$i=1,\ldots,m$and$j=1,\ldots,n$. - For math names (e.g., functions, abbreviations), use the LaTeX syntax
$\text{name}(x)$instead of$\operatorname{name}(x)$or$\mathrm{name}(x)$. Using\text{name}helps screen readers know to read the name aloud like it would regular text (instead of maybe reading "name" aloud one letter at a time). Even abbreviations like "RHS" typically sound more natural if they are typeset by the command\text{}. Here are some examples:$\text{Closest}(x)$$\text{Label}(x)$$\text{RHS}_x$$\text{grad}(x)$
- Put the alignment character
&before the equals sign=, or whatever symbol you want to align on. In other words, use& =instead of= &. For example:
$$
\begin{aligned}
\text{Total Shipment}
& = \sum_{i=1}^m \sum_{j=1}^n x(i, j) \\
& \leqslant \sum_{i=1}^m s(i) \\
& < \sum_{j=1}^n d(j) \\
& \leqslant \sum_{j=1}^n \sum_{i=1}^m x(i, j)
\end{aligned}
$$
- For images that do not have a figure caption, add Alt text: below the image using the Markdown syntax
**Alt text:**, i.e.:

**Alt text:** Put your alternative text describing the image here.
- If you want to export to HTML (does not apply to Word exports), put your alternative text between the brackets
[...]in addition to below the image:

**Alt text:** Put your alternative text describing the image here.
- If you want to export to HTML (does not apply to Word exports), wrap images in appropriate HTML tags. In other words, for images that are labeled as figures with captions, wrap the Mathpix image(s) with HTML with a
<figure>tag and put a<figcaption>tag below the image(s):
<figure>

<figcaption style="text-align: center">
Figure #: caption text
</figcaption>
</figure>
- If you want to export to HTML (does not apply to Word exports), use the LaTeX syntax
$\displaystyle ...$for inline math that you want to be rendered in display mode; e.g.,$\displaystyle \int_a^b \frac{f(x)}{x} \, dx$.
Review the Note
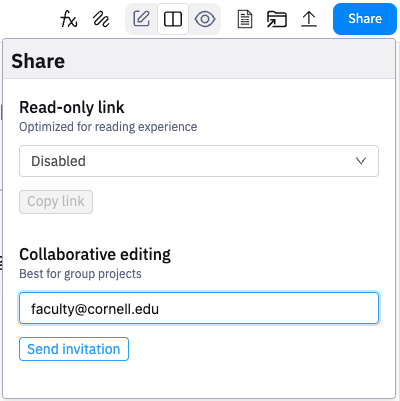
Mathpix Notes can be shared with faculty authors for review.
- Click the Share button in the upper-right corner of your screen:

- Go to the Collaborative editing field, enter the faculty member's email address, and click the Send invitation button:
Export to Word (or HTML)
After you have finished editing your Note, you can export the Note to different file formats. The native Note format is Mathpix Markdown (file extension .mmd). For general accessibility, Word documents are typically the best option. Once your Note is in Word format, you can do further editing as needed.
You may alternatively want to export your Note to an HTML file. In that case, you will need to do a more extensive editing job of your Note because the exported HTML file should generally not be edited (though exceptions could be made under certain circumstances).
The export process itself is rather quick. It takes a little longer for the Word export than it does for the HTML export because the Snip Web editor is essentially an HTML editor with additional features for supporting STEM content. For the same reason, you'll notice that an HTML export is a more accurate representation of what you see in Preview mode, compared to a Word export.
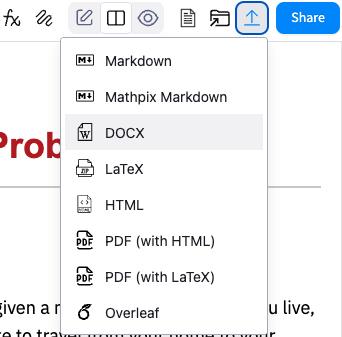
- Click the Export file button in the upper-right corner of your screen:

- Select DOCX for a Word file (or HTML for an HTML file):
- Save the exported file with an appropriate name in a designated folder.
- Notify the Creative Services Group (CSG) when the Word files are ready for styling.
Mathpix Guide
When you're getting started with Mathpix, you may find it helpful to have a few more tips, tricks, and templates at your disposal. For that, please see this Mathpix Guide. You may want to occasionally check the link for any updates to the guide. For your convenience, you can copy this guide into your own instance of Mathpix Snip Web as follows:
- Click the Raw View button in the upper-right corner of your screen:

- Press
CMD+Ato highlight all the Mathpix Markdown code. - Press
CMD+Cto copy the highlighted code to your clipboard. - Click the Rendered View button to return to the original view:

- Create a new Note and press
CMD+Vto paste the highlighted code into your Note.
