Departmental Standards
Company-Wide
eCornell Styleguide & Branding
Cornell University Branding
Writing and Editing Style Guide
Faculty and Expert Naming Conventions in Courses
Cornell School and Unit Names
Tips for Campus Engagements
LSG
Legal Policies
CSG
Updating Wrike Due Dates
Photography Style Guide
eCornell Mini Visual Style Guide
The Pocket Guide to Multimedia Design Thinking (*as It Pertains to Your Job Here)
Creative Services (CSG) Handbook
Administrative
LSG Meeting Recordings and Notes
Sending Faculty Sign-Off Forms in Adobe Sign
Weekly Faculty Status Emails
Animation/Motion Design
Instructional Design
Required Course Elements
The Pocket Guide to Instructional Design Thinking at eCornell
Adding AER to Canvas
Grading
D&D Newsletter
LSG Newsletter (LSGN) - February 2024
LSG Newsletter (LSGN) - March 2022 Edition
LSG Newsletter (LSGN) - December 2023
LSG Newsletter (LSGN) - October 2021 Edition
LSG Newsletter (LSGN) - June 2022 Edition
D&D Newsletter November 2024
LSG Newsletter (LSGN) - August 2022 Edition
LSG Newsletter (LSGN) - June 2023
LSGN Newsletter April 2023
LSG Newsletter (LSGN) - February 2022 Edition
LSG Newsletter (LSGN) - October 2022 Edition
LSGN Newsletter February 2023
LSGN Newsletter March 2023
D&D Newsletter September 2024
LSG Newsletter (LSGN) - August 2023
LSG Newsletter (LSGN) - March 2024
LSG Newsletter (LSGN) - April 2022 Edition
D&D Newsletter - August 2024
LSGN Newsletter January 2023
LSG Newsletter (LSGN) - October 2023 article
LSGN Newsletter (LSGN) - April 2024
LSG Newsletter (LSGN) - November 2021 Edition
D&D Newsletter February 2025
LSG Newsletter (LSGN) - January 2022 Edition
LSGN Newsletter December 2022
D&D Newsletter April 2025
LSG Newsletter (LSGN) - July 2022 Edition
LSG Newsletter (LSGN) - September 2022 Edition
Course Development
Image Uploads for Inline Projects
How to Install the Firefox Canvas Utilities Extension
Revising a Course/ Creating a Redux Version/ Course Updates
Creating a Perma Link With Perma.cc
Course Content Deletion Utility — Removing All Course Content
Teleprompter Slide Template
Course Names
Requesting High Resolution Video Uploads
Technical Talking Points Template
Writing Discussions: Guidelines for IDs
Online Resources in Credit-Bearing Courses
Hiring Actors for an eCornell Project
Marketing
Operations
Tech
Master Course Template Differences (8675309s)
Non-CSG File Uploads
Mentored Learning Conversion Process and Resources
Doc-Based Master Course Template and Standards (8675309-DOC)
Pedagogical Guidelines for Implementing AI-Based Interactives: AER
Coding Master Course Template and Standards (8675309-CODE)
Practice Quiz Standards
Hero Image
Platform Training
Administrative Systems
ADP
Google Drive
Downloadables Process
Embed a Document from Google Drive
Adding Google Links to Canvas
File Naming and Storage Convention Standards
Google Drive for Desktop Instructions
Storing Documents in Multiple Locations
Wrike
Wrike System Fundamentals
Field Population
1.0 to 2.0 Wrike Project Conversion
Blocking Time Off in Work Schedule (Wrike)
Wrike Custom Field Glossary
Wrike "Custom Item Type" Definitions
How to Create a Private Dashboard in Wrike
Using Timesheets in Wrike
Importing Tasks into a Wrike Project
Wrike Project Delay Causes Definitions
Setting OOO Coverage for Roles in Wrike
How to Change a Project's Item Type in Wrike
Using Search in Wrike
How to Create a Custom Report in Wrike
@ Mentioning Roles in Wrike
Automate Rules
Using Filters in Wrike
Managing Exec Ed Programs in Wrike
External Collaborators
Wrike for External Collaborators: Getting Started
Wrike for External Collaborators: Views
Wrike for External Collaborators: Tasks in Detail
Wrike Updates
New Experience Update in Wrike
Wrike Course Development Template 2.0 - What's New
Wrike - Course Development Template 3.0 Release Notes
Wrike Process Training
Course Development & Delivery Platforms
Canvas
Development
Adding Custom Links to Course Navigation
Adding Comments to PDFs from Canvas Page Links
Setting Module Prerequisites and Requirements in Canvas
Canvas Page Functionality
Create a New Course Shell From 8675309
Using LaTeX in Canvas
Search in Canvas Using API Utilities - Tutorial
Reverting a Page to a Previous Version
Student Groups
Create Different Canvas Pages
Importing Specific Parts of a Canvas Course
Canvas HTML Allowlist/Whitelist
Understanding Canvas Customizations/Stylesheets
Operations
Discussion Page Standards
How to import a CU course containing NEW quizzes
Canvas LMS: NEW Quiz compatibility
Faculty Journal
Course Content Style Guide
Click-To-Reveal Accordions in Canvas
Course Maintenance Issue Resolution Process
Meet the Experts
Codio
Codio Operations
Managing Manually Graded “Reflect and Submit” Codio Exercises
Codio Structure and Grading for Facilitators
Premade Codio Docs for Ops & Facilitators
Codio Remote Feedback Tools for Facilitators
Developers
Development Processes
Creating a New Codio Course
Creating a New Codio Unit
Integrating a Codio Course into Canvas Using LTI 1.1
Embedding a Codio Unit into Canvas
Setting Up the Class Fork
Jasmine Autograde Unit Testing
Setting Up the Class Fork (LTI 1.3)
R Studio - Exclusion List for R Code
Mocha/Selenium Autograding
Starter Packs in Codio
Configuring Partial Point Autograders in Codio
Launch a Jupyter Notebook from VM
AI Extensions
Program-Specific Developer Notes
Codio Functionality
Jupyter Notebooks
Jupyter Notebooks - nbgrader tweaks
Jupyter Notebooks Style Guide
Adding Extensions to Jupyter Notebooks
Setting up R with Jupyter Notebooks
Change Jupyter Notebook Auto Save Interval
How to Change CSS in Jupyter Notebook
RStudio in Codio
How To Centralize the .codio-menu File to One Location
Codio Fundamentals for LSG
Using the JupyterLab Starter Pack
Using Code Formatters
Using the RStudio Starter Pack
Conda Environments in Codio
Updating Codio Change Log
Codio Basics: Student Support
eC Facilitator Guide to Codio
Migrating to Updated Codio Courses
Qualtrics
Ally
Ally Institutional Report Training
Ally Features Overview Training
Using the Ally Report in a Course
Ally Vendor Documentation/Training Links
Adobe
Other Integrations
Pendo Overview
How to Add VitalSource eBooks in Canvas
Enabling Zoom/"Live Sessions" in a Course
Pendo Guide Creation
H5P
Modifying Subtitles in H5P Interactive Videos
Embedding H5P Content Into Canvas
Troubleshooting H5P Elements in Canvas
Inserting Kaltura Videos into H5P Interactive Videos
Adding Subtitles to H5P Interactive Videos
S3
BugHerd
Instructional Technologies & Tools Inventory
Canvas API Utilities
Getting started with the MOP Bot
eCornell Platform Architecture
HR & Training Systems
Product Development Processes
Accessibility
What Is Accessibility?
What Is Accessibility?
Accessibility Resources
Accessibility Considerations
Accessibility Support and Assistive Technology
Structural Accessibility
Accessibility Design and Development Best Practices
Accessible Images Using Alt Text and Long Descriptions
Accessible Excel Files
Accessibility and Semantic Headings
Accessible Hyperlinks
Accessible Tables
Creating Accessible Microsoft Files
Mathpix: Accessible STEM
Design and Development General Approach to Accessibility
Integrating Content Authored by a Third Party
Planning for Accessible Tools
Accessibility Considerations for Third Party Tools
Studio Accessibility
Designing for Accessible Canvas Courses
Accessibility: Ongoing Innovations
Course Development
Planning
Development
0. Design
1. Codio Units
1. Non-Video Assets
3. Glossary
4. Canvas Text
4. Tools
4. Tools - Wrike Task Definitions
3. Review And Revise Styled Assets
ID/A to Creative Team Handoff Steps
General Overview of Downloadables Process
Course Project: Draft and Final
Excel Tools: Draft and Final
eCornell LSG HTML Basics
1. Non-Video Assets - Wrike Task Definitions
2. Video
Multifeed Video
2. Video (Standard) - Wrike Task Definitions
Studio Tips
Tips for Remote Video Recording Sessions
Who to Tag for Video Tasks
3. Animation
3. Animation - Wrike Task Definitions
2. Artboard Collab Doc Prep
6b. Motion Design Review and Revise
Who to Tag for Animations Tasks
3. Artboard Collab Process Walkthrough
DRAFT - FrameIO Process Walkthrough
Motion Contractor Guide for IDAs / IDDs
Requesting / Using Stock Imagery (Getty Images and Shutterstock)
3. Ask the Experts
5. On-Demand Conversion
5. Review
5. Review - Wrike Task Definitions
1. Prep Course for Reviews
2. Conduct Student Experience Review
3. Implement Creative Director Edits
3. Implement IDD Edits
3. Implement Student Experience Review Edits
4. CSG - Revise Tools Export 1
5. Conduct Faculty Review
6. Implement Faculty Edits
7. Conduct Technical Review of Course (STEM-only)
Technical Student Experience (Tech SE) Review Process
2. Conduct IDD or Sr ID Review
6. Alpha
6. Alpha - Wrike Task Definitions
Alpha Review Process
Prepare a course for Alpha review
Schedule & Conduct Alpha Triage Meeting
7. QA
7. QA - Wrike Task Definitions
1. Prep Course for QA
2. Copy Edit Captions
2. Copy Edit Course & Files
4. Conduct Content QA of Course
4. Final Creative Review and Export
Adding Chat With Tech Support to Course Navigation
5. Implement QA Edits
Working With Video Captions That Contain Special Characters
Copy Edit Captions in SubPLY
Creating a Course Style and Settings Guide
Copy Editing Content in Frame.io
1. Complete Dev to QA Checklist
Copy Edit Captions in 3Play
Tag a Video for Transcription by 3Play
Course QA Checklists
8. Deployment
8. Deployment - Wrike Task Definitions
1. Finalize Master Version of Course
2. Create & Add Course Transcript (CT) to Course
Replace a Master -M With a Redux Version of the Course
3. Create -T (Training Course) and Associate With Master Blueprint
Canvas Blueprint Course Functionality
Project Management in Wrike
Managing Project Reporting in Wrike
Managing Task Needs/Schedule in Wrike
Adding Tasks
Comments and Communication
Statuses
Updating Task Start and Due Dates
Predecessors
Durations
Rollups
Calculating Project Schedule by Deadline in Wrike
Creating Course Project Plans in Wrike
Setting Custom Capacity for Resources
Customizing Effort in a New Project Plan
Marking Projects Complete in Wrike
How to Set Up Workload Charts to Track Effort in Wrike
For-Credit Considerations
1-Sheet Population
Post-Development
AI Simulations
Program Facilitation & Operational Guidelines
Data Science
Facilitator Resources
Canvas Navigation
Adding Events to the Course Calendar
Navigating Canvas and the Dashboard
How Do I View Previous Courses I Have Taken or Facilitated?
Why Am I Receiving Duplicate Canvas Emails?
How Do I Edit My Canvas Profile?
Send Students a Direct Message on Canvas
Adding Notes to Canvas Gradebook
How Do I Send Students Nudges from the Gradebook?
Overview of 2024 Changes- Course Layout and Structure
How Can I Update My Canvas Notification Preferences?
Ursus Navigation
How Do I Access My Offer in Ursus?
How Do I Edit My Ursus Profile?
How Do I Request Time Off (Blackout Dates)?
How Can I Request to Learn More Courses?
Live Sessions
Enabling Student Use of Closed Captioning in Zoom
When Should I Schedule My Live Sessions For?
Changing Live Session Date and Time After Created with Facil Tool
Help! I Need to Reschedule a Live Session
Live Session Information page
Set up Live Sessions with the Facil Tool
Combining Live Sessions with Facil Tool
Course Set-Up
Course Set Up: Getting Ready for Live Sessions
Recording and Posting a Welcome Video
Course Set Up: When can I begin to edit my course?
Course Set Up: Reviewing Due Dates
Course Set Up: Reviewing Announcements
What Do I Need to Do to Make Sure My Course is Set Up Correctly?
How Do I Customize My Course Sections?
Course Announcements and Messages Templates
Facilitator Focus
Zoom and other Technical Support
Reporting Spam/Phishing
How Do I Set Up My Zoom Account?
Support Resources for Facilitators
Live Session/Zoom Trouble Shooting Guide & Technical Readiness
How to Upload Videos to Zoom On-Demand
Student Survey FAQs
How Do I Save and Refer Back to Zoom Recordings?
How Do I Find My Personal ID Meeting link in Zoom?
Benefits as an eCornell Employee
Do I Have Access to Microsoft Office as a Cornell Employee?
Taking Courses as a Student
Professional Development Benefit
Student Success
Help! My Students Can't View a Video Within My Course
Extensions and Retakes
Policies and Navigation Resources for Students
Symposium Access Extension- Fall 2025
Students enrolled through special groups: Corporate and VA
Unique Circumstances for Student Extensions and Retakes
Communicating with Students via Canvas
Can I Provide Students with a Letter of Recommendation?
Understanding and Addressing Instances of Plagiarism
Support Resources for Students
Understanding and Addressing Use of AI
Help! My Student is Having a Hard Time Uploading a Video
Unique Student Situations
I Have a Student Requesting Accommodations- How Should I Proceed?
Canvas Mobile App
Messaging Students via the Canvas Mobile App
Setting up and Navigating the Canvas Mobile app
Setting up Push Notifications on Canvas Mobile
Canvas App Features for eCornell courses
New Facilitator Onboarding and Quick References
Facilitator Onboarding at eCornell
Why Do I Have Multiple eCornell email and Canvas Accounts?
Quick reference: Systems and Accounts we use at eCornell
Quick reference guide: Key eCornell Personnel
How do I Log Onto Canvas and Access FACT101?
How Do I Add eCornell to My Email Signature?
Training Course Review & Facilitation Authorization
What to Expect During Live Shadowing Experience
Setting up Email Forwarding
Facilitator Expectations and Grading Help
Changes in Grading Scheme: Incomplete/Complete and 75% to 85%
New (Embedded/Inline Format) How do I grade Course Projects?
Navigating the Gradebook and Accessing the Speedgrader
Quick Reference: Sort assignments in the Speedgrader
How do I Grade Quizzes?
(Old format) How Do I Grade Course Projects and Add Annotations?
Rubrics for Effective Facilitation
Is There an Answer Key for my Course?
How to Monitor and Promote Student Progress
How Do I Grade Discussions?
Adding an Attempt to a Course Project
How Quickly Do I Need to Provide Grading to Students?
Payroll and the Monthly Scheduling Process
Codio References
Manually Graded “Reflect and Submit” Codio Exercises
Codio Quick Resources
Codio Reference: Embedded quiz questions (H5P)
Codio Reference: Checking for Completion Status
Codio Reference: Manually Graded Exercises
Codio Remote Feedback Tools
Codio Reference: Ungraded exercises
Codio Reference: Autograded Exercises
Archived
- All Categories
- Platform Training
- Course Development & Delivery Platforms
- Codio
- Developers
- AI Extensions
- Codio AI Extensions - Virtual Coach Overview
Codio AI Extensions - Virtual Coach Overview
Updated
by Nick
When Virtual Coach is enabled, students can use AI to assist them with their programming tasks. Codio’s prompts to the AI ensure that only assistance is provided, not solutions. The Virtual Coach can help students understand error messages they have received, gain a better understanding of the assignment prompt, or receive a hint about the next possible steps.
In the assignments settings area, there are three settings you can toggle to enable the following features: Summarize Prompt, Error Augmentation, and Next Steps Hint.
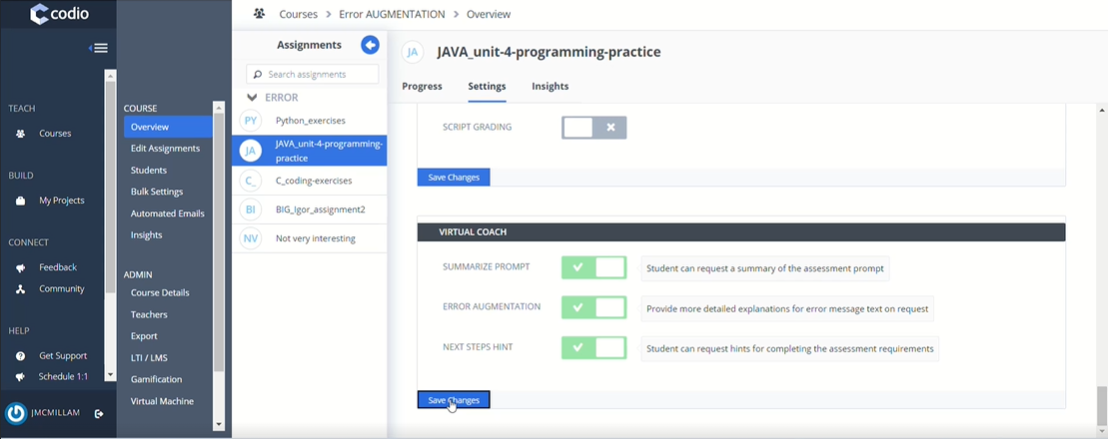
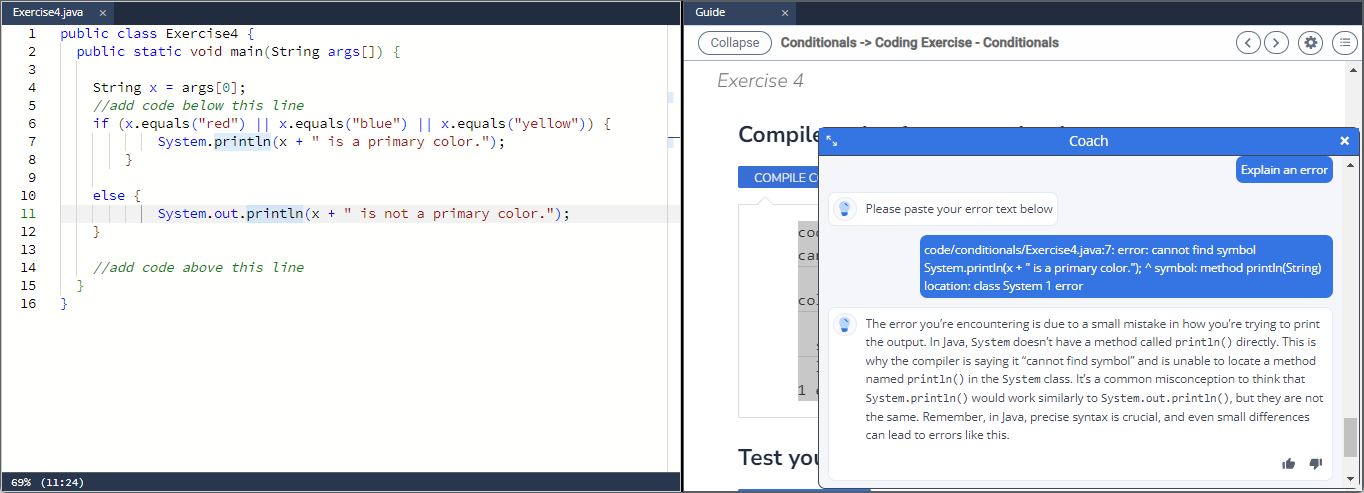
When a student clicks on the Virtual Coach icon in the bottom right corner, a dialog opens, and they can see up to three options depending on the settings applied. If there is no Guide in the assignment only error message augmentation will be available.
Students may select one of the options presented by the coach to receive more information.
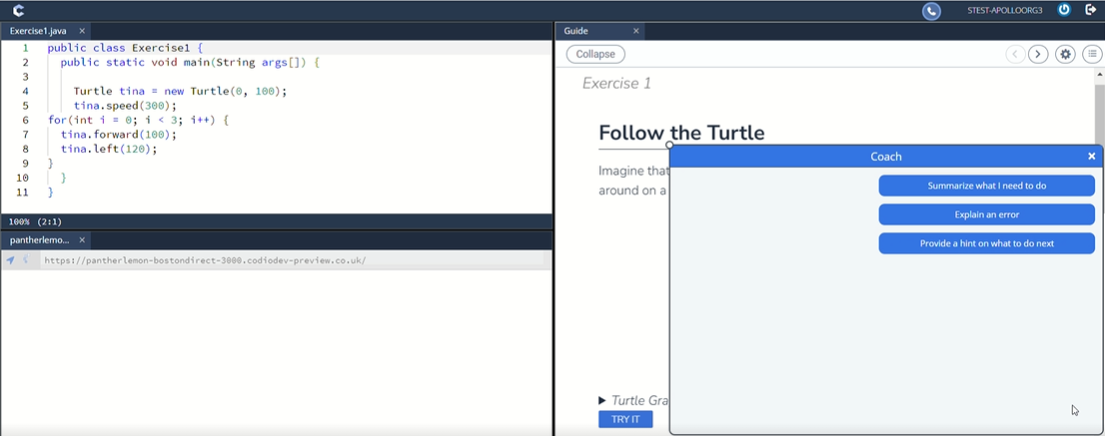
- Summarize prompt: This option summarizes the text in the guide on the page and provides students with an enumerated set of steps.
- Error Augmentation: Provides detailed explanations of error messages.
- Next steps hint: Provides students with ideas for the next steps they can take to complete their assignment.
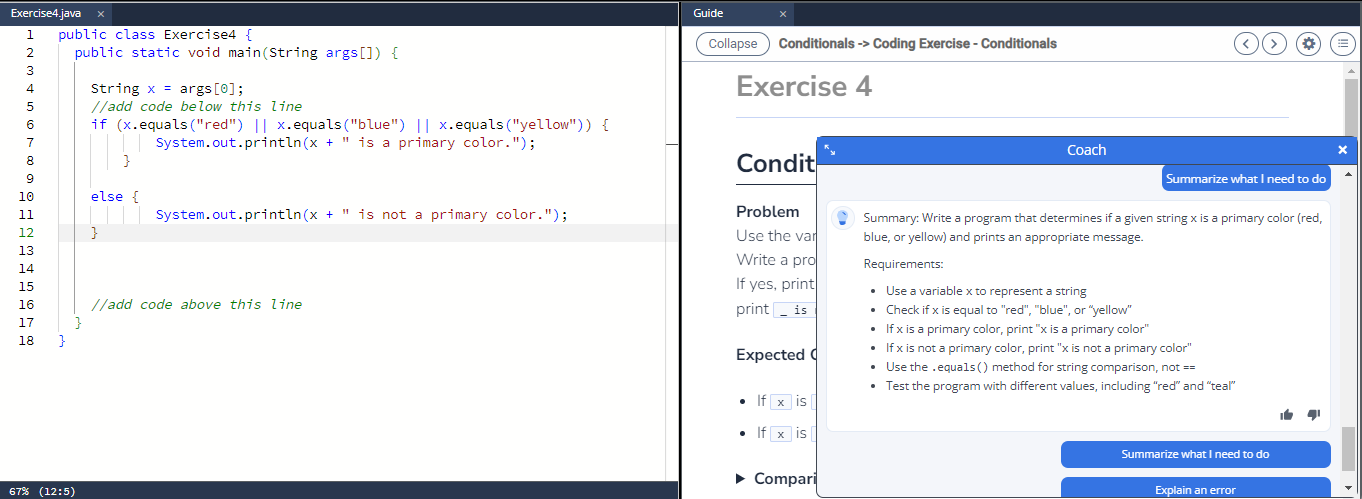
If error output is not directed to the guide, students will need to paste the text of the error message in the prompt field in Virtual Coach.
If an error message is not provided, the student will receive the following: “The provided text does not look like an error message. Please paste an error message below.” If, on the second attempt, the student still does not provide an error message, they will be returned to the first screen with three buttons.
Note
Standard and Advanced Code tests have an additional “Explain this error” button that will appear if Error Augmentation is on and running a code test results in an error state.
Students can provide feedback on the Virtual Coach’s responses by using the thumbs up icon to vote up or the thumbs down icon to vote down the responses. The Virtual Coach window may be resized by dragging the circle in the upper left corner.
Note
You can export Virtual Coach logs using one of the Codio API codio.course.exportCoachData(courseId). For more information on Codio APIs and how to use it, check out Codio JS API
Note
You can review how the Virtual Coach interacts with students by exporting the Course Coach Log Data. For more information, see the Course Coach Log Data
Enable/Disable Virtual Coach Assistants via Bulk Settings
You can enable/disable these three settings for all assignments in a course at bulk, check out Bulk Assignment Update
- The csv template for bulk assignment settings upload has 3 new columns now, one for each of the virtual coach assistants.
- These column values in the csv can be set to TRUE to enable any/all of the 3 assistants for any assignments in the course, and FALSE to disable them as part of the bulk settings update process.
Customize Assistants for Virtual Coach
You can extend the current capabilities of Coach by adding your own custom assistants as Javascript extensions. You’re going to need a Github account to get started. If you don’t have one, follow the steps by visiting this web page to create: https://docs.github.com/en/get-started/start-your-journey/creating-an-account-on-github
Once you’re signed in to your Github account, you will be able to create, install and test your very own custom AI assistant with Coach.
Customize/Use an existing custom assistant as a Javascript extension
- Click this link to head over to the Codio Extensions Github Page - https://github.com/codio-extensions and scroll down to the Repositories section.
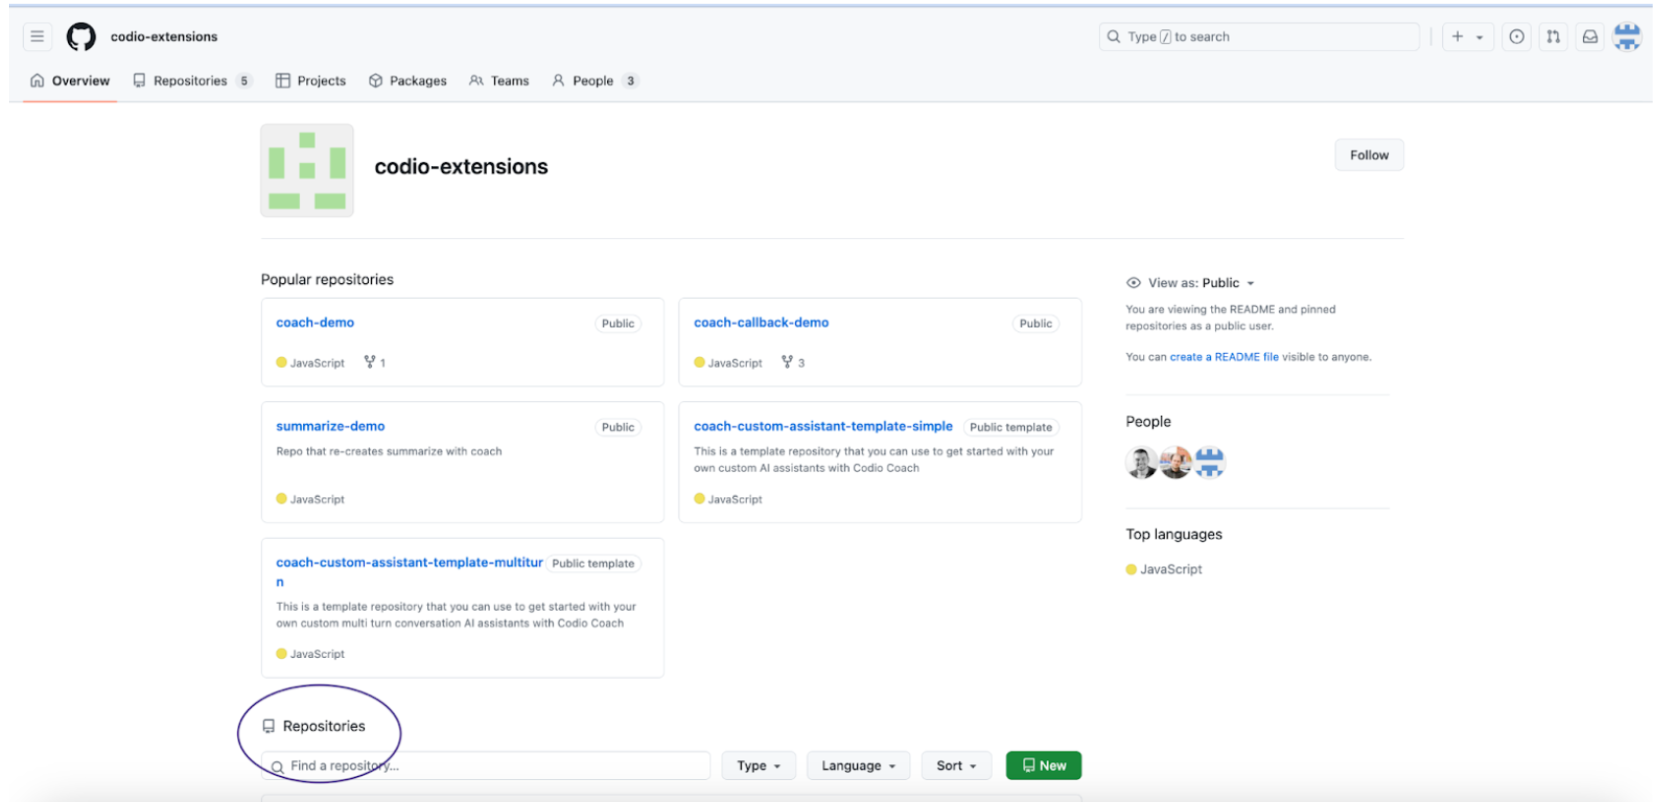
- Choose one of repositories that starts with custom-assistant-example-<example_name>
Note
These examples are experimental and may receive small improvements and updates. If you’re using them as is, please check the respective github repositories for the latest release available.
- Click on the green Use This Template button or the Fork button, in the top right corner, to create a copy of the example repo, and give it a unique name - This will be your own copy of the custom assistant where you can make edits to the example code to customize your assistant.
- You’ll see 2 files in your repo:
- metadata.json: This file will contain some basic information about your extension:
- name: The name of your extension - rename this field to describe what your assistant will do
- type: For any Coach extension, the default value is “helper”
- user_type: Describes who will be able to see the extension - one of 3 possible values: “learner”, “instructor”, “all”
- component: For any Coach extension, the default value is “all”
- index.js: This file will contain the Javascript code for the extension.
- metadata.json: This file will contain some basic information about your extension:
- The index.js file has example code of how you can use the Coach API to create your own assistant.
- You’ll see 2 files in your repo:
- Edit the metadata.json file (rename the extension, choose user_type). Save and commit the changes to your branch.
- Refer to the API documentation and edit the index.js file with the Javascript code for your assistant.
Creating a Release
Now that the code for the extension is complete, you’ll have to create a Release for your repository, making it deployable and ready to use.
- Navigate back to your repository and on the right panel, click on “Create a new release”.
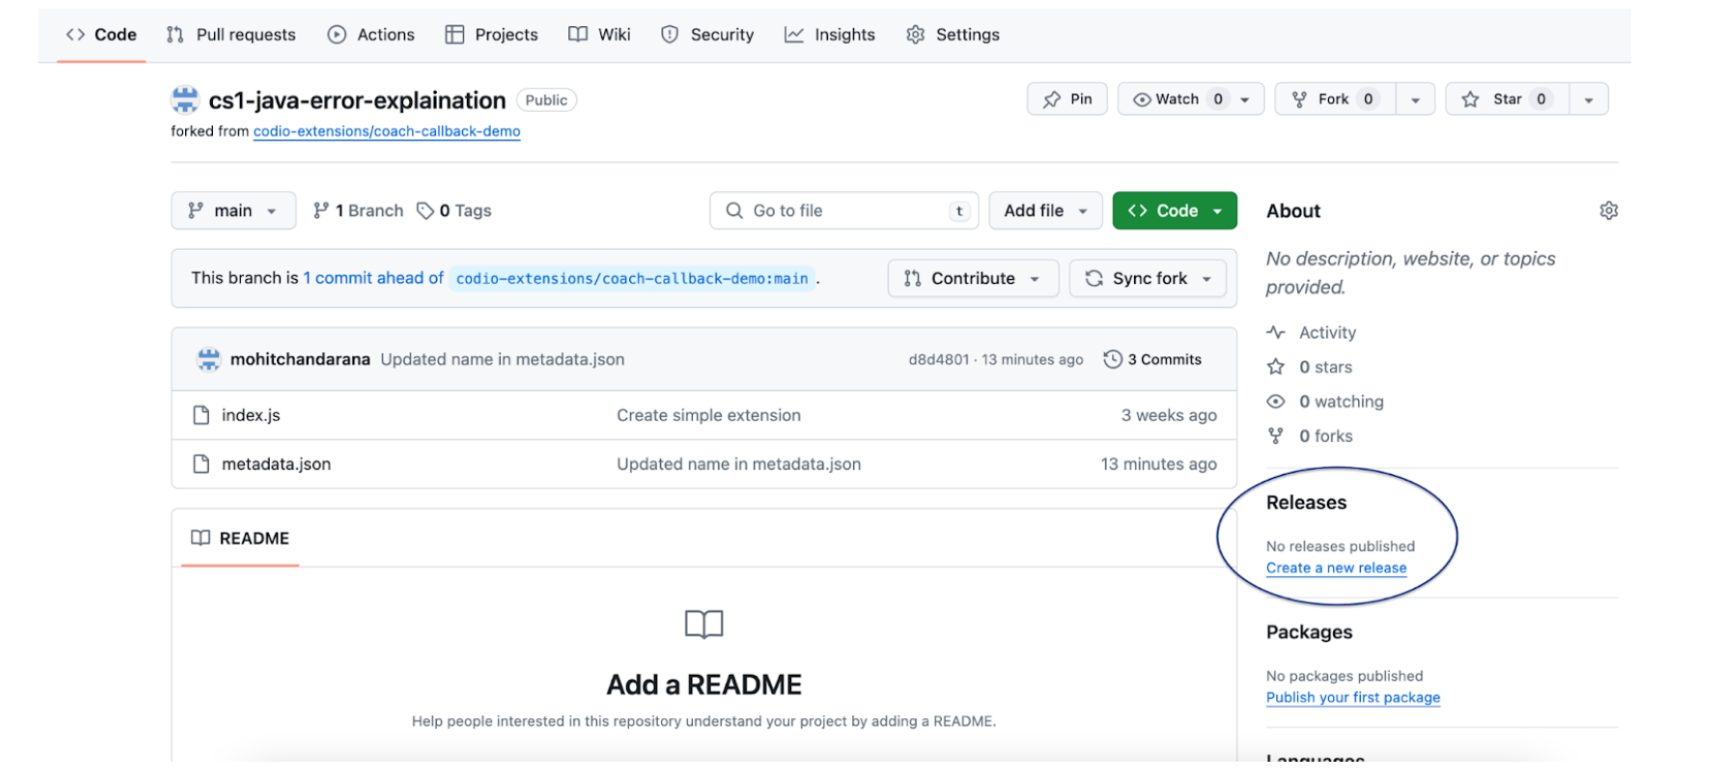
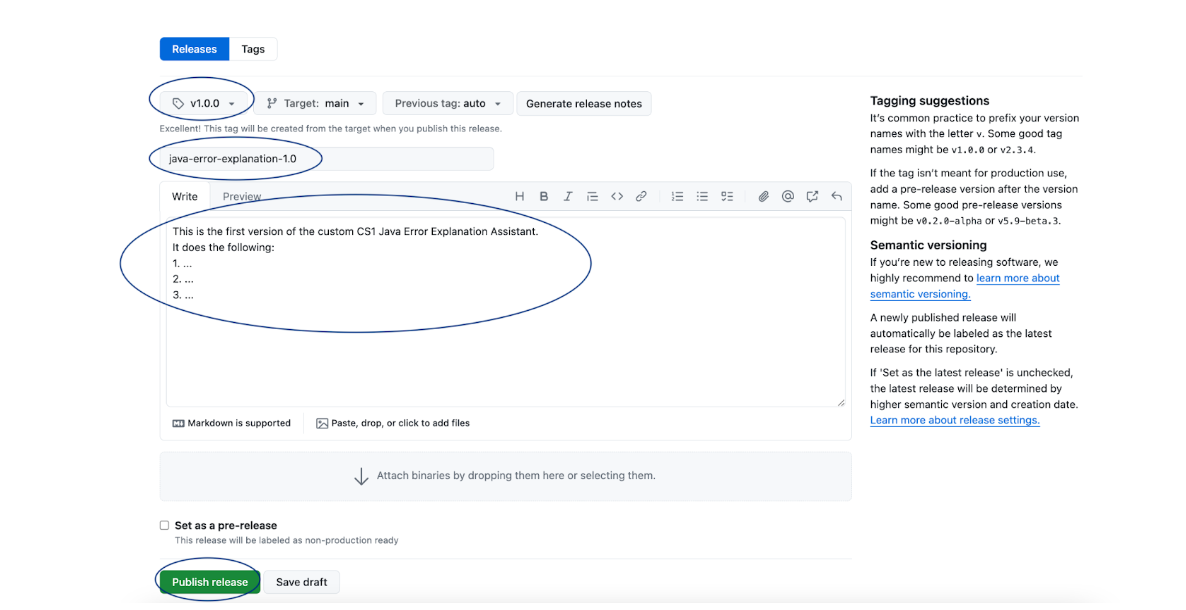
- On this page, in the tags field, write and create a new tag by referring to the tagging suggestions on the right panel. Enter a name and description for this release, and click on the Publish release button at the very bottom of the page.
Note
If you’ve made any changes, updates or edits to your code files (index.js or metadata.js) after creating a release, you will need to create a new release in order to propagate those changes to your custom assistant.
Deploying a custom assistant to your organization
Now that you have authored and tested your very own custom AI assistant, let’s look at the steps to deploy it in your organization:
- Navigate to your extension’s Github repository and copy the webpage URL: it should look something like this:
- Login to your Codio account, and click on your username or Avatar on the bottom left corner of your screen to open Account Settings.
- Click on Organizations and choose an Organization that you’re an owner of - this is how you’ll be able to set up your assistant as an extension. If you’re not an owner, contact your Organization Admin to help you set it up.
- Now click on Extensions, and then click on the Add extension button.
- Paste the URL of your Github repository’s webpage that you copied in step 1, and click Add Extension. You should now see it pop up as an Inactive Extension. To deploy the assistant to your account, click Use. Now it is active and deployed in your organization.
Note
This is an experimental feature. BY adding an assistant to your organization, it will automatically be available to be toggled on/off in every course in that organization. It will appear as an assignment level setting, in the Virtual Coach section.
Applying updates to a custom assistant after creating a new release
Once you’ve made more edits to your code files and created a new release, here’s how you can apply the updates to your assistant:
- Login to your Codio account, and click on your username or Avatar on the bottom left corner of your screen to open Account Settings.
- Click on Organizations and choose an Organization that you’re an owner of - this is how you’ll be able to set up your assistant as an extension. If you’re not an owner, contact your Organization Admin to help you set it up.
- Now click on Extensions. You should be able to see your Custom Assistant under Active Extensions.
- Click on the Check for Updates button in the top right corner.
- If there are any updates to be applied, you will be prompted to do so!
Authoring your own custom assistant as a Javascript extension
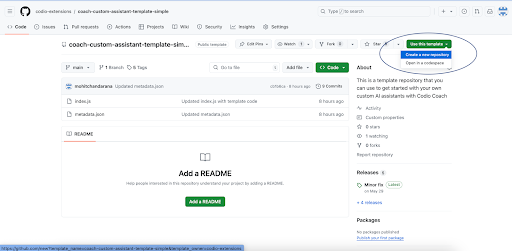
1. Click this link to head over to the Coach Custom Assistant Template repository - https://github.com/codio-extensions/coach-custom-assistant-template-simple
- Click on the green Use This Template button in the top right corner, and select Create a new repository from the drop down menu to create your own repo from the template. Now pick an owner for this repository, give it a unique name and click Create Repository - This is where you will be making the edits to the template code to create your own custom assistant.
- You’ll see 2 files in your repo:
- metadata.json: This file will contain some basic information about your extension:
- name: The name of your extension - rename this field to describe what your assistant will do
- type: For any Coach extension, the default value is “helper”
- user_type: Describes who will be able to see the extension - choose one of 3 possible values: “learner”, “instructor”, “all”
- component: For any Coach extension, the default value is “all”
- index.js: This file will contain the Javascript code for the extension.
- metadata.json: This file will contain some basic information about your extension:
- The index.js file has boilerplate code of how you can use the Coach API to create your own assistant.
- You’ll see 2 files in your repo:
- Edit the metadata.json file (rename the extension, choose user_type). Save and commit the changes to your branch.
- Refer to the API documentation and edit the index.js file with the Javascript code for your assistant. The example gives some context about the API elements and how you can use them. Save and commit the changes to your branch.
5. Now that the code for the extension is complete, you’ll have to create a Release for your repository, making it deployable and ready to use. Follow the steps in the Creating a Release section above.
- And finally, follow the steps in the Deploying a custom assistant section to add the custom assistant to your organization.
Note
This is an experimental feature. By adding an assistant to your organization, it will automatically be available to be toggled on/off in every course in that organization. It will appear as an assignment level setting, in the Virtual Coach section.
Using your own LLMs in custom assistants via Codio’s LLM Proxy
If you’d prefer sending API requests to your own LLMs (commercial or open-source) instead of Codio’s built-in Anthropic LLMs, you can do so by leveraging your Organization Level LLM API keys via Codio’s LLM Proxy.
Please refer to our documentation on adding LLM API keys to your Codio Organization and enabling it for a course. Large Language Models in Codio
Once the API keys are set up and LLMs are enabled in your course, refer to the Coach Custom Assistants API Reference to send requests and fetch responses from your own LLMs!
Testing your custom assistant using Development Mode
If you’d like to test your assistant before deploying it to your organization, you can use the Extension Development Mode to test it.
- Navigate to your extension’s Github repository, click on the green button, then click on SSH and copy the displayed URL.
- Now, go back to your repository’s home page, click on the metadata.json file and copy its contents.
- Login to your Codio account, click on My Projects on the left panel, and then click New Project on the top left.
- In the select your starting point section, click Import and then paste the URL you copied in Step 1 in the URL field, and give your project a name in the Add some details section.
- Make the Project visibility Public, and click Create. This will automatically open the Project as well.
- Now, you should see the ‘index.js’ file in the filetree on the left. Right click on it, and select Preview Static in the drop down menu.
- This will open the file and display a web URL. Copy this web URL.
- Go back to the homepage of your Codio account and click on your username or Avatar on the bottom left corner of your screen to open Account Settings.
- Now click on Extensions at the bottom of the list, and scroll down to the Development mode section.
- Paste the index.js webpage URL that you copied in Step 1 in the Source Code URL field
- Paste the contents of the metadata.json file that you copied in Step 2 in the metadata section, and click Save changes.
Now you can open any of your assignments or projects and your extension should be visible as a menu item in Coach. Test away, make changes and once you’re happy with it, create a release and deploy your assistant!
Note
By adding an extension to your account or testing it in Development mode, it will only be visible to you, and not your students, even If you’ve chosen “learner” or “all” as the user_type in the metadata.json file. This will let you test your assistant, giving you the ability to make changes to it before deploying it for your organization.
